If you are looking for a professional program to edit 4K footage, Premiere Pro is a great choice. In this article, we’ll show you how to edit 4K video in Premiere Pro. Besides, this post also covers an easier alternative for 4K video editing and converting, as well as some tricks to help when you run into issues like “Premiere Pro MOV importing error” or “Premiere Pro audio out of sync”.
Get this versatile alternative to record 4K videos and then edit, convert, compress…https://www.videoconverterfactory.com/download/hd-video-converter-pro.exe https://www.videoconverterfactory.com/download/hd-video-converter-pro.exe
Rocabella Rocabella | Mar 15th, 2023

How to Edit 4K in Premiere Pro?

Premiere Pro is leading video editing software that is widely used by pro editors around the world. Next, follow this detailed guide to learn how to edit 4K video in Adobe Premiere.

Step 1. Firstly, open Premiere Pro and create a new project. Then name your new project and select a location on your computer for the project. Click on OK to save the settings.

Step 2. 
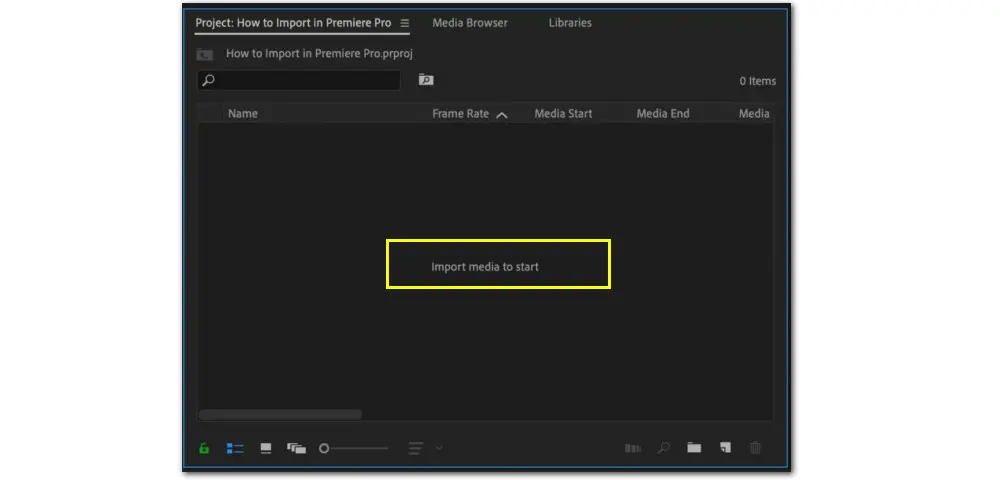
You now open your new project. There are 3 main ways to import the 4K footage.

You can double-click anywhere in the Import media to start area at the lower-left side. Then add one or multiple clips and hit Import. Or, you can click the File tab at the top of Premiere Pro’s toolbar and select Import. Also, you can simply drag and drop the 4K videos into your project panel in Premiere Pro.

How to Import 4K Video in Premiere Pro

Step 3. 
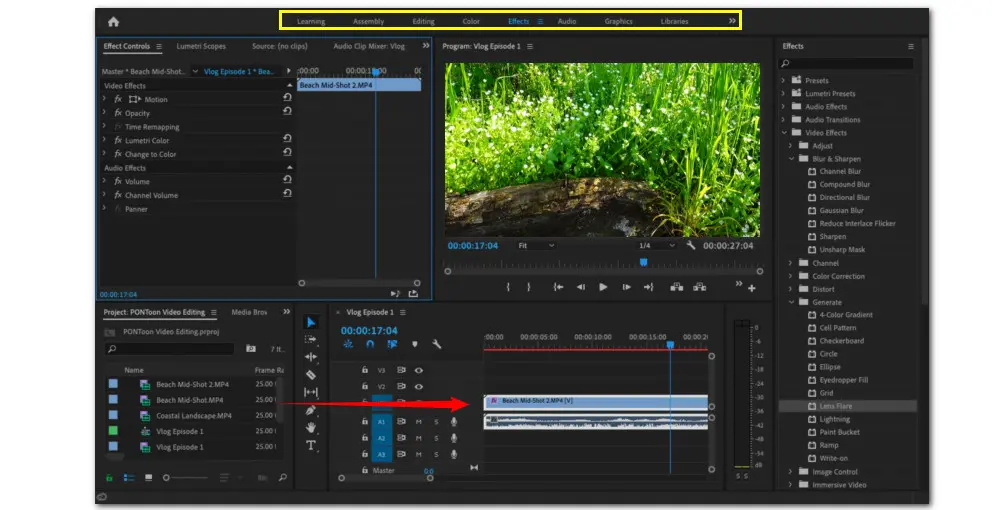
Then bring all your video files into the Timeline panel on the right side for editing. You can preview the video in the upper part.

Step 4. Bingo! You now are ready for the editing. You can trim and cut, change the aspect ratio, resize the 4K video, and so forth.

Step 5. Once you finish editing 4K in Premiere Pro, navigate to File > Export > Media. You can name the exported video and specify where to save the final cut.

Edit 4K Footage Premiere Pro

Part 2. Tips for How to Edit 4K in Premiere Pro without Lag

Though Premiere Pro is well-known for its tons of pro-level editing features and excellent editing performance, some users complained that they have suffered from some tricky issues like lagging, choppy, freeze, Premiere importing only audio, etc., when using it to edit 4K footage recorded from camera or downloaded from online. So, what’s the reason? And how to ensure a smooth 4K editing experience in Premiere Pro?

In this part, we’ve rounded up some tricks to help so that you can edit 4K videos in Premiere Pro without lag.

# Create Proxies for Your 4K Footage Files

As technology is advancing, it is very common to get 4K files with your camera or recording software on a PC. 4K video offers viewers an unparallel picture quality. However, 4K video files usually are massive, and working with this high-quality footage comes at a cost. It will pose challenges to your RAM, GPU, CPUs, and storage.

The good news is that the proxy workflow in Premiere Pro can help you create a copy of your original 4K footage with a small size. So, you can work efficiently with the proxy videos and output at the original resolution in the end.

It is easy to create proxies. Take the steps below:

Step 1. You just need to select the target 4K video clips in your project panel and right-click the selected clips. Move down to select Proxy > Create Proxies.

Step 2. Then choose a preferred Format and Preset with low resolution. For the destination, you can save your proxies in a folder next to your original media files. Don’t forget to click OK to save the settings.

Step 3. Then Adobe Media Encoder will start the transcoding process. This could take a while depending on your video size and length.

Step 4. Go to the playback controls on the right side of your program window and click the Plus (+) sign to find the “Toggle Proxies” button. You can drag the icon to the playback control bar so that you can switch between your proxy files and the original 4K footage.

Adobe Premiere 4K Video Editing

# Upgrade Your Computer Hardware

You may be experiencing burry videos or missing fragments, but note that software is not the only thing that should be responsible for these issues. As we mentioned previously, if your computer doesn’t meet the minimum requirements to handle the 4K file, you also cannot edit 4K videos in Premiere Pro. Hence, when it comes to editing 4K in Premiere Pro without lag, the CPU, GPU, RAM, graphic card, and storage space, all play a vital role. You can switch to a high-performing laptop (such as MacBook Pro 16 with M2 Max or Razer Blade 15) for a smooth 4K video editing experience.

Easily Fix Premiere Import Failure

Wrong format/codec and variable frame rate (VFR) are the main causes of Premiere Pro import failure. Convert video to Premiere-friendly formats or change VFR to CFR with HD Video Converter Factory Pro. Then you should be able to import video to Premiere Pro with no issue. Download this tool to fix your import problem at once.

# Convert the Unsupported 4K Video to Premiere Pro

Have a powerful computer but still fail to import the 4K video files into your Premiere Pro. This importing failure mainly stems from incompatible formats or codecs. Firstly, it is strongly suggested that you check whether your video type is on the list of Premiere Pro-supported formats.

If not, you’ll need a powerful video converter to transcode the 4K video file to a Premiere-friendly editing format, such as ProRes or DNx. Luckily, there are many free and paid converters available, such as Format Factory, Handbrake, FFmpeg, or WonderFox HD Video Converter Factory Pro.

If you prefer freeware, then choose Handbrake or FFmpeg. But to use them, you have to go through a learning curve. All considered, WonderFox HD Video Converter Factory Pro is the overall best solution.

This robust, Windows-based ProRes converter supports all kinds of video inputs, including MP4, MKV, Xvid, H.265, AVCHD, etc. The following is the process of how to convert your unsupported 4K video type using this efficient batch converter.

Download and install WonderFox HD Video Converter Factory Pro to convert your 4K videos to ProRes format without any hiccups.

Free Download

Compatible with Windows

100% Clean & Safe

Free Download

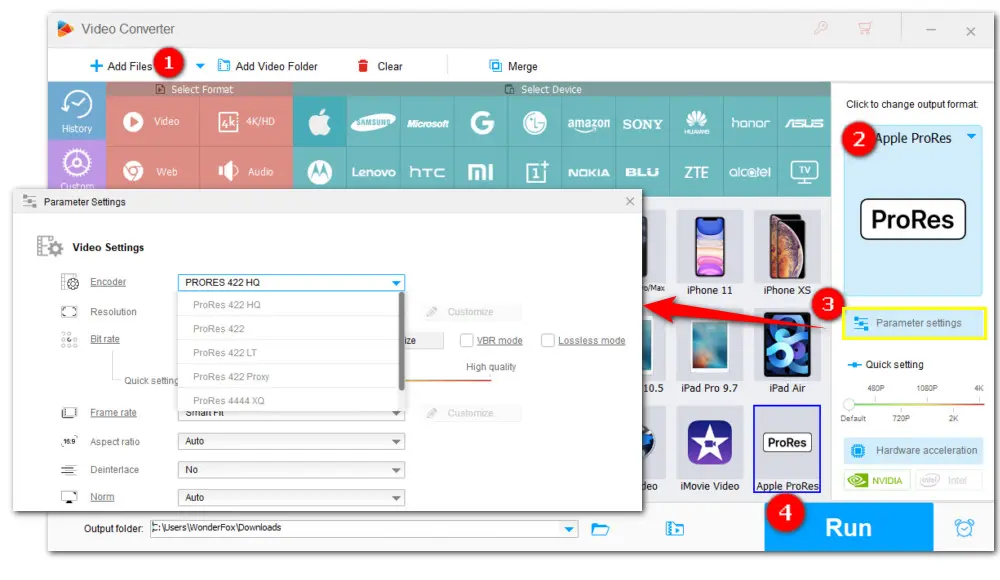
Step 1. Launch HD Video Converter Factory Pro and open the Converter. Next, click + Add Files or Add Video Folder to add the source 4K video files to the conversion list. You can also drag the file(s) into the program directly.

Step 2. On the right side of the converter interface, click on the format image to enter the output format library. Then go to the Apple device section and choose the ProRes profile below.

Step 3. By default, the codec is set to ProRes 422 HQ. If you want to use a different ProRes type, click the Parameter settings tab below the format image and switch to a new ProRes type from the Encoder drop-down list.
You are also allowed to modify other parameters here. For example, playing a media file with a variable frame rate in Premiere Pro may result in the audio being out of sync. In such a case, you can modify the frame rate from VFR to CFR.
Don’t forget to click OK to save the changes.

Step 4. Click the bottom triangle button to specify an output path or leave it as default. Finally, hit Run to start converting your 4K footage file to ProRes on Windows.

Once the conversion is over, import the converted files again to start editing 4k video in premiere pro without hassle now!

Editing 4K Footage Premiere Pro

Do More Than Fix Format Incompatibility

500+ optimized presets for a fast conversion.
Trim, merge, crop, rotate, flip, watermark…
Compress large-sized videos with no quality loss.
Record live streams, gameplay, webcam, and video call
Download HD/FHD/2K/4K/8K videos from 1000+ sites.
Make animated GIFs from video or image sequences.
Make ringtones, extract subtitles & more...

# Switch to Another 4K Video Editor

There are many 4K video editing programs in the market, like Final Cut Pro X, Vegas Pro, Cyberlink PowerDirector, iMovie, and much more. These apps all offer advanced editing features and are more suitable for pros. But if you are a beginner and all you need for editing are basic tools like cut, trim, rotate, crop, watermark, and video effects, then try HD Video Converter Factory Pro.

Yes! HD Video Converter Factory Pro is not only a powerful converter but also a handy 4K video editor. And all these essential editing tools like trimmer, rotator, cutter, splitter, filters can be handled by this simple video editor.

Other notable features include video recorder, online video downloader, split-screen maker, GIFs maker, and so forth. Thanks to its intuitive interface, all features are easy to use.

Next, we’ll walk you through how to edit 4K video in this easy alternative for Premiere Pro on Windows.

Step 1. Launch the program and enter the Converter module. Then simply perform a drag-and-drop action to load the 4K videos you want to edit. It may take a while depending on the number of source videos and file sizes.

Step 2. After loaded, you’ll see a toolbar under the imported video file. Based on your need, you can choose any option below or a combination of them to start editing.

Step 3. Click the Output Profile image to expand the full list of output presets. Choose a preferred format. Then back to the main conversion interface and set a destination by clicking the bottom triangle button. Finally, click the big Run button to activate the process.

Related read: HEVC Video Editor | Compress 4K Video | 4K Video Joiner | 4K Video Cutter

Edit 4K Video in Premiere Pro Alternative

FAQs about How to Edit 4K Video in Premiere Pro

1. How much RAM do I need to edit 4K video?

16GB RAM is fine for a simple 4K video editing, with almost no effects. 32GB is the optimal capacity of RAM needed for smooth 4K video editing.

2. Can you convert 4K to 1080p in Premiere Pro?

Yes. Downscaling 4K to 1080p is easy in Premiere Pro. Here are the simple steps:
Step 1. Open your video files within Premiere Pro;
Step 2. Go to File > Export. In the Export dialog box, choose your desired Export Option. Your video will now begin rendering from Premiere Pro.

Wrap-up

That’s all about how to edit 4K video in Premiere Pro without lag. In a word, to operate the 4K video editing smoothly, you’d better prepare a 4K-capable video editing PC and a video converter for processing any Premiere Pro-unsupported video type.

Specialized in multimedia software solutions.
Since 2009

Privacy Policy | Copyright © 2009-2024 WonderFox Soft, Inc.All Rights Reserved

Back to Top