Want to trim, merge, and convert your MP3 files or more on Windows 10? In this post, we share detailed guides on how to edit MP3 files on Windows 10 with 5 free methods. Read on and start editing your MP3 files now!
If you want to edit the audio file in Windows 10, trying Windows Movie Maker is also a good choice since it is the default video editing program for Windows 10. If you still have it on your Windows PC, then follow this part to go through the MP3 audio file editing process. It can help with some basic audio editing jobs, like applying fade-in/out effects, changing the audio volume, etc. But Windows Movie Maker cannot directly import and edit audio files, you can only add a photo and then import the MP3 file you want to edit to start editing. The following are the detailed steps for editing MP3 files in Windows Movie Maker.
Note: As of January 10, 2017, Microsoft ceased to support Windows Movie Maker. The Windows Movie Maker application will continue to function and can still be used by those who installed it previously. But if you don't have it on your computer, never download it from an untrusted source. You can use some alternatives, like HD Video Converter Factory Pro to edit files.
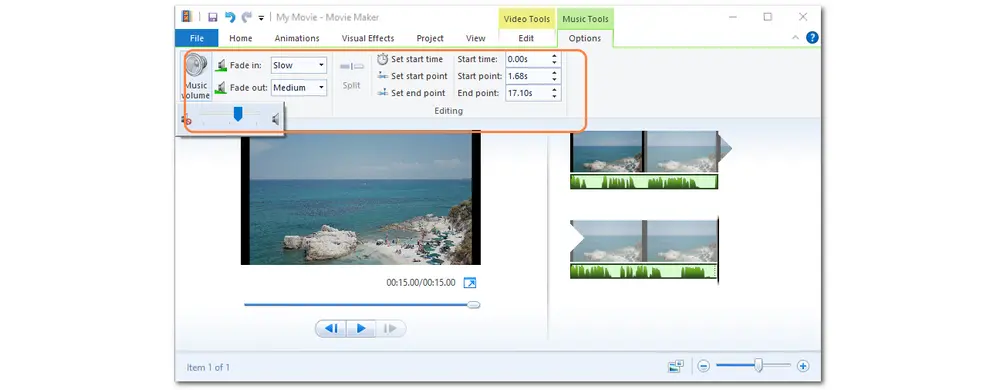
Step 1. Launch Windows Movie Maker on your computer and click “Add videos and photos” to select a photo from your PC. Then click “Add Music” to add an MP3 audio file you wish to edit.
Step 2. Switch to the “Music Tools” section at the top of the program. Then you can see some editing options. Here you can trim the audio file by changing the “Start point” and “End point”. And add the “Fade in” or “Fade out” effect, and adjust the volume level.
Step 3. After doing the edits, click “File” > “Save movie”, then scroll down and you can find the “Audio only” option. Select it and then you can select the audio type (only M4A and WMA formats supported) and name the edited audio.
Want to edit audio files on Windows 10 with the pre-installed app? You can give Windows Media Player a try. Actually, it is designed as a media player and manager. But with some plugins installed, you can edit audio and videos by trimming, cutting, etc. in Media Player. Otherwise, it can only help with adding the album art, renaming the Contributing artists, and changing the song’s title.
Edit the metadata of MP3 files:
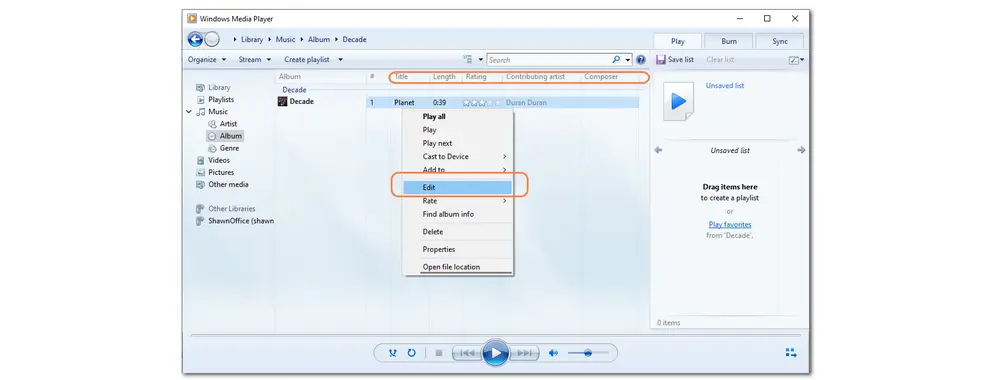
Step 1. Open Windows Media Player and navigate to the “Music” tab from the left panel to display the Windows’ MP3 files.
Step 2. Find the metadata you want to edit and right-click the song and then select “Edit”.
Step 3. Now, you can edit the title, genre, artist, etc. of the song.
Trim MP3 in Windows Media Player with plugin installed
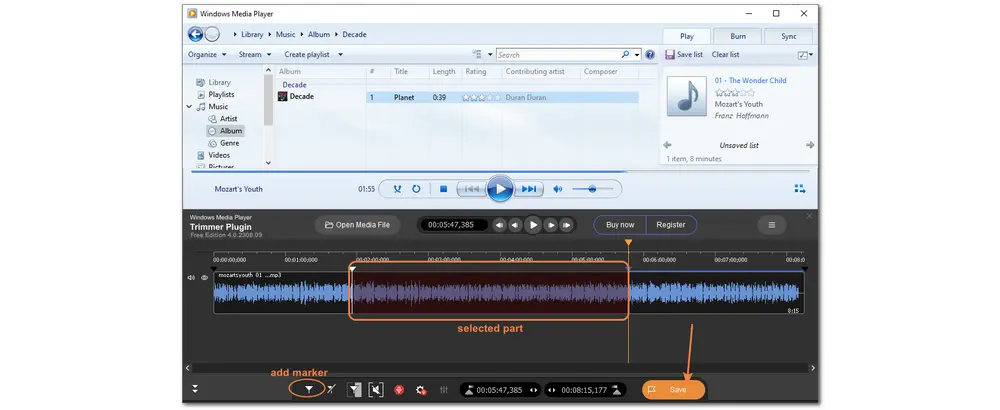
Step 1. Install SolveigMM WMP Trimmer Plugin (https://www.solveigmm.com/en/products/wmp-trimmer-plugin/) on your computer and launch Windows Media Player
Step 2. Now you can see the plugin shown at the bottom of the interface. (If the plug-in doesn't appear, click on Alt, select Tools > Plug-ins, and enable SolveigMM WMP Trimmer.)
Step 3. Click “Open Media File” to import your MP3 audio file or you can directly drag and drop the source MP3 file into the program and click “Edit this file”.
Step 4. Move the orange slider to choose the start position and click on the “Add marker” button. Then repeat the process to choose the end position. Finally, click on the “Trim” button to trim the selected part.
Step 5. Press the “Save” button to select an output path and rename the edited MP3 file if needed.
WonderFox HD Video Converter Factory Pro is an all-in-one audio processing tool designed for Windows that allows you to record, convert, download, and edit audio files, and more. With its powerful format support, you can import almost all audio and video files and start editing, converting, compressing, etc. Additionally, you can use it to edit the MP3 metadata, add MP3 to videos, extract MP3 from other videos, and more. All the features are easy to access and only a few simple clicks are required.,
Free downloadFree download it here and read the following to edit MP3 audio files on Windows 10 effortlessly.
✔ Trim/split/merge/compress MP3 files
✔ Convert various video and audio files to MP3
✔ Add or edit audio metadata like title, artist, genre, etc.
✔ Record system sound or your voice in MP3/WAV...
✔ Download music from 1000+ sites in MP3 format
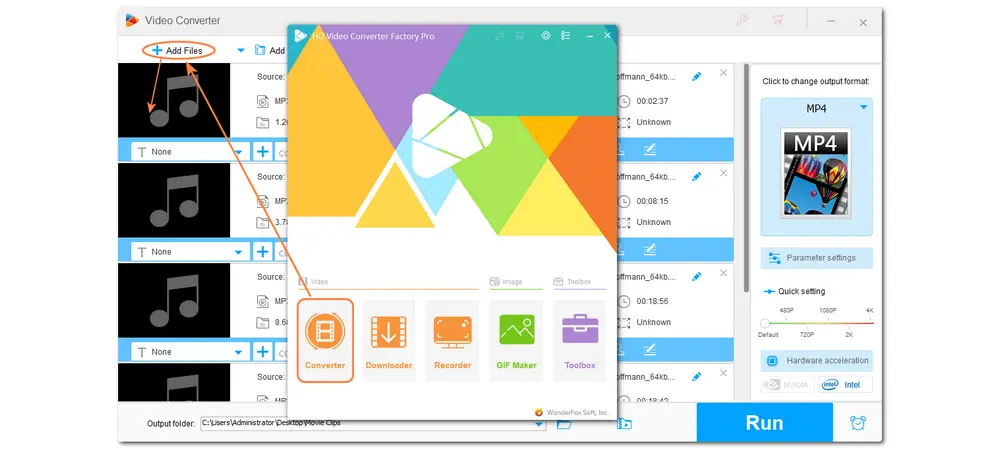
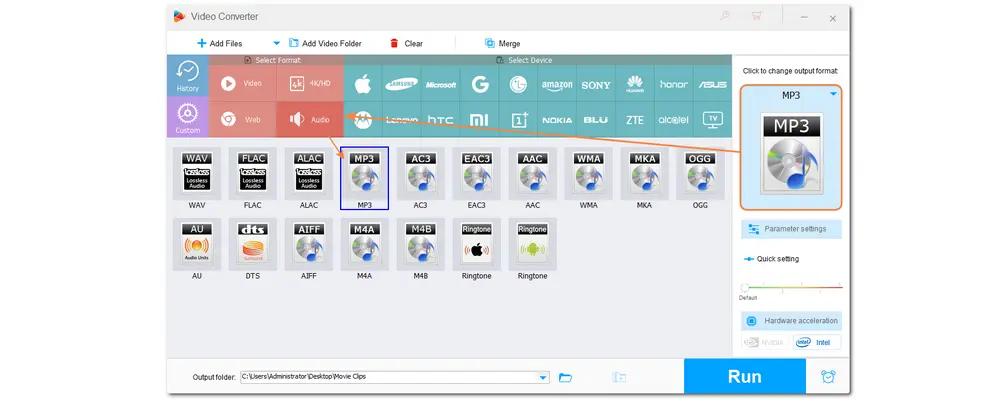
Launch HD Video Converter Factory Pro and open the “Converter” from the initial interface. Click “+ Add Files” to add the source MP3 files. You can also directly drag and drop the source files into the program. Batch processing is supported in this program for you to export multiple files simultaneously.
If needed, you can open the output format library on the right side of the interface to change the audio format. Just go to the “Audio” tab and select a desired output format.
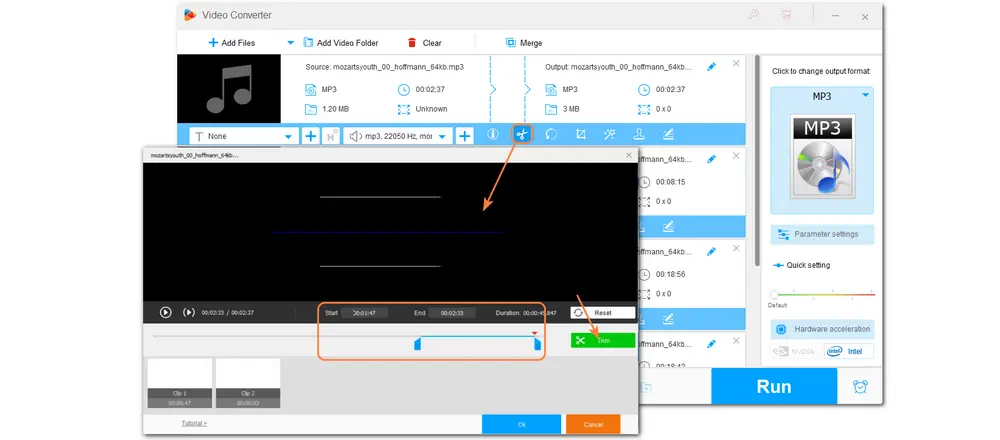
With HD Video Converter Factory Pro, you can trim, split, merge, and compress MP3 files as well as do other edits.
1. Cut/Split MP3 Files: Click the scissor-shaped icon to open the trim window. Here you can type in the exact start and end times or move the sliders to select the wanted part. Then press “Trim” to make a trimmed video clip. You can repeat the process to split the audio into several clips. Finally, click “OK” to save the trimmed clips.
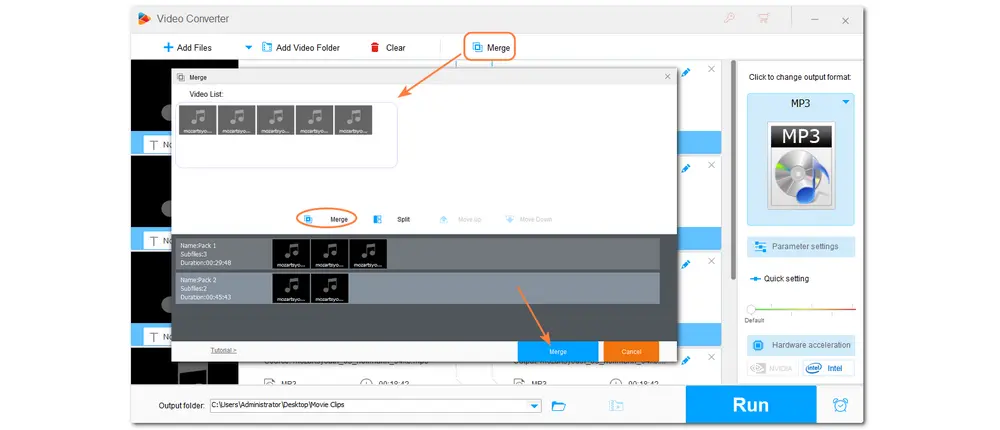
2. Merge MP3 Files: If you have multiple MP3 files and want to combine them into one clip, you can click the top “Merge” button. Then all the imported files will be placed under the “Video List” section. Just select the audio files and hit the middle “Merge” button to create an audio pack. (It allows you to make multiple file packs from the imported files.) Finally, click the bottom “Merge” button to save the joined packs.
3. Edit Metadata, Compress MP3, And More: Click the last icon on the toolbar to expand the metadata window and you can edit the metadata for your MP3 file. Open the “Parameter settings” window, here you can lower the audio bitrate, adjust audio volume, and modify other settings.
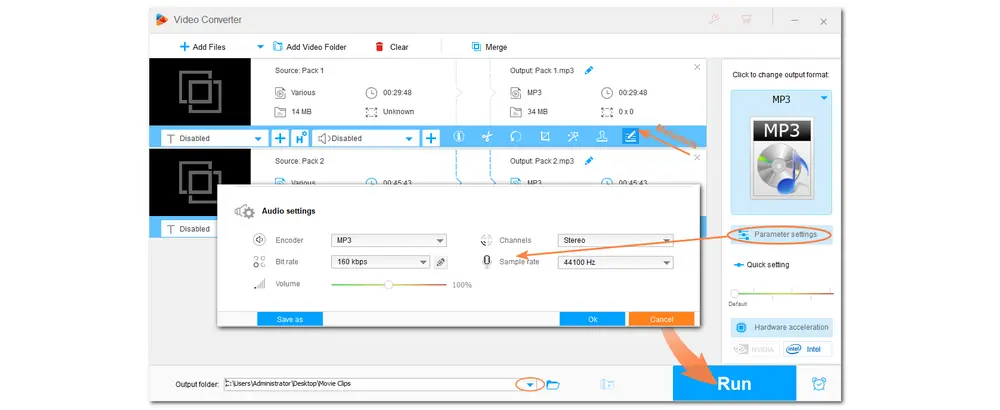
Now, specify an output path for the exported files by clicking the bottom inverted triangle button or just leave it as default. Finally, hit the “Run” button to start the exporting process.
Audacity is a free and open-source audio editor that allows users to trim, split, merge, and compress audio files as well as extract audio from video, record PC audio, and more. It allows you to edit WAV, MP3, AIFF, AU, FLAC, and OGG Vorbis audio files efficiently. If you hope to edit an MP3 audio file on Windows 10 more professionally, just give Audacity a try.
The following is a simple guide for how to edit the MP3 audio file on Windows 10 with Audacity.
Step 1. Launch Audacity and navigate to “File” > “Open” to import your MP3 file.
Step 2. Edit an MP3 File:
1. Trim an MP3 File: Click the “Selection Tool” icon and then hold & move your cursor on the audio wave to select the wanted audio part. Go to “Edit” > “Remove Special” > “Trim Audio” to remove the unselected part. Then place your cursor at the file name and drag it to the beginning of the time.

2. Split an MP3 File: Ensure the “Selection Tool” icon is enabled. Then move the cursor to the point you want to split. Select “Edit” > “Labels” > “Add Label at Selection” and then a new track will occur below the audio track you import. Name the audio clip and then repeat the process to split more clips.

......
Step 3. Now you can save the trimmed/split audio clips. Just click “File” and then go to “Export Audio” > “Export as MP3” / “Export Multiple”. Here you can also select another format. Then name the edited file, and choose a bitrate mode, quality, and channel mode.Finally, press “Save” / “Export” to export the edited audio file to your device.
Besides editing MP3 files on Windows 10 with desktop tools, you can also edit an MP3 file online. Just open the web browser on your device, and then you can search and use online audio editors like VEED.IO, Kapwing, Clideo, AudioMass, etc.
The following will take VEED.IO to show you how to edit MP3 files on Windows 10 online.
Step 1. Visit the VEED.IO MP3 editor page at https://www.veed.io/tools/audio-editor/mp3-editor.
Step 2. Click "Choose MP3 Files" to upload your MP3 file.
Step 3. Move the slider on the timeline and press "Split" to split your MP3 file.
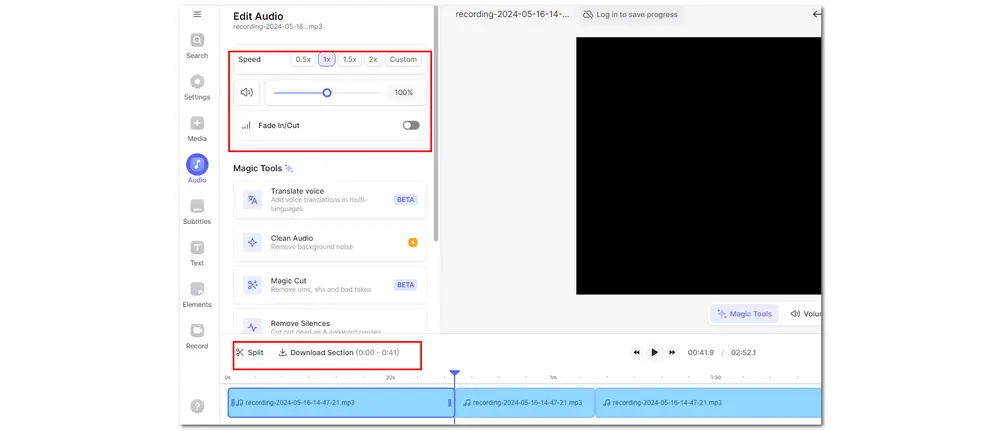
Step 4. Navigate to the "Audio" section, and you can change the playback speed, control the volume, and apply fade in/out effects.
Step 5. Then you can select the desired clip and click "Download Section" to save the clip to your device.
Now, you have learned 5 ways to edit an MP3 audio file on Windows 10. Just feel free to choose one and start editing according to your actual needs. But for the easiest editing process and high output quality, it is recommended that you use HD Video Converter Factory Pro, which can help you cut, merge, compress, and convert... your MP3 and other files with just a few simple clicks.
That’s all I want to share with you about editing MP3 files on Windows 10. Hope you can find this article helpful. Thanks for reading. Have a nice day!
Sure. Editing MP3 files on Windows 10 is not a tough task. You can use the default Windows programs like Windows Movie Maker and Windows Media Player to trim MP3 files and edit MP3 metadata. If you want more features, just give WonderFox HD Video Converter Factory Pro, Audacity, or other online audio editors a try.
If you want to edit the metadata of an MP3 file in Windows Media Player, you can go to the "Music" tab and find the file you want to edit, right-click on it, and select "Edit".
If you want to trim an MP3 file in Windows Media Player, you need to install a plugin called SolveigMM WMP Trimmer Plugin.
This depends on your purposes and the audio editing software program that you are using. However, it is recommended to save the edited MP3 file in the original file format to keep the quality.

WonderFox DVD Ripper Pro
WonderFox DVD Ripper Pro is a professional DVD ripping program that can easily rip any DVD, be it homemade or commercial, to all popular formats including MP4, MKV, MP3, WAV, H264, H265, Android, iPhone, etc. without a hitch. It also lets you edit and compress DVD videos at high efficiency. Download it to enjoy a fast and trouble-free DVD ripping experience.
* Please DO NOT use it to rip any copy-protected DVDs for commercial purposes.
Privacy Policy | Copyright © 2009-2026 WonderFox Soft, Inc.All Rights Reserved
