

Have some 10-bit camera footage to edit, share, or play on another device? You can either keep its 10-bit color depth or make a more widely compatible 8-bit copy. This guide explains the difference in plain English, helps you choose the right option, and shows an easy way to convert your videos on Windows.
 Kevincy | Oct 15, 2026
Think of a sunset fading from bright orange to dark blue. The colors should blend smoothly, without obvious lines between one shade and the next. Bit depth tells you how many small steps a video can use to describe those changes.
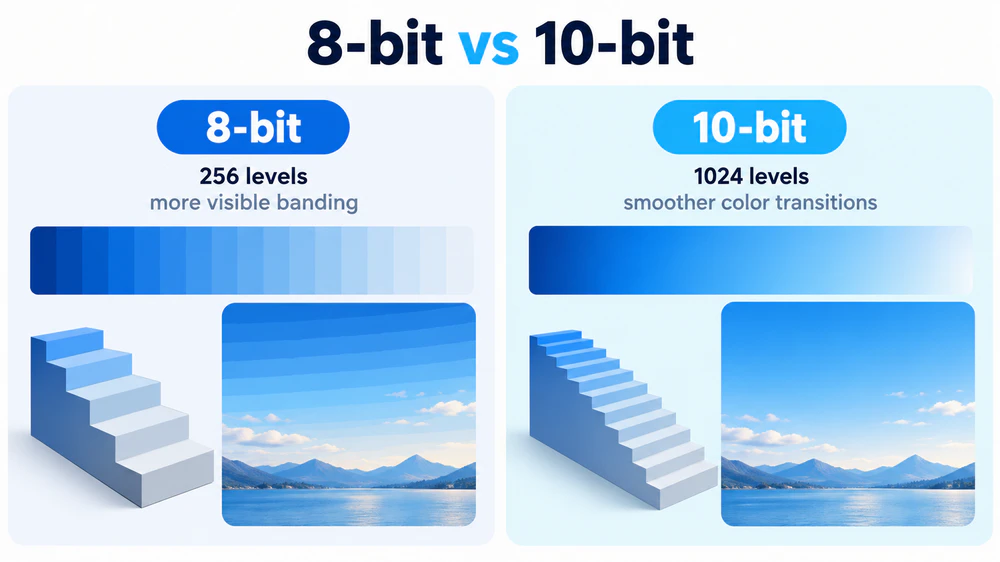
Imagine two staircases connecting the same two floors. One has 256 big steps; the other has 1,024 much smaller steps. The second feels smoother because each step is less noticeable. That is roughly the difference between 8-bit (256 levels) and 10-bit (1,024 levels) for each color component. In video, those extra levels help skies, shadows, and other gradual color changes look smoother, especially when you edit the colors later. These numbers are levels per component, not the total number of colors in an image.
You might get 10-bit footage from a camera, drone, phone, or HDR source. Keeping it can be useful for editing, while converting it to 8-bit may help an older TV, player, or app open the file.
⚠️ Don't confuse bit depth with bitrate or resolution. Bit depth is about how finely colors can be described. Bitrate is how much data the video uses each second; resolution is how many pixels make up the picture. So 10-bit does not automatically mean a sharper image, a larger file, or better quality. The encoder and conversion settings still matter.
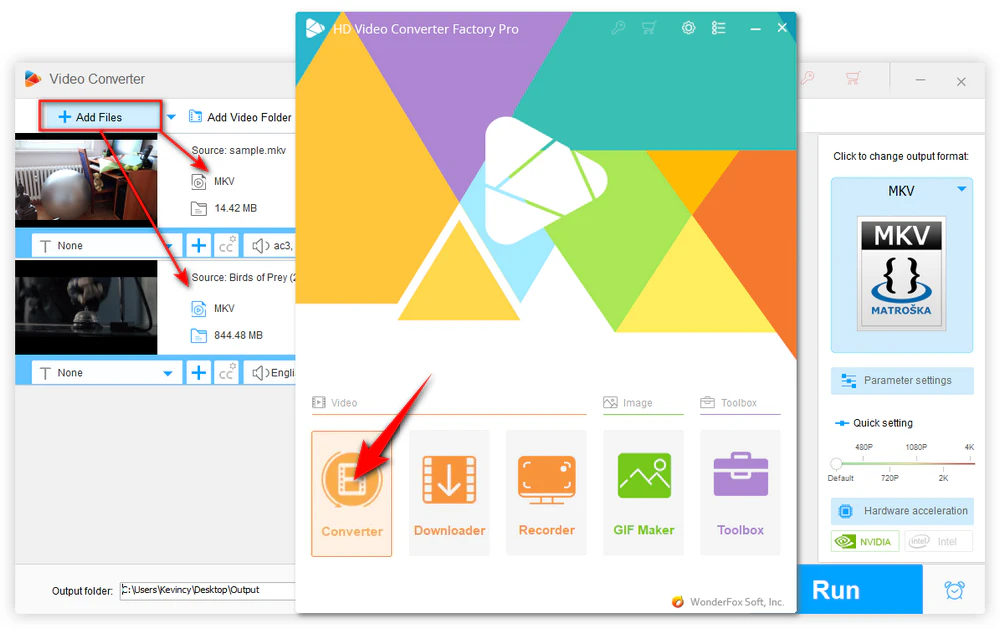
Don't want to work through complicated encoder menus or command lines? WonderFox HD Video Converter Factory Pro has a clear, beginner-friendly interface. Convert one or many of your footage in a few clicks.
If you plan to color-grade the footage, keep a high-quality working copy, or watch it on a compatible device, keeping 10-bit is usually a good choice. The important thing is to choose an encoder and profile that can actually produce 10-bit video. Common options include:
Note: A codec's ability to support 10-bit does not mean every program or preset will export 10-bit. Always check the actual output settings and finished file.
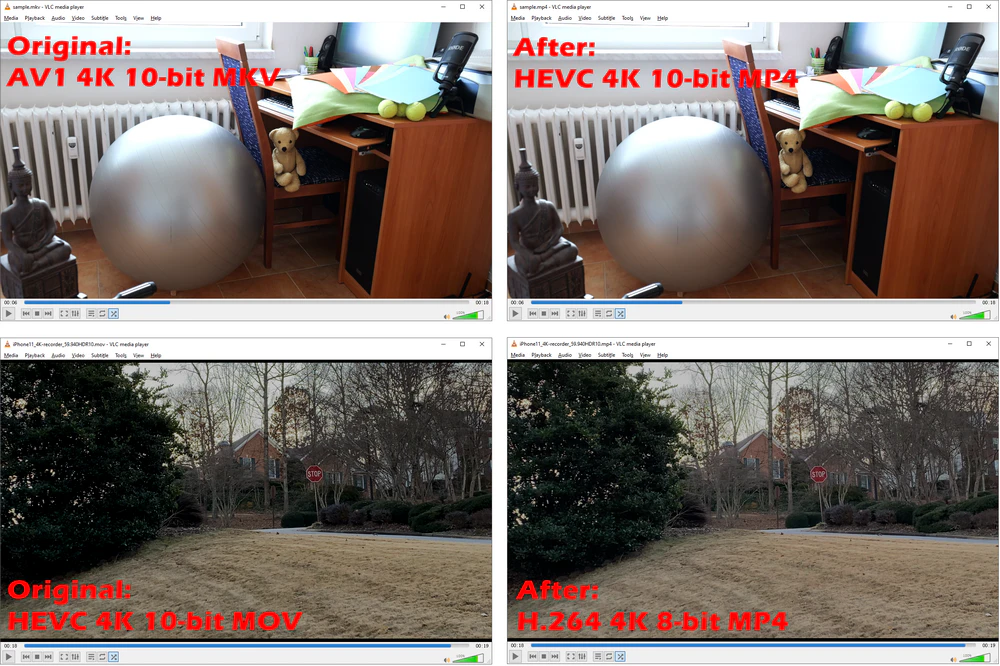
If you mainly want to send a clip to someone, upload it, or play it on an older device, 8-bit H.264 in MP4 is often the simplest choice. It has broad support across players, phones, TVs, and websites. You may lose some smoothness in delicate color gradients, so keep the original 10-bit file in case you want to edit it later.
👉 One more thing about HDR: Think of HDR as a way to show a wider range from dark to bright, while bit depth describes how smoothly those changes can be represented. Turning a 10-bit HDR video into an 8-bit video does not automatically make it look right on an SDR screen. That can also require HDR-to-SDR tone mapping to adjust brightness and colors properly.
Not necessarily. Think of making a copy of a photo: even if the new file can hold the same range of colors, saving it with heavy compression can still reduce its quality. A 10-bit export can look almost identical to the original, but it is not automatically a perfect copy. The encoder, bitrate, and other settings still matter.
No. Remember the staircase example: fewer steps can make the transitions more obvious, but they do not automatically change the distance between the bottom and the top. Similarly, 10-bit to 8-bit conversion can make smooth areas show visible bands of color, but it should not inherently cause a big contrast drop. If the video looks washed out, too dark, or unusually flat, check whether HDR was converted to SDR correctly and whether the color and playback settings match.
Hardware and software encoders use different algorithms and settings. They may produce slightly different quality or file sizes at similar bitrates. A GPU encoder can be much faster when supported, while software encoding often offers more tuning options. Neither is always superior; test a short, representative scene if the quality difference matters to you.
No. These describe different parts of a picture: resolution is the number of pixels (how much detail can fit), bit depth is how finely shades are recorded, and HDR deals with a wider brightness range and the way that brightness and color are represented. A video can be 10-bit without being HDR, or 4K without being 10-bit. Simply changing a setting to 10-bit will not create real HDR or bring back detail that was never captured.
Video conversion tools come in many forms, but some demand command-line knowledge or lots of technical choices. WonderFox HD Video Converter Factory Pro keeps the process approachable with a visual Converter module and ready-made output profiles. You can simply add your video, choose a format, and start converting, or open the settings when you need more control over 10-bit and 8-bit output.
🤔 Not sure whether the footage is actually 10-bit? Check its video stream in MediaInfo first.
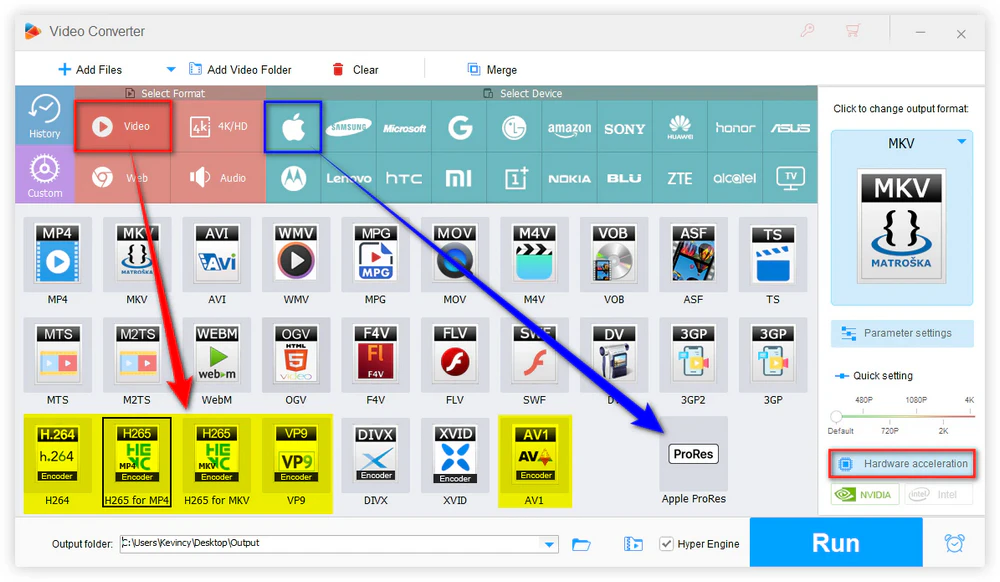
Click the Output Format image on the right to open the format list. The best choice depends on whether you want to preserve the original 10-bit depth or convert the video to 8-bit for better compatibility.
To keep the 10-bit color depth, go to the Video category and select:
For 10-bit H.264 output (.mp4), there's one extra step: turn off Hardware Acceleration on the right side before starting the conversion. In the current WonderFox workflow, hardware-accelerated H.264 encoding produces 8-bit video, while software encoding can retain 10-bit depth.
If you only need an 8-bit video for everyday playback or sharing, H.264 with hardware acceleration enabled is a practical choice.
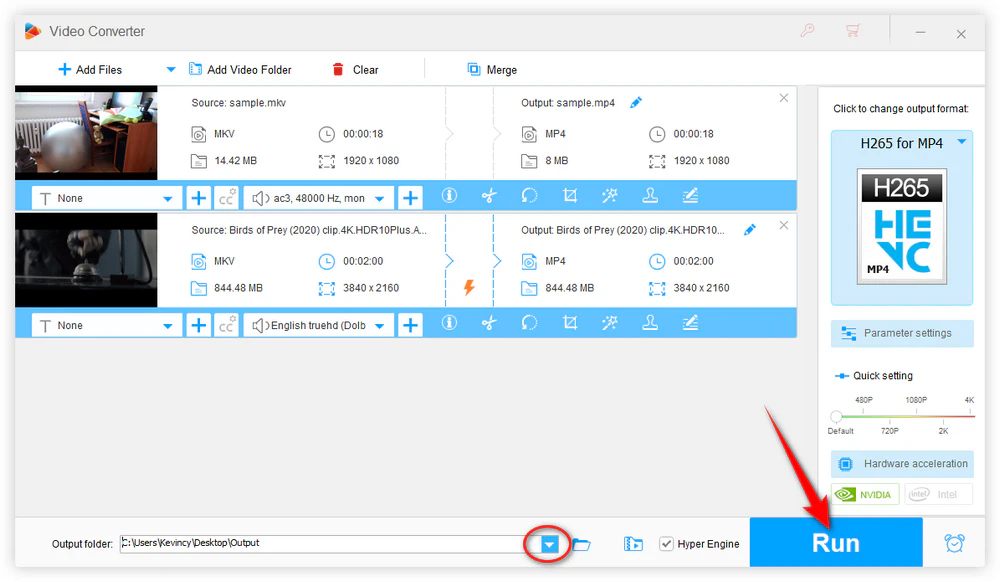
Click the triangle icon at the bottom to choose an output folder. Finally, click Run to convert your 10-bit footage.
After conversion, open the exported file with MediaInfo and check Bit depth under the video stream: it should read 10 bits for a 10-bit delivery or 8 bits for an 8-bit one. It is worth checking the codec and color information as well.
Preview the converted clip, especially smooth gradients and dark scenes. If you need a 10-bit output but MediaInfo reports 8 bits, revisit the encoder/profile and hardware acceleration settings, then try a short test clip before processing the whole batch. For an HDR source, also confirm the output looks correct on an HDR-aware player and display.
The easiest way is to check it with MediaInfo. Switch to Tree or Text view and look for Bit depth under the Video section. If it says 10 bits, your video is 10-bit. If it says 8 bits, it's 8-bit.
Yes, through an appropriate H.264 profile. However, 10-bit H.264 has more limited support in everyday players and devices than standard 8-bit H.264, so HEVC is often a more practical choice when retaining 10-bit for playback.
The chosen preset, encoder profile, or hardware-encoding route may output only 8-bit. Switch to a suitable 10-bit-capable configuration, disable hardware acceleration if you are using the WonderFox 10-bit H.264 software path, and export a short test file again.
HEVC is space-efficient, but it can be harder to decode smoothly during editing. ProRes generally needs much more storage, yet it is often preferable in supported editing workflows. Choose based on your editor, available disk space, and desired workflow.
There is no single best setting for all 10-bit footage. Keep 10-bit when you want more grading flexibility or a high-quality working copy; use 8-bit H.264 when compatibility is the main concern. Most importantly, verify the exported bit depth and check the picture before deleting or replacing your original files.

Kevincy joined the WonderFox team in 2014 and has been a senior columnist ever since. With over two decades of experience in the video editing industry, he shares tutorials, tips, and how-to guides on video/audio processing and personal DVD backups. Family-oriented and passionate about helping others, he is dedicated to making video and audio processing easier for readers.


Kevincy joined the WonderFox team in 2014 and has been a senior columnist ever since. With over two decades of experience in the video editing industry, he shares tutorials, tips, and how-to guides on video/audio processing and personal DVD backups. Family-oriented and passionate about helping others, he is dedicated to making video and audio processing easier for readers.

WonderFox HD Video Converter Factory Pro
1. 500+ optimized presets for fast conversion in bulk.
2. Compress videos with adjustable quality and file size.
3. Trim, merge, crop, rotate, flip, watermark video.
4. Download supported online videos for offline use.
5. Record live streams, gameplay, webcam, video call
6. Make animated GIFs from video or image sequence.
7. Make ringtones, extract subtitles & more...

Privacy Policy | Copyright © 2009-2026 WonderFox Soft, Inc. All Rights Reserved
