2 Ways to Record Dota 2 Gameplay on PC? | Step-by-Step Guide Dota 2 is a multiplayer online battle arena video game that is considered one of the greatest video games since its release in 2013. There are over a million active players at its peak, and many want to record Dota 2 replays for sharing with friends or uploading to their social platforms. If you have the same demand, this post shares 2 easy methods to record Dota 2 on your PC.
To capture Dota 2 at a high-speed frame rate on any Windows version without time limit, install this powerful game recording software and follow the guide in the second part: https://www.videoconverterfactory.com/download/hd-video-converter-pro.exehttps://www.videoconverterfactory.com/download/hd-video-converter-pro.exe
Windows 10 and Windows 11 have a pre-introduced recording feature called Xbox Game Bar. It’s designed to help gamers capture video, take screenshots, and broadcast their gameplay online. The Windows Game Bar works with most PC games, such as Dota 2, Fortnite, CSGO, Sims 4, etc. Using the built-in digital video recorder (DVR), it’s easy to record screen with audio on Windows 10/11. Let's see how to:
Tips. Currently, Xbox Game Bar is only available for Windows 10 and 11. If you need to record the Dota 2 gameplay on your Windows 8.1/8/7/Vista or laptop, use the handy Dota 2 recorder introduced in Part 2.
How to Capture Dota 2 with Xbox Game Bar?
Step 1: Launch Dota 2 on your PC. Then go back to the desktop and press the Windows and G keys to open the Windows Game Bar.
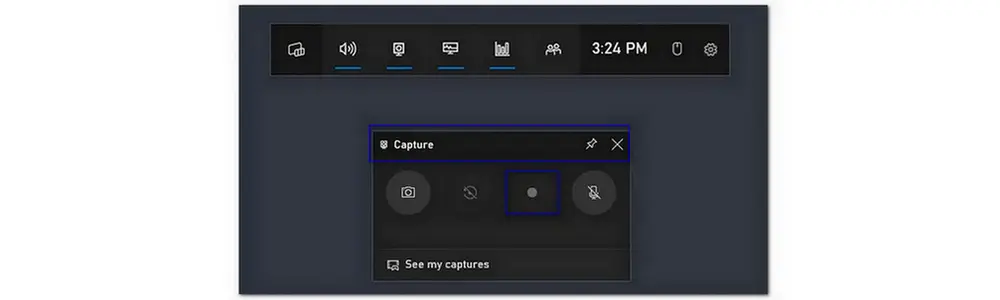
Step 2: (Select the “Yes, this is a game” option on the screen.) In the main interface of Xbox Game Bar, click the third Start recording button on the Capture widget to record the Dota 2 gameplay.. Alternatively, press Windows + Alt + R on your board to begin recording.
Step 3: Click the record button again to stop the recording. You can also set a timer and make the recording automatic in the Xbox DVR settings.
Step 4: Once done, the video will be saved as an MP4 file in your folder automatically.
Though Xbox Game Bar is a very convenient feature for game players, it can affect the performance of the game and your computer. To avoid this, you can utilize this recommended game recorder for Windows, which can promise high-quality recordings never slows down your computer:
HD Video Converter Factory Pro makes it easier than ever to record Dota 2, Valorant, Minecraft, and other video games on PC. It can record gameplay at a high-speed frame rate of 60fps and capture mic/system audio at the same time. Try it now!
WonderFox HD Video Converter Factory Pro offers a simple yet functional screen recorder for PC, which can help you capture gameplay, movies, online conferences, and other videos on Windows 11/10/8.1/8/7... It has a game-recording feature, enabling you to record game videos at 60fps (30fps and 10fps are also available).
WonderFox Dota 2 recorder supports recording in MP4, AVI, MOV, and MKV format, which helps you avoid compatibility issues on most players and devices. It also supports GPU acceleration to improve the efficiency of the recording process. Moreover, this software provides a straightforward way to pick up the audio from your computer or microphone. It lets you record the mic and system audio simultaneously or select one of them separately.
Now, free downloadfree download the Dota 2 screen recorder on your PC and follow the below steps to start recording.
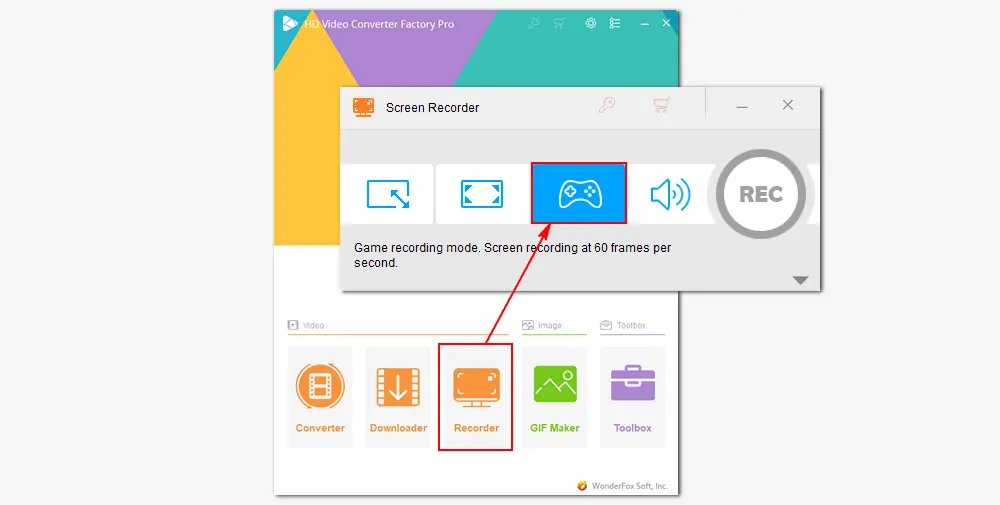
Run HD Video Converter Factory Pro after you install it. On the home interface, select Recorder. Then choose the game recording option by clicking on the gamepad-shaped button on the top of the Screen Recorder.
Now, select the first custom or the second full-screen mode to confirm a recording region. Both part-screen and full-screen modes allow you to adjust the area by dragging the four borders. Then, click the OK button at the center of your screen.
There are some basic recording settings. You can leave them just as default or select your desired video format and quality. MP4/High Quality is adapted in most instances.
The Desktop and Microphone audio source options are both enabled by default to record the system sound and your mic voice. You can also customize the audio options according to your needs.
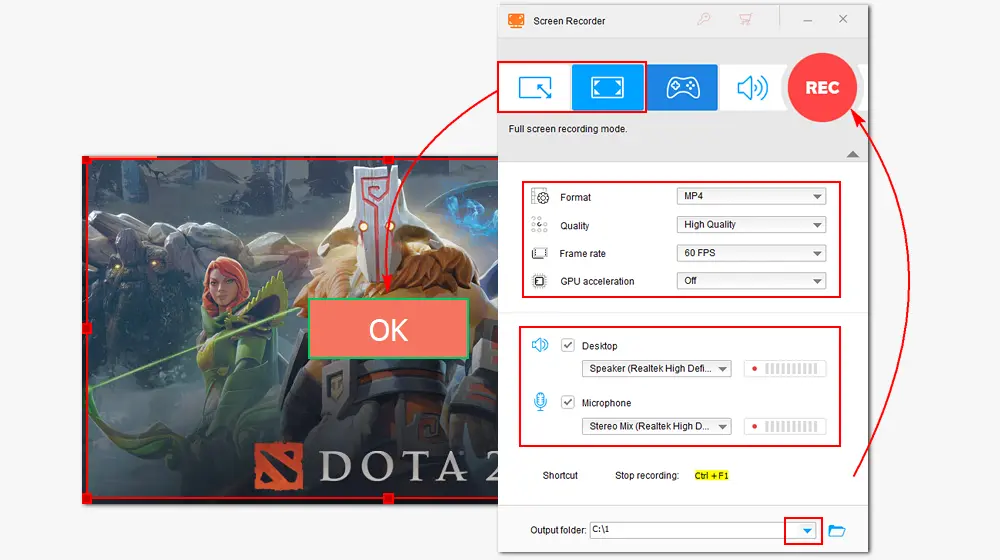
Click the bottom triangle button to specify an output path for your recording. Then, click the red REC icon to start recording Dota 2 after a five-second countdown. The program will minimize at the edge of your screen. When you finish, tap on the stop button or press Ctrl + F1 to stop the recording. The video file will be automatically saved in the folder you set before.
That’s all about the two Dota 2 screen recorders and how to use them to capture Dota 2 gameplay on Windows. Hopefully, this article could be helpful to you. And if you encounter any problems with HD Video Converter Factory Pro, you can contact us immediately. Thanks for reading!
Follow the steps below to watch replays of your Dota 2 replays:
Step 1. Click on the player profile on the main menu.
Step 2. Click "Previous Matches Performace" under the "Profile" section.
Step 3. Choose the match you want to watch.
Step 4. Click "Download Replay" at the bottom right of the Overview screen.
Step 5. Click "Watch Replay" to start watching.
No. Dota 2 replays cannot be downloaded as videos directly. If you want to save it as a video to watch, you can use some screen recording software like HD Video Converter Factory Pro to record the Dota 2 replays as a video.
1. Go to your Dota profile by clicking on your name
2. On the bottom right is the recent match list, go to "view all games" if it's longer ago.
3. Click on the match and select "Download replay".
4. Click "Watch Replay".
WonderFox HD Video Converter Factory Pro
1. Record any screen activity with/without audio;
2. Batch convert video to over 600 presets.
3. Extract audio, add a soundtrack, compress, and combine screen recordings;
4. Download video/audio files from websites;
5. Trim, crop, rotate, make GIFs, extract subtitles, etc.
Privacy Policy | Copyright © 2009-2026 WonderFox Soft, Inc.All Rights Reserved
