Best FPS Converter to Convert Video FPS on PC
WonderFox HD Video Converter Factory Pro
√ Convert FPS from/to 24, 30, 60, 120fps
√ Customize video FPS
√ Convert VFR to CFR
√ Adjust bitrate, resolution, sample rate, etc.


Frame rate, measured in frames per second (fps), represents how many individual still images appear in a second on the screen. It can impact the smoothness, clarity, and detail of a video, playing a crucial role in video quality. Common frame rates used in modern videos include 24 fps, 30fps, 60fps, and 120fps. 24fps is the cinema standard, while 30fps is common for TV and online content. For high-action content and slow-motion videos, 60fps and higher can offer smoother playback.
Depending on your project’s purpose, you should choose a suitable frame rate. Premiere Pro is a powerful editing software that enables you to get a professional-look video with the desired frame rate. Nevertheless, not all users know how to change the fps in Premiere Pro. To offer help, this detailed guide will explain the process with 2 examples, helping you grasp it more intuitively.
Next, we’ll walk you through how to change fps in Premiere Pro with the following 2 examples. (The version I’m using is Adobe Premiere Pro v23.5.)
If you want to change the frame rate of a sequence to 24fps in Premiere Pro, follow these steps:
Step 1. Launch Premiere Pro and create a New Project.
Step 2. Name your project and choose a location for it.
Step 3. Then select your video and click Import.
Step 4. Then Premiere Pro (v22.3 and later) import your media as a sequence by default, ready for editing.
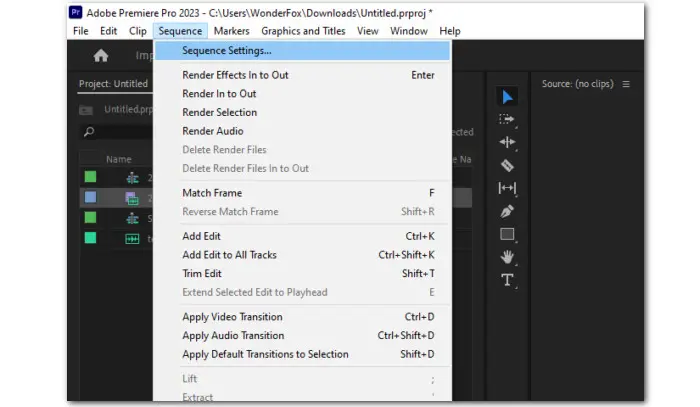
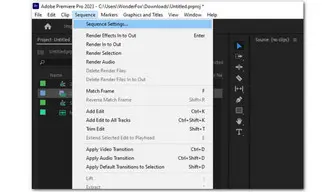
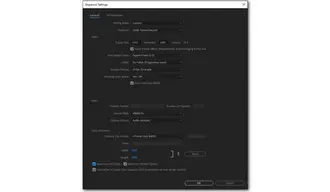
Step 5. To convert the frame rate of the existing sequence to 24fps, select the sequence, click “Sequence” on the top menu bar, and select “Sequence Settings” from the drop-down option.
Step 6. In the pop-up window, set Custom as the Editing Mode. In this mode, you can make any adjustment fit for the chosen sequence.
Step 7. Then choose 24.00 frame/second from the Timebase drop-down menu.
Step 8. According to your file’s purpose, continue to change other video and audio settings. For example, for building a YouTube video, these settings (in the picture) are suitable for most cases.
Step 9. Give a sequence name and click OK. Voilà! The frame rate of the selected sequence is 24fps now.

But if you just want to change the frame rate of a clip in the sequence from 60fps to 24fps or the like, you can follow the instructions here:
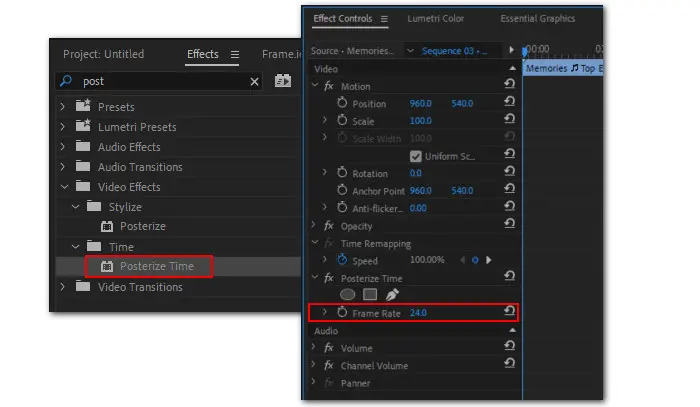
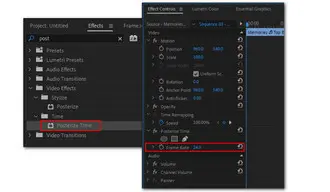
Step 1. In the Premiere Pro’s Edit workspace, find the Effects panel and type “posterize” in the search box.
Step 2. Drag the effect onto the clip on the timeline.
Step 3. In the Effects Controls, go to the Posterize Time. The frame rate will be changed to 24.0 automatically. You can also tweak it to any other value you want.
We have learned how to change the video frame rate in editing. What if you want to export a 120fps video in Premiere Pro, what to do? Well, the process is pretty easy. Just follow us:
Step 1. The export quality relies much on the source quality. Therefore, if you want to create a smooth 120fps video, make sure you capture it at 120fps or higher. Select your footage and drag it into the Timeline panel.
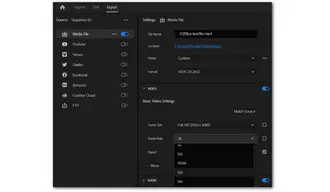
Step 2. Then edit it normally. After editing, go to File > Export > Media.
Step 3. For better compatibility, it is suggested you set the Format to HEVC (H.265) and select Match Source-High bitrate or Custom from the Preset list. Then go with other settings.
Step 4. Once done, preview it and click Export to get the 120fps video. Meanwhile, you can choose to save these export settings for next-time use.

With an intuitive interface, WonderFox HD Video Converter Factory Pro offers an easier way to change the video frame rate. Plus, it has full support for batch mode with GPU acceleration, so you can convert multiple videos’ FPS from 60fps to 120fps, 30fps to 24fps, etc., in one go at a fast speed.
To get started, download this program and follow the steps below:
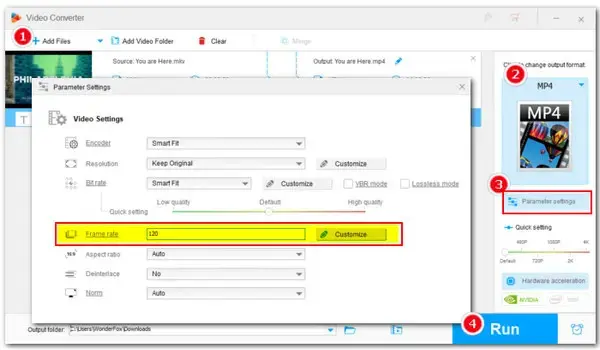
Step 1. Launch HD Video Converter Factory Pro and enter the Converter.
Step 2. Click Add Files to import videos or directly drag and drop them into the workplace.
Step 3. Hit the format image on the right side of the window to choose a desired output format.
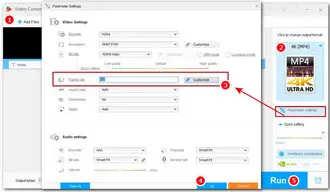
Step 4. Enter Parameter settings. You can select a frame rate from the drop-down presets or click Customize to input the value you need. Then, click OK to save the change.
Step 5. Then click the ▼ icon to set an output folder and hit Run to begin the conversion.
Before exporting, you can also use the editing tools to trim, crop, rotate, add text, or add subtitles to your video.

That’s all about how to change frame rate in Premiere Pro. Hopefully, this guide has helped you change the video fps with Premiere Pro to perfectly suit social media or viewing devices. Also, you can try the alternative -WonderFox HD Video Converter Factory Pro - to edit video FPS in a simpler manner.
Checking the frame rate of your video in Premiere Pro is easy to do.
Just follow the steps in our guide, you can change the FPS of a video in Premiere Pro easily.
Choose the method based on your actual needs. For changing the sequence frame rate, use Sequence Settings, while for changing the frame rate of a clip, apply the Posterize Time effect.
Terms and Conditions | Privacy Policy | License Agreement | Copyright © 2009-2026 WonderFox Soft, Inc.All Rights Reserved