


Sample rate (sometimes called sampling rate/frequency) refers to the number of samples of audio recorded every second. A sampling rate of 44100 Hertz means the audio signal has been measured 44,100 times by second. For WAV, it’s recommended to record with a sample rate of 48kHz and then bounce down to 44.1kHz for the final release because 48kHz can record everything within the range of human hearing, and stereo 44.1kHz/24-bit is the best setting for an uncompressed audio format like WAV. If you have recorded or downloaded some WAV files of 48kHz, 96kHz, etc., follow the guide below to change the sample rate of WAV files to 44,100Hz in the easiest way.
To convert WAV 48 to 44.1 kHz, a good WAV sample rate converter is essential. I recommend you use WonderFox HD Video Converter Factory Pro. It’s a professional converter app for converting nearly all audio/video files and changing related parameter settings. The software can help you convert WAV 48,000 to 44,100 Hz, change audio bitrate, and convert channels from stereo to mono with several simple clicks. It also offers many formats for audio conversions, including MP3, FLAC, OGG, AAC, M4A, M4R, and more.
Next, I will show you how to change the sample rate of WAV files step by step. Please free downloadfree download the software on your PC for preparation.
It’s the most straightforward and effective way to convert the sample rate of WAV and other audio/video files with HD Video Converter Factory Pro. In simple steps, you can change all the parameters as you wish.
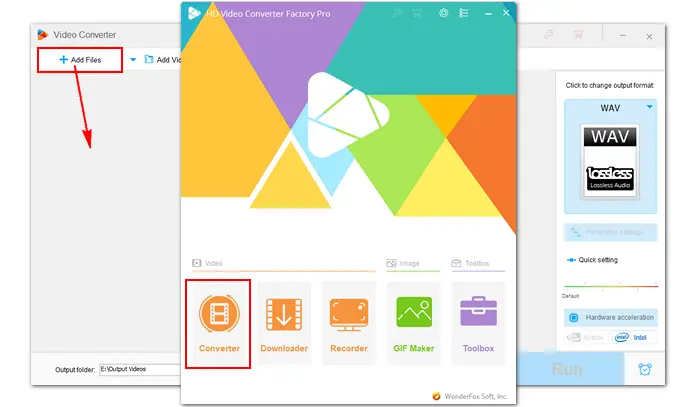
Launch HD Video Converter Factory Pro after installing it. Open the Converter and click Add Files to import your WAV files. Or you can drag and drop them into the software directly.

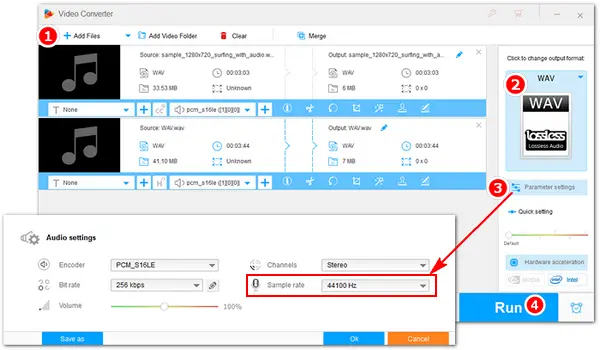
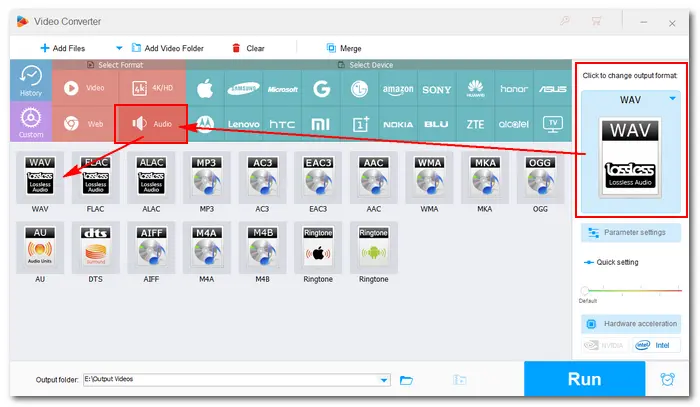
Go to the output format section on the right side of the interface. Navigate to the Audio tab and select a profile. You can keep it as the original WAV or choose other formats based on needs.

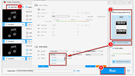
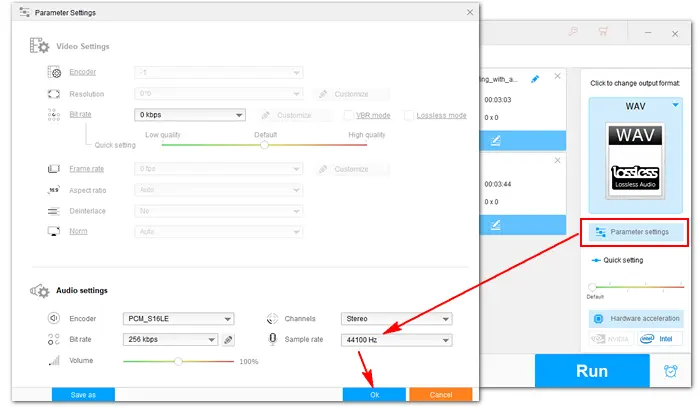
Open Parameter settings under the format image. Set the Sample rate as 44100 Hz.
You can also change the bitrate, alter channels, and adjust volume of the audio file. When you are done, click OK to save the settings.
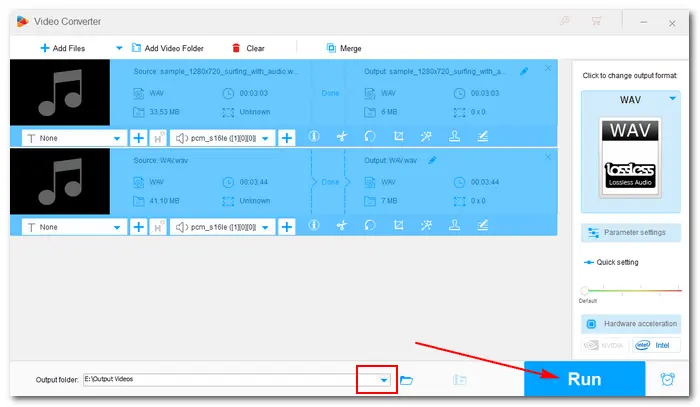
Hit the bottom triangle button to specify an output path or leave it as default. And press Run to convert sample rate of WAV file immediately. When the process is completed, you can check the converted files in the output folder.
Audacity is a well-known audio recording and editing program for Windows and other operating systems. It has native support for audio files in WAV, MP3, and OGG Vorbis, so you can import WAV to Audacity and use it to change the audio sample rate. If you want to try this method, you should install Audacity on your PC first.
Official website: https://www.audacityteam.org/download/
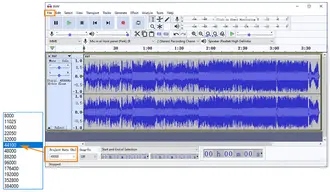
How to change WAV sample rate in Audacity?
1: Run Audacity. Go to “File” > “Open” > select a WAV file.
2: In the bottom left corner, convert sample rate of WAV file by selecting “44100” from the drop-down list of “Project Rate (Hz)”.
3: Click “File” > “Export” > “Export as WAV” > set an output destination > “Save”.

An online WAV file sample rate converter is also a good solution for this task. Generally, audio converters on the website provide options for audio bitrate, frequency, and channels. And they directly work on the browser so you don’t need to install any software or plugin. If you have no idea about which online converter to choose, here are some useful ones:
https://audio.online-convert.com/convert-to-wav
https://cloudconvert.com/wav-converter
https://online-audio-converter.com/
How to change the sample rate of a WAV file online?
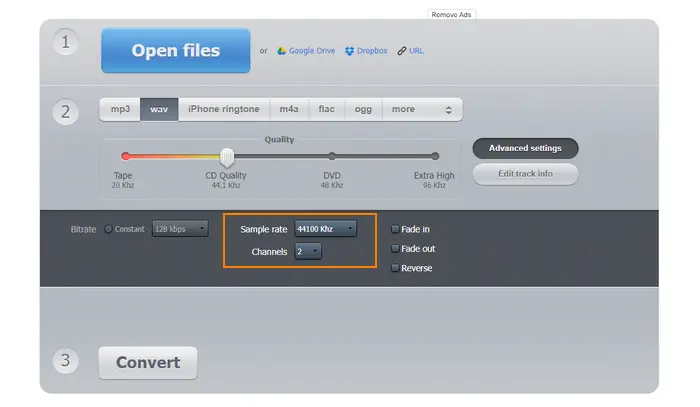
1: Visit the site of a sample rate converter. Add a WAV file to the converter.
2: Select an output format.
3: Go to settings and change the sample rate to 44,100Hz.
4: Start to convert. When the process is finished, download the converted file to your computer.
This article introduced three methods to change sample rate of WAV files. With the excellent toolkits above, you can easily convert your WAV files to the proper sampling rate for listening or uploading. At last, if you find this article helpful, you can share it with more people. Thanks for reading!

Terms and Conditions | Privacy Policy | License Agreement | Copyright © 2009-2026 WonderFox Soft, Inc.All Rights Reserved