Free Download
Practical Audio Enhancers for Files, Recordings, and Windows Playback.
AuthorRecommended by the author

SoftwareHow to & Tips

Video FormatsConvert Video

Resources

Audio Enhancer for Windows: Improve Audio Quality, Recordings & Playback

Author: Kevincy by Kevincy

Updated on Jul 27, 2026

Audio can sound disappointing for very different reasons: a recording may be too quiet, a video may use unsuitable audio settings, a file may contain steady hiss, or your Windows playback device may simply be configured poorly. There is no single switch that repairs every problem, so this guide shows several practical ways to enhance audio quality based on what is actually wrong.


For quick file-level adjustments on Windows, download this handy tool first and follow the steps below:

What Can an Audio Enhancer Actually Improve?

Before choosing a tool, identify the symptom. If the audio is simply too quiet or inconsistent, adjusting or normalizing volume may help. If a video has an incompatible audio format, re-encoding the audio can fix playback. If you hear steady fan noise, hiss, or hum in a recording, a noise-reduction tool is more appropriate. And if the original file sounds fine on one device but poor on a Windows PC, check the playback device and driver settings before modifying the file.

The methods below cover three common situations: permanently adjusting an audio or video file, improving Windows 11 playback, and reducing steady background noise in a recording.

Method 1. Adjust Audio Files and Recorded Video with HD Video Converter Factory Pro

WonderFox HD Video Converter Factory Pro is a Windows converter that can modify the audio stream in common audio and video files. It lets you change audio bitrate, sample rate, channels, format, and volume, and it can process multiple files in batch. That makes it useful for music, voice recordings, screen recordings, camera clips, downloaded videos, and other media that need consistent output settings or louder sound.


This method changes the exported file itself, unlike Windows playback enhancements that affect only what you hear through a particular output device. If you only need occasional conversion or parameter adjustments, Free HD Video Converter Factory uses a similar Converter workflow; the Pro version is more suitable for batch processing and the full feature set.

Free Download Free Download

How to Improve Audio or Video Sound in Three Steps

import audio or recorded video into audio enhancer

Before start, please downloaddownload the software.

Step 1: Add Your Audio File or Recorded Video

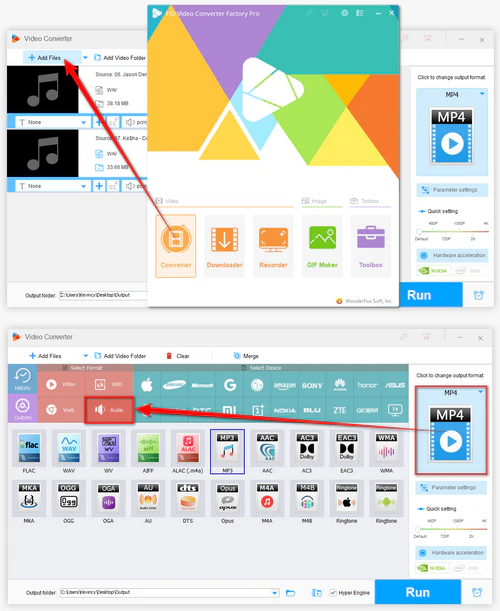
Run WonderFox HD Video Converter Factory Pro and open the Converter module. Click Add Files or Add Video Folder to import your audio files or videos, or drag them directly into the interface. You can load a voice recording, song, screen recording, camera clip, or other supported media in the same workspace.

Open the output format list on the right. For standalone audio, choose an appropriate profile under Audio. For a video recording, choose a video profile under Video that matches your playback or sharing needs. If compatibility is not a problem, avoid changing formats without a reason.

Tips: For batch work, add multiple files first and use one suitable output profile for the group.

adjust audio bitrate sample rate channels and volume

Step 2: Adjust Only the Settings You Need

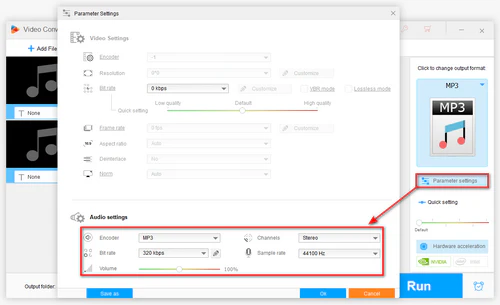
Click Parameter Settings and find the Audio settings.

Use Volume when the source is too quiet. Choose a bitrate that is appropriate for the source and output codec, and change the sample rate only when a device, editor, or workflow requires it. You can also change the channel layout when you need a compatible mono, stereo, or supported multichannel output.

Click OK to save the parameter changes.

Do not automatically select the highest values. A higher bitrate can preserve more information when encoding from a good source, but it cannot restore information already lost in a low-quality file. Likewise, upsampling does not make the original recording more detailed. Matching sensible output settings to the source usually gives a better result than simply maximizing every number.

👉 For example, increasing a 128 kbps MP3 to 320 kbps, changing 44.1 kHz to 48 kHz, or turning mono into stereo or multiple channels does not recreate detail that is already missing from the source. These settings are useful for compatibility, workflow requirements, volume control, or avoiding unnecessarily low output settings during conversion, but they should not be treated as restoration.


export enhanced audio or video file

Step 3: Choose an Output Folder and Export

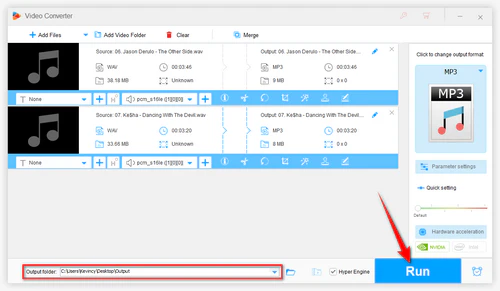
Choose an output folder at the bottom, and press Run. When the conversion finishes, compare the result with the source using the same player, headphones, or speakers. If the output is louder but distorted, reduce the volume setting and export again.

For recorded video, this workflow keeps the sound and picture together, so you do not need to extract the audio first just to change volume, audio format, bitrate, sample rate, or channels.

Method 2. Check Windows 11 Audio Enhancements

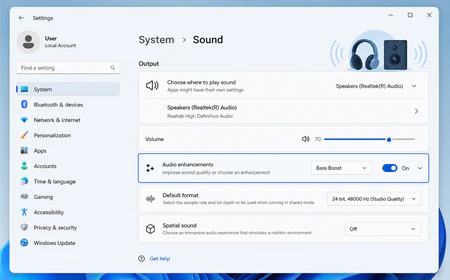
If the file itself sounds normal on another device, do not re-encode it yet. The problem may be your Windows playback configuration. Windows 11 includes device-level audio enhancements, and some audio drivers expose extra effects such as loudness equalization, bass management, or spatial processing. These settings affect playback on that PC rather than permanently changing the media file.


Windows 11 audio enhancements settingsWindows 11 audio enhancements

Step 1: Open Start > Settings > System > Sound.

Step 2: Under Output, select the speakers or headphones you are actually using. Find Audio enhancements and test the available setting. Depending on the device and driver, Windows may show an On/Off choice, Device Default Effects, or additional controls in the classic device properties.

Step 3: Play the same audio before and after the change. Keep the setting only if it genuinely improves your playback. If you hear crackling, distortion, or unexpectedly low volume, turn Audio enhancements Off and test again. You can also try a different Default format under the device's advanced sound settings.

Note: the options vary by audio hardware and driver, so not every Windows 11 PC shows the same enhancement controls. These effects change playback on the selected device; they do not repair or rewrite the original audio file.

Method 3. Reduce Steady Background Noise with Audacity

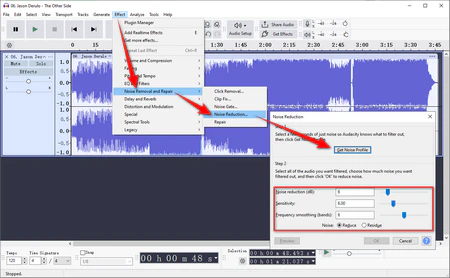
If a recording contains steady hiss, fan noise, buzz, or hum, changing bitrate or sample rate is not the right fix. Audacity's Noise Reduction effect is designed for consistent background noise and works best when the recording contains a short section with only the unwanted noise.


Audacity noise reduction for hiss hum and fan noiseReduce steady noise in Audacity

Step 1: Open the recording in Audacity and select a short section that contains only the background noise. Go to Effect > Noise Removal and Repair > Noise Reduction, then click Get Noise Profile.

Step 2: Select the part you want to clean, open Noise Reduction again, and use Preview while adjusting the controls. Apply only as much reduction as needed. Aggressive settings can create metallic or watery artifacts and damage speech or music.

Step 3: Export the cleaned audio. For a video, you can replace the original audio track afterward in a video editor or converter that supports adding audio tracks.

Get Better Audio Before You Record

Post-processing has limits. A cleaner source almost always gives you a better result than trying to rescue a badly clipped or very noisy recording later.

Use the best microphone available, move it closer to the speaker or sound source, and record in a quieter room. Keep the input level high enough for a healthy signal but below clipping. A stand can reduce handling noise, while a pop filter helps with strong plosive sounds in speech. When possible, record important microphones on separate tracks so their levels can be adjusted independently afterward.

For screen recordings or online meetings, make a short test first and listen back through headphones. This catches the wrong microphone, low input level, echo, or system-audio mistakes before a long recording is finished.

FAQs

Q1. Will converting 128 kbps MP3 to 320 kbps improve the original quality?

No. The new file may have a higher bitrate, but information discarded by the original lossy encoding cannot be recreated. Use a suitable bitrate to avoid additional unnecessary loss when you must re-encode.


Q2. Does changing 44.1 kHz audio to 48 kHz make it clearer?

Not by itself. Resampling can be useful when 48 kHz is required for video production, hardware, or another workflow, but it does not add detail that was not captured at 44.1 kHz.


Q3. Why is Audio enhancements missing in Windows 11?

The available controls depend on your playback device and audio driver. Check the selected output device, update the manufacturer's driver if needed, and look in More sound settings > device Properties for any driver-specific controls.


Q4. Can an audio enhancer fix clipping or heavily distorted recordings?

Usually not completely. Once peaks are clipped or the wanted sound is buried under severe noise, some information is gone. Restoration tools may reduce the damage, but re-recording from a cleaner source is the best option when possible.

Wrapping Up

The right way to improve audio depends on the problem. Use WonderFox HD Video Converter Factory Pro when you need to adjust the exported audio or video file, including volume, format, bitrate, sample rate, or channels. Use Windows 11 audio enhancements when the source file is fine but playback on one PC needs adjustment. Use a dedicated editor such as Audacity when a recording contains steady background noise that requires actual signal processing.

Most importantly, do not confuse bigger numbers with restored quality. Start with the cleanest source you have, change only the settings that solve a real need, and compare the result with the original before keeping it.


Kevincy

Kevincy Berel

Kevincy joined the WonderFox team in 2014 and has been a senior columnist ever since. With over two decades of experience in the video editing industry, he shares tutorials, tips, and how-to guides on video/audio processing and personal DVD backups. Family-oriented and passionate about helping others, he is dedicated to making video and audio processing easier for readers.

Email

Kevincy

Kevincy Berel

Kevincy joined the WonderFox team in 2014 and has been a senior columnist ever since. With over two decades of experience in the video editing industry, he shares tutorials, tips, and how-to guides on video/audio processing and personal DVD backups. Family-oriented and passionate about helping others, he is dedicated to making video and audio processing easier for readers.

Email

Simple Audio & Video Processing for Windows

WonderFox HD Video Converter Factory Pro

WonderFox HD Video Converter Factory Pro

Process common audio and video files in one place. Convert formats, adjust output bitrate and sample rate, change channels and volume, and batch-process multiple files. It is a practical choice when you want straightforward file-level adjustments without using a full audio workstation.

Free Download Free Download

More Related Articles

How to Normalize Audio to a More Consistent Volume Level Top 10 Volume Boosters for Windows in 2026 [FREE & FAST] How to Change Audio Bitrate Properly
How to Enhance Sound on Video on the Desktop & Online? How to Fix Audio and Video Out of Sync on Windows? How to Change an Audio File Type