Free Download
Audio Sample Rate Converter – Change Audio and Video Sample Rates
AuthorRecommended by the author

SoftwareHow to & Tips

Video FormatsConvert Video

Resources

Audio Sample Rate Converter: How to Change Sample Rate for Audio and Video

Author: Kevincy by Kevincy

Updated on Sep 23, 2026

Need to change the sample rate of an audio file or a video soundtrack? Whether your project calls for 44.1 kHz, 48 kHz, or another supported rate, this guide explains how to choose a suitable value and convert your files with WonderFox, Audacity, VLC, or an online tool.

Need to meet an upload requirement, match a video project, or make an audio file compatible with your device? You can resample audio to a different supported rate without changing its duration or pitch. The key is choosing a rate that suits your destination, rather than always choosing the highest available number.


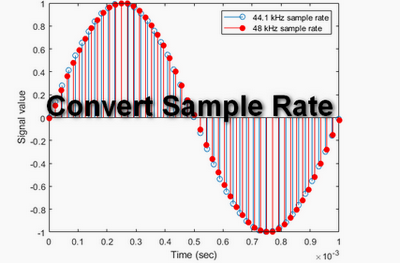
What is audio sample rate? It is the number of audio samples recorded per second. A rate of 44.1 kHz means 44,100 samples per second; 48 kHz means 48,000. Sample rate is different from bitrate (such as 128 or 320 kbps) and bit depth (such as 16 or 24 bit).


Which rate should you choose? 44.1 kHz and 48 kHz are two of the most widely used sample rates, but they are not the only options. The right rate depends on the source, output format, device, and project requirements:

8 or 16 kHz: Common in certain speech and telephony applications.

22.05 or 32 kHz: Used in some lower-bandwidth audio and speech workflows.

44.1 kHz: Standard for audio CDs and widely used for music.

48 kHz: Widely used for video, film, and broadcast audio.

88.2 or 96 kHz: Found in some high-resolution recording and production workflows.

176.4 or 192 kHz: Used in certain specialized, high-resolution audio workflows.

Choose the rate required by your software, device, or delivery platform. Not every audio codec or output format supports every rate. Increasing an existing file's sample rate cannot restore audio detail that was never captured.


This guide covers four practical methods. Choose one based on your files and device:

👉 WonderFox HD Video Converter Factory Pro: convenient settings for common audio and video formats, plus a free option for occasional conversions.

👉 Audacity: free audio editing, track resampling, and export at a specified rate.

👉 VLC Media Player: convert a file using a customized audio profile.

👉 123apps Online Audio Converter: change the rate in a browser without installing software.

Method 1: Change the Sample Rate with WonderFox HD Video Converter Factory Pro

WonderFox HD Video Converter Factory Pro is suitable when you need to convert several files or change the audio track in a video. It accepts common audio and video formats and lets you choose an output sample rate in Parameter settings. For example, you can convert a 48 kHz WAV file to 44.1 kHz or prepare audio recorded at 44.1 kHz for a 48 kHz video project.

If you only need a different sample rate, you can usually keep the same output format. Bear in mind that re-encoding a lossy format, such as MP3 or AAC, may reduce quality.

To process multiple files together, downloaddownload the Windows converter and follow these steps.

Free Download Free Download

4 Steps to Convert the Sample Rate for Audio/Video Files

Add Source Files & Choose an Output Format

Install and open WonderFox HD Video Converter Factory Pro on your Windows PC.

Step 1: Add Your Audio or Video Files

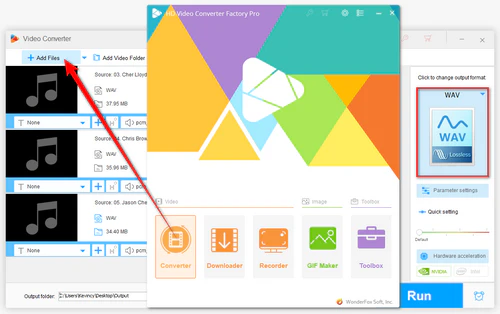
Open Converter, then click Add Files or drag your source files into the window. You can add multiple audio or video files if they need the same output settings.

Step 2: Choose an Output Format

Open the format menu on the right and select the format you need. For example, select Video > MP4/MKV/MOV or Audio > WAV/MP3/FLAC.

Change the Sample Rate & Save the Converted Files

Step 3: Change the Sample Rate

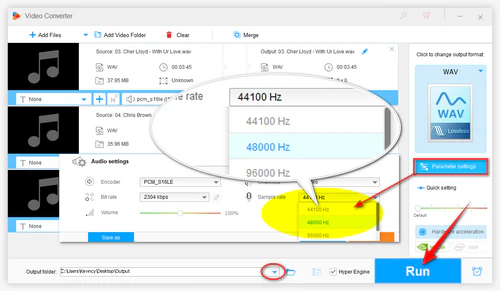
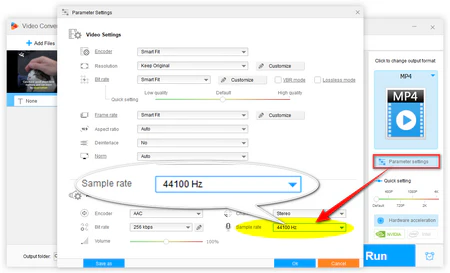
Click Parameter settings, find Sample rate under the audio settings, and select 44100 Hz, 48000 Hz, or another available option. Confirm with OK. Available values vary by codec; not every format supports every rate.

Step 4: Save the Converted Files

Choose an output folder, click Run, and check the resulting files before deleting the originals. If your target app specifies a codec, channel layout, or bitrate as well, set those parameters before conversion.

Free Alternative: Change Audio Sample Rate with Free HD Video Converter Factory

Free Alternative for Sample Rate ConversionFree Alternative for Sample Rate Conversion

WonderFox Free HD Video Converter Factory offers a similar workflow at no cost, but it does not provide the Pro version's batch conversion or GPU acceleration.


Step 1. Install the free Windows program, open Converter, and add your source file.

Step 2. Choose an output format, open Parameter settings, and select the required supported rate (for example, 32000 Hz, 44100 Hz, or 48000 Hz).

Step 3. Set the destination folder and click Run. Repeat for other files as needed.

Method 2: Resample Audio with Audacity (Free)

Resample Audio with AudacityResample Audio with Audacity

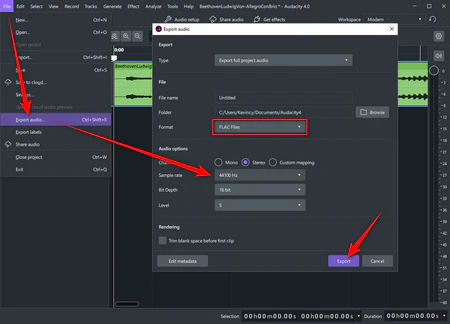
Audacity is a free audio editor for Windows, macOS, and Linux. It can export WAV, MP3, FLAC, and other supported audio formats at a specified sample rate. Audacity 4.0 was released in September 2026, so the steps below use its current export workflow.

Step 1: Install Audacity, then open your file using File > Open or drag it into a project. If an M4A, AC3, or other file will not import, install Audacity's FFmpeg library.

Step 2: Select File > Export Audio (or press Ctrl + Shift + E). Choose the file name, destination, and output format. Set Sample Rate to the required value, such as 44100 Hz, 48000 Hz, or another rate supported by the export format; then choose the channel setting and any other options required by your output format.

Step 3: Export the full project (or the selection, if that is all you need), click Export, and verify the output rate in the finished file.

Method 3: Change Sample Rate with VLC Media Player (Free)

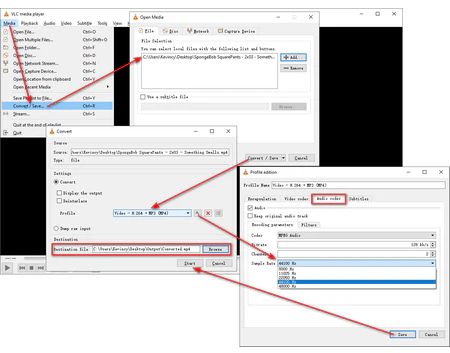
VLC audio codec profile and sample rateConfigure the audio codec in VLC

VLC Media Player is a free player that can also transcode audio and video. On Windows, its Convert / Save feature lets you choose an audio profile and set a target sample rate. Menu names may differ on macOS and Linux.

Step 1. In VLC, open Media > Convert / Save, click Add, and select your file. Click Convert / Save again.

Step 2. Under Profile, select a suitable output format, such as Audio - MP3. Click the wrench icon to edit the profile.

Step 3. Open the Audio codec tab, make sure audio encoding is enabled, and choose the desired Sample rate (for example, 44100 or 48000 Hz). Check the codec, bitrate, and channel settings, then click Save.

Step 4. Choose a destination and a filename with the correct extension, then click Start. Play the result to check for unexpected changes. VLC's available rate options depend on the selected codec and version.

Method 4: Convert Audio Sample Rate Online with 123apps

Convert Audio Sample Rate Online with 123appsConvert Audio Sample Rate Online with 123apps

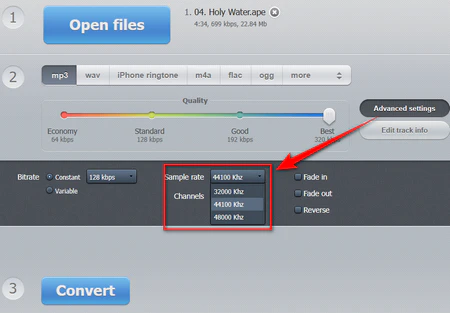
For a quick conversion without installing software, 123apps Online Audio Converter provides browser-based audio conversion with advanced sample-rate settings. It is convenient for an occasional audio file, but avoid uploading sensitive recordings to a third-party service.

Step 1. Open the website and click Open files to upload your audio.

Step 2. Select the output format, such as MP3 or WAV. Open Advanced settings and choose the target Sample rate, such as 32, 44.1, or 48 kHz. Available options may vary with the format.

Step 3. Click Convert and download the finished file. Upload and processing times depend on file size and your connection.

FAQs

Q1. Why is the sample rate I want missing from the options?

Available rates depend on the output format, codec, and converter. For example, MP3 supports several standard rates but not 96 or 192 kHz. If you need a higher rate for a production project, check whether a compatible lossless format, such as WAV, meets your requirements.


Q2. Does increasing the sample rate improve sound quality?

No. Upsampling adds samples between existing samples; it does not recreate frequencies or detail missing from the source. Resample when a device or workflow requires a different rate, not simply to obtain a larger number.


Q3. Will changing the sample rate make my song play faster or change its pitch?

Proper sample-rate conversion keeps the original duration and pitch. However, reinterpreting the same samples at a different playback rate without resampling can change both. In Audacity, use Resample track rather than the track's Rate setting when you need to change the samples themselves.


Final Words

Changing the sample rate is mostly about meeting the requirements of a player, editor, or delivery platform. Audacity, VLC, and 123apps are useful free options; WonderFox Free HD Video Converter Factory handles occasional conversions on Windows, while HD Video Converter Factory Pro adds batch audio/video processing.

For the most reliable result, keep your original file, choose the rate your destination requires, and verify the exported file before sharing it. A higher number alone will not improve an existing recording.

Free Download Free Download


Kevincy

Kevincy Berel

Kevincy joined the WonderFox team in 2014 and has been a senior columnist ever since. With over two decades of experience in the video editing industry, he shares tutorials, tips, and how-to guides on video/audio processing and personal DVD backups. Family-oriented and passionate about helping others, he is dedicated to making video and audio processing easier for readers.

Email

Upgrade to Pro to Enjoy More Features Unlimited!

WonderFox HD Video Converter Factory Pro

WonderFox HD Video Converter Factory Pro

Compared with the free edition, WonderFox HD Video Converter Factory Pro adds unlimited downloads and more batch-processing features. It supports video and music downloads from 1000+ websites, including high-resolution sources up to 8K when available, and can also batch-convert media, record the screen, edit videos, compress files, and make GIFs.

Free Download WonderFox HD Video Converter Factory Pro Free Download WonderFox HD Video Converter Factory Pro

More Related Articles

How to Convert MP3 from 128kbps to 320kbps and Vice Versa? 3 Effective and Easy Solutions to Convert Stereo to Mono How to Downmix 5.1 to Stereo with 3 Simple yet Practical Ways
How to Change Sample Rate of WAV Files (48 to 44.1 kHz) How to Convert 24-bit to 16-bit WAV? [PCM Converter] How to Convert WAV to PCM, and Vice Versa?