VLC can record your computer screen with audio with settings properly configured. Follow this article to learn how to do it step by step and fix errors when VLC won’t record audio.
Tip: Want to know an easier way to record screen with audio? Try this professional video recorder: https://www.videoconverterfactory.com/download/hd-video-converter-pro.exe hd-video-converter-pro.exe
Do you want to record your desktop with audio? Are you searching for a reliable screen recorder? No need to look elsewhere, VLC can help you achieve your goal with the right settings.
You may know that VLC is a free and cross-platform media player. But it not just plays your media, but also records media files with high quality and system audio included. You can use it to capture literally anything on your screen, but before that, learn the steps to do it the right way.
Step 1. Go to https://www.videolan.org/ and install the latest version of VLC media player.
Step 2. Run VLC.
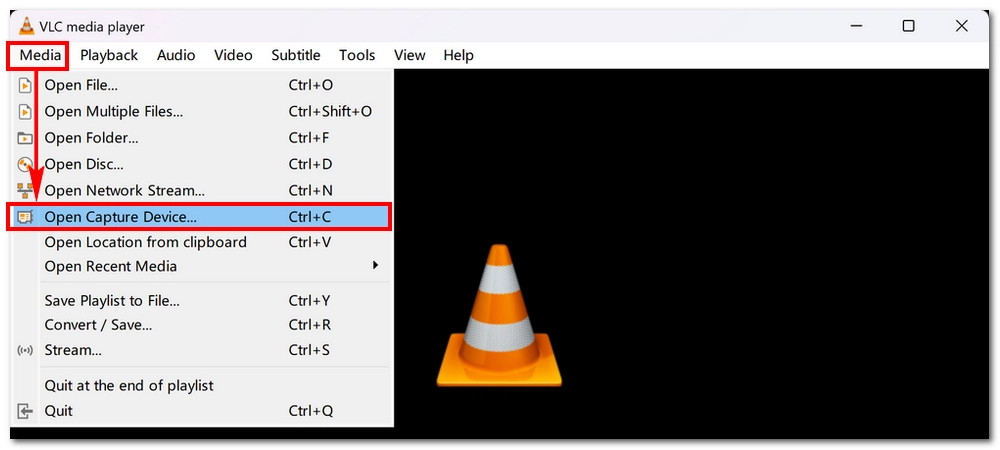
Step 3. Click Media > Open Capture Device.
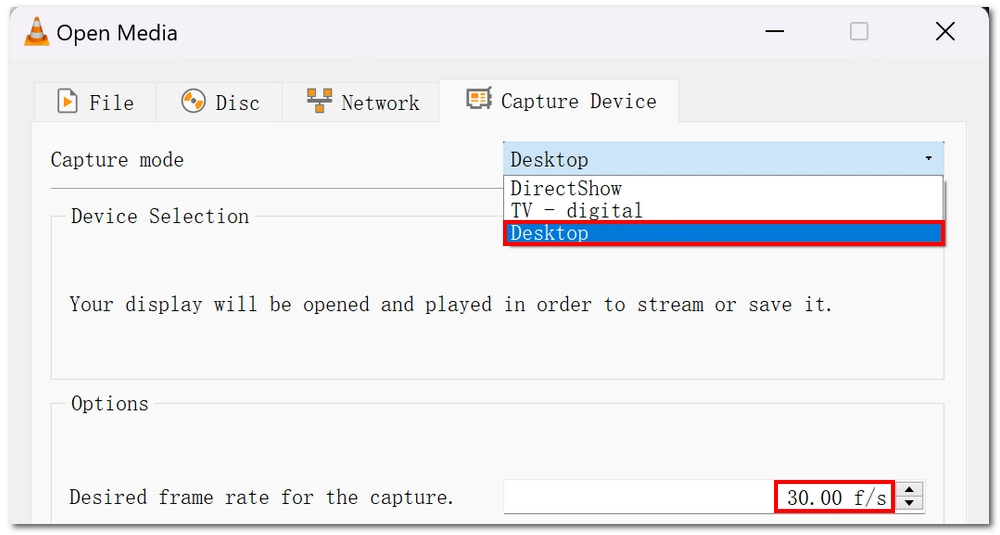
Step 4. Select Desktop as the capture mode. Then specify a frame rate for the capture, for example, 30 fps is recommended for a smooth video capture.
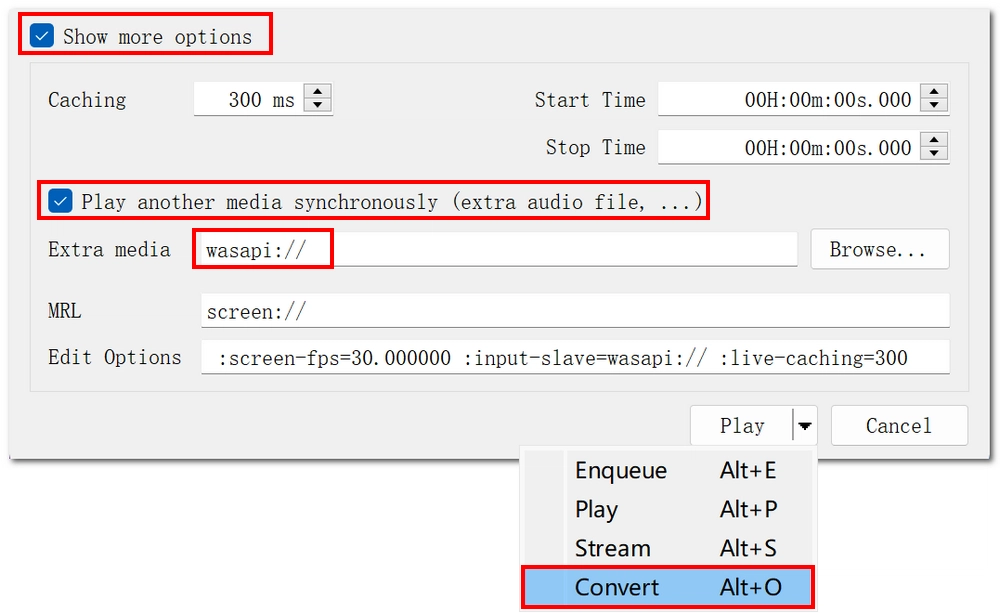
Step 5. Select Show more options.
Step 6. Then select Play another media synchronously…, and enter wasapi:// into the Extra media box.
Step 7. Click the down-pointing arrow next to Play and select Convert.
Step 8. Expand the Profile drop-down list and choose Video – H.264 + MP3 (MP4). Or you can select other profiles or make a new profile based on your needs.
* Optionally, you can click the wrench icon to edit the selected profile, including its container, video and audio codecs, bit rate, sample rate, and more. It’s recommended to have the profile set to MP4 container, H.264 video codec and AAC audio codec.

Step 9. Click Browse, name your recording and specify an output location.
Step 10. Click Start to begin the recording. You can see that the count has started, indicating how long you’ve been recording.

Step 11. When you want to complete the recording, click the stop button to end it. Then, go to the folder where you save the recording to view the recorded file.

What needs to be clarified is that VLC is not able to record desktop with audio by default - you need to manually set up the WASAPI audio output so that it can capture the audio signal coming from the computer. However, if VLC can’t open the MRL 'wasapi://' or you still failed to record audio after trying the steps above, you can apply these fixes:
Stereo Mix is a feature used for recording audio playback on a computer. You’ll need to enable it for proper sound capture.
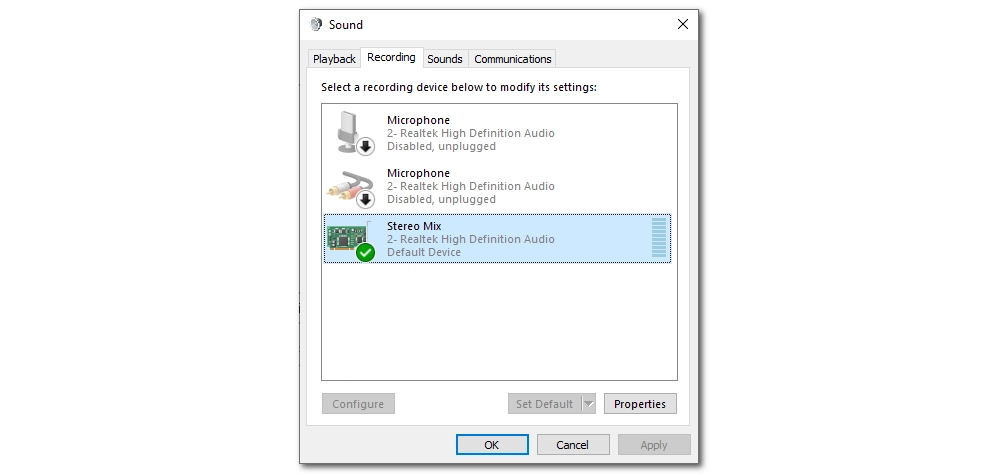
If enabling Stereo Mix didn’t help, it might be that you did not use the correct recording device. For example, if you’re using a headset, the audio output will not be set to Stereo Mix. You need to unplug it or choose the correct device as the default output.
There are alternatives to recording screen with audio besides VLC. If you’d like to know a better way to capture your screen with more customization, give WonderFox HD Video Converter Factory Pro a try.
It’s an all-in-one video software with a screen recorder that makes it easy to record the full screen, part of the screen, system audio, and microphone on your Windows computer. You can also set the recording format, quality, and frame rate to capture the highest-quality video. Once the recording is complete, you can continue to use its built-in video editor to edit the file, such as cropping and trimming. Download Download the program for free and have a try.
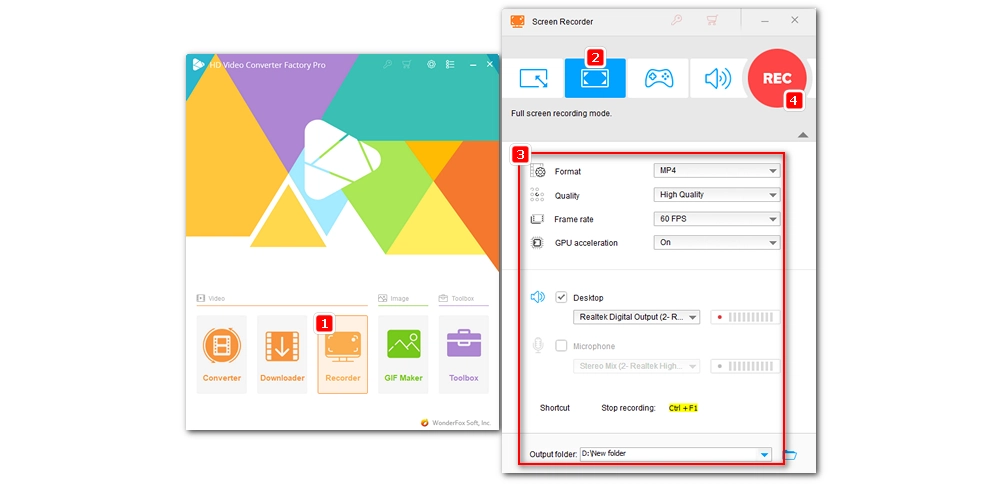
Step 1. Launch the software and open the Recorder.
Step 2. Select Custom mode (first from the left) and select the area you want to record. Or you can select the second Full Screen to capture your entire desktop. Next, choose the recording format, quality, frame rate, and GPU acceleration according to your needs.
Now, tick off the Desktop option to ensure that system sound will be recorded. You can also select Microphone to record your voice.
Step 3. Click REC to start recording (there is a 5-second countdown before recording starts). When recording is complete, click Stop or press Ctrl + F1 to stop recording. The recorded video will show up in the output folder you set.
Screen recording with audio can be straightforward using VLC. You can capture decent quality video and crisp audio. But errors can happen. You need to make sure that you’ve followed the steps carefully and use the correct sound recording device. If, unfortunately, VLC recording doesn’t work for you, the remedy is to try an alternative screen recorder, such as WonderFox HD Video Converter Factory Pro.
That’s all I want to share in this post. Thanks for reading.
Yes. VLC can record desktop with audio, but you need to manually set the audio source. When configuring the capture device, expand “Show more options”, select “Play another media synchronously”, and then enter the audio output “wasapi://”.
If VLC does not capture audio on desktop recording, it’s likely that the recording device isn’t set up properly. You need to go to the Sound Control panel, and set Stereo Mix or other output you’re currently using as the default recording device.
In addition to using VLC, you’re recommended to try an alternative way – WonderFox HD Video Converter Factory Pro - to record screen with audio easily and quickly. For more details, you can refer to this article: How to Screen Record on Windows.

WonderFox HD Video Converter Factory Pro
1. Convert video/audio to 600+ formats and presets;
2. Download movies and music from 1000+ websites;
3. Record screen with audio in high quality;
4. Basic editing tools for making GIFs, slideshows, etc.;
5. Batch conversion mode and hardware acceleration;
Privacy Policy | Copyright © 2009-2026 WonderFox Soft, Inc.All Rights Reserved