

Screen recording is an important skill to master these days. You may want to record a video to demonstrate how to use a product, explain a math problem, show off your gaming skills, or record drawing videos to capture your digital art process.
In this article, we will guide you through the best methods to screen record on Windows 11, 10, 8, and 7 using built-in tools like Game Bar, Snipping Tool, Clipchamp, and Steps Recorder, as well as a professional third-party program that can record your computer desktop, whole screen, and specific areas, with audio simultaneously. We will also provide additional troubleshooting tips for common issues, such as black screen recording, to make the recording process smoother for you. Just read and follow.
👉 Want a powerful yet simple screen recording tool? Try our recommended screen recorder for Windows: https://www.videoconverterfactory.com/download/hd-video-converter-pro.exe hd-video-converter-pro.exe
 Michelle | Updated on Sep 4, 2026
| Built-in Tools | Third-party Software |
|---|---|
Convenient for capturing quick, short, and simple clips, but lack advanced options and controls. |
Ideal for creating longer videos with customization, and easily recording your voice and system sounds. |
No idea how to screen record your desktop? Start with WonderFox HD Video Converter Factory Pro. It offers a super-easy way to record high-quality MP4 videos from your desktop, selected window, or full screen. You can even edit and convert your recordings with ease.
Windows systems actually come pre-installed with screen recording utilities, which are a good starting point.
• Use Xbox Game Bar
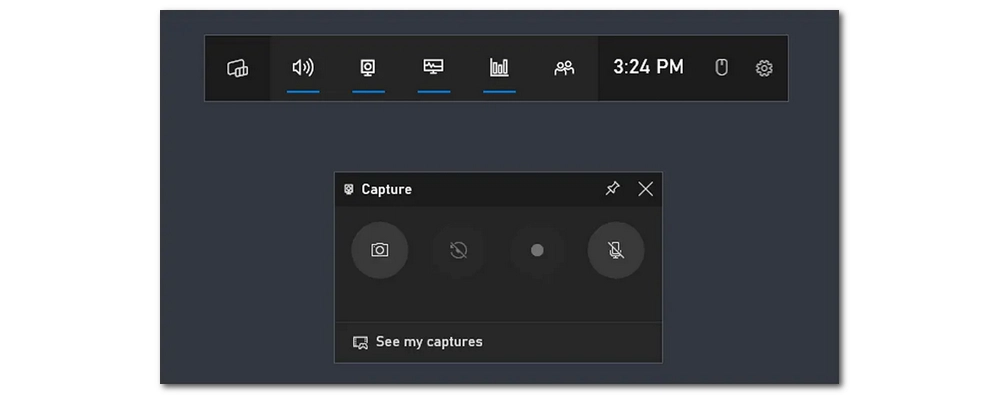
The Xbox Game Bar is available on both Windows 10 and 11, and you can use it to capture PC games and app activities using shortcuts. Here is how:
Step 1: Open the app or start the game you wish to record.
Step 2: Press Windows Key + Alt + R to start recording. The screen will flash to indicate it has started.
Step 3: Press Windows Key + Alt + R again to stop recording.
💡 Xbox Game Bar allows you to record the last few moments of your game using the Windows Key + Alt + G shortcuts, but make sure you have enabled background recording in the Captures settings beforehand.
To record with the microphone on or off, use Windows Key + Alt +M.
• Use Snipping Tool (Windows 11)
Note that Xbox Game Bar has strict limitations. You cannot record the desktop or File Explorer, and if you switch applications, the recording stops immediately. In this case, you can use the Snipping Tool, which is built into Windows 11:
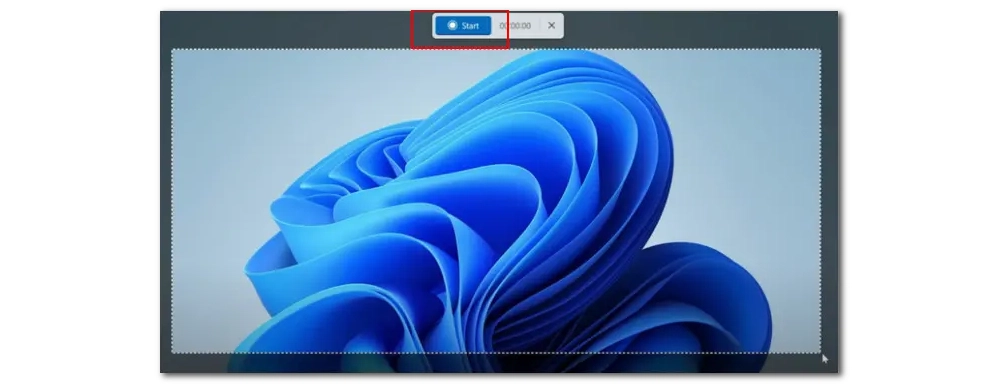
Step 1: Press Windows Key + Shift + R on Windows 11. A crosshair cursor will appear.
Step 2: Select the area you want to record.
Step 3: To record audio at the same time, be sure to click the Microphone or Speaker icon to choose an audio input.
Step 4: Click the Start button at the top, and the recording will start after a 3-second countdown.
Step 5: Click the Stop button to stop the recording. A preview window will appear, and you can save the recording to your local folder.
• Use Clipchamp
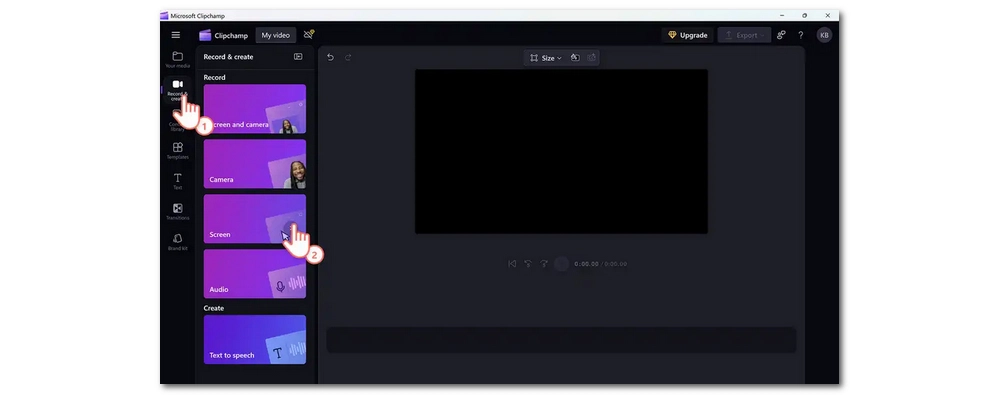
Additionally, the default video editor Clipchamp pre-installed on Windows 11 also includes a built-in screen recorder that allows you to capture your screen, webcam, and microphone. Here is how.
Step 1: Search for Clipchamp in the Start menu and launch it.
Step 2: Click Create a new video.
Step 3: Click Record & create > Screen. Enable the permissions required.
Step 4: Select your microphone if needed. Then click the red record button, select a recording region, and then initiate the recording process.
Step 5: Once finished, click Save and edit. Edit the recording if you want, then click Export to save it to your computer.
📌 Quick Verdict: Use Xbox Game Bar for capturing gaming videos, Snipping Tool if you want to snap quick, short clips of your on-screen activities, and Clipchamp if you want to edit the recording before export.
• Use Steps Recorder (Restricted)
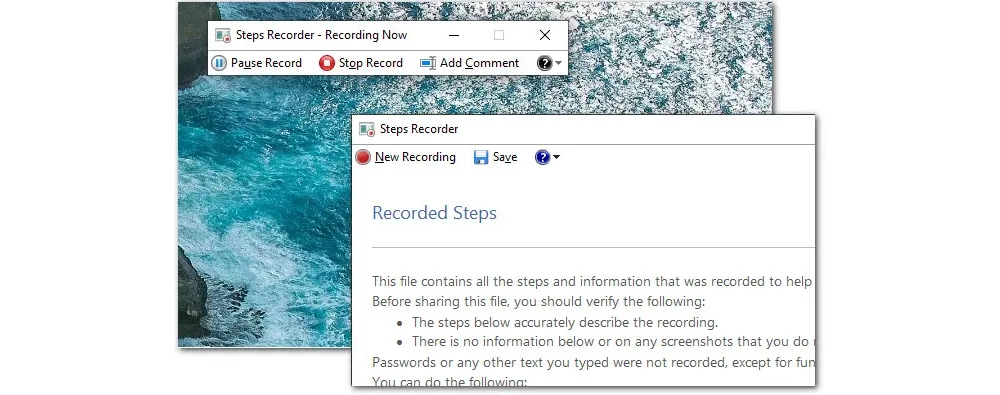
It's important to know that Windows 8 and 7 don't have a built-in video recorder but a tool called Steps Recorder. It takes screenshots of every move you make, along with a description of the actions (like clicking a button or entering text). You can use it to document bugs, errors, or demonstrate tutorial steps.
Step 1: Type 'Steps Recorder' in your Windows start menu to bring it up.
Step 2: Click on the Start Record button to begin recording your actions.
Step 3: Hit Pause Record if you want to pause the process and click Resume Record to continue.
Step 4: Click the Stop Record button when you're finished.
Step 5: Then click the Save button on the top bar. Name the recorded file and choose a file path for the recorded file, which will be saved in an MHT file packed in a zip file.
As a reminder, Steps Recorder cannot produce video screen recordings. It's rather a snapshot tool. If you need to record a video on Windows 8 and 7, you need a professional third-party screen recorder, like the one I'll introduce next.
Third-party screen recorders are recommended for higher-quality recordings on your Windows systems.
Among various options, WonderFox HD Video Converter Factory Pro stands out as a powerful and easy-to-use screen recorder. It can be used as a desktop recorder to capture all activities on the desktop. It can also record any part of your screen, as well as record your voice and the system sounds simultaneously.
With the program, you can record MP4, MKV, MOV or WebM videos. It allows up to 60fps recording and supports hardware encoding. Additionally, you can crop your screen recording or trim and compress it in its built-in video editor. Now, let me show you how to screen record on Windows using this tool.
Download the software to get started:
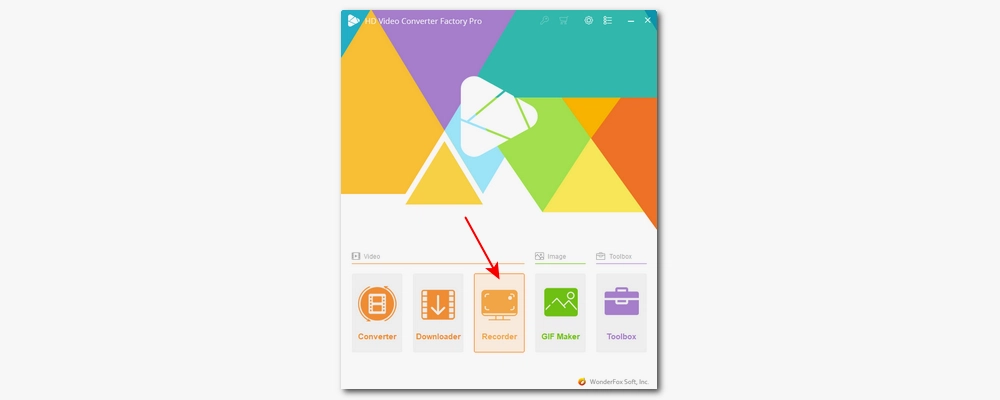
Download and install Download and install HD Video Converter Factory Pro. Then launch the software and open the Recorder program.
In the recording window, you'll see four recording modes: Custom, Full-screen, Game mode, Audio-only. Select your desired mode and confirm the recording area. For example, if you need to record a drawing video, you can use the Custom mode and select the drawing software window to exclude other parts of the desktop.

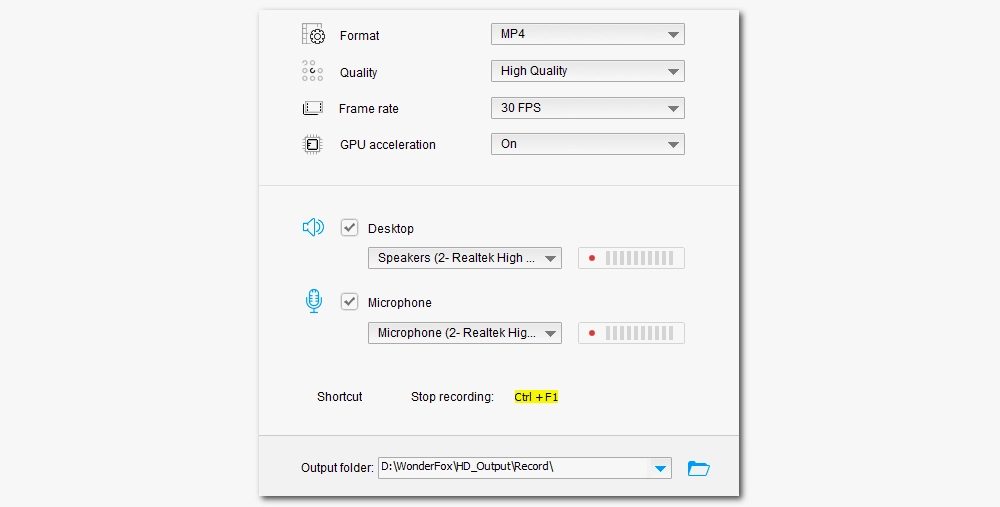
Before recording, customize the output to match your needs:
• Format: MP4 (recommended for compatibility)
• Quality: High
• Frame rate: 30 FPS (standard) or 60 FPS (smoother motion)
• GPU acceleration: On (if supported, for better performance)
Next, select the audio source:
• Desktop – capture system sounds
• Microphone – capture your voice
• Select both if you want to record system audio and microphone simultaneously.
Click the ▼ button at the bottom to set your output folder.
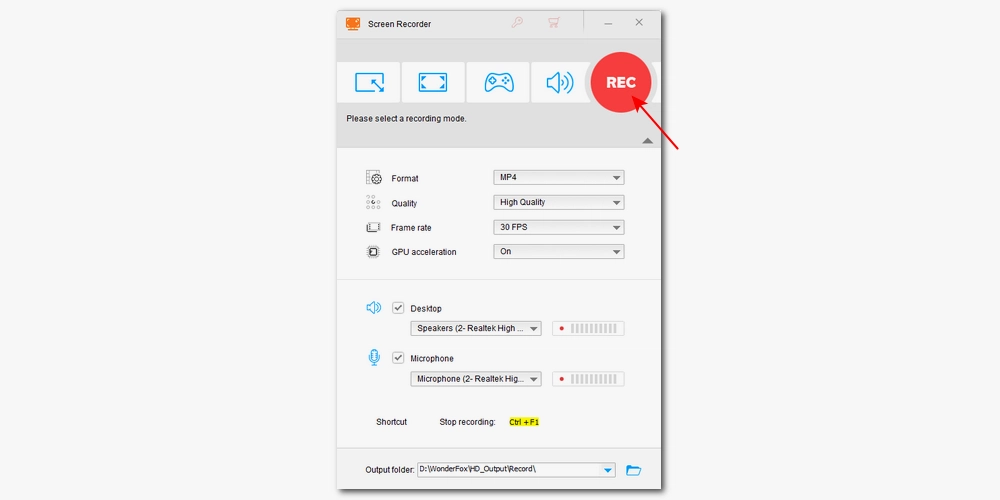
When you're ready, hit the red REC button. After a short five-second countdown, the recording will begin.
To stop recording, press Ctrl + F1 or click the recorder icon. The output folder will pop up automatically, showing your recorded video. From there, you can play, edit, or convert your file with the built-in tools.
🔔 The unregistered version of HD Video Converter Factory Pro lets you record up to 5 sessions. To remove this limit and unlock additional features like batch processing, HD video conversion, and online video downloading, you can upgrade to the full version. Currently, a 50% discount coupon is still available.
Honorable Mention: Fraps
If you're using an older Windows 7 or 8 system and only want to record retro games, try Fraps, a classic, high-quality game recording software. See steps >>
If you want to reduce background noise, try the following:
If you need to record the mic and system audio at the same time, a relatively quiet recording environment can help you reduce noise through the microphone.
Usually, the dynamic microphone is better than other microphones because it's less sensitive to ambient sounds. Also, you can plug a USB mic into your laptop or computer to prevent background noise.
When you record with your mic, you should not be too close or too far from it. You can even use a pop shield for the microphone, which will help maintain a natural speech signal and reduce background noise while recording.
While screen recording is an easy process, it happens from time to time that you may fail to screen record on your device. There are three typical screen recording errors:
• Can't start recording: You may encounter issues like "Recording isn't working error. 0x82323007" or "Recording isn't working error. 0x82323619" using the Windows built-in screen recording tools.
• Screen recording shows a black or green screen: This is most likely due to the content you want to record being protected or a faulty graphics card.
• Screen recording has no audio: The audio input isn't set up correctly.
#1. Select the Correct Audio Input
If you are unable to record system sounds, first ensure that the volume is not muted. If the volume is already on, right-click the speaker icon in the system tray and open "Sound Settings". Then go to "Sound Control Panel" and switch to the "Recording" tab. Right-click in an empty area and select "Show Disabled Devices". Right-click "Stereo Mix" and click "Enable". Right-click "Stereo Mix" again and set it as the default device.
#2. Update Windows and Graphics Drivers
Outdated Windows or graphics drivers might cause screen recording issues. Ensure you have the latest Windows updates and graphics drivers installed by checking for updates in the Settings app and visiting your graphics card manufacturer's website.
#3. Check Privacy Settings
Windows 10 has privacy settings that could prevent screen recording. Go to Settings > Privacy > Microphone and Camera, and make sure the "Allow apps to access your microphone/camera" option is toggled on.
#4. Ensure Sufficient System Resources
Screen recording can be resource-intensive, requiring ample processing power and memory. If your system lacks the necessary resources, it can lead to recording issues. Close any unnecessary applications running in the background and consider upgrading your hardware if needed.
#5. Disable Conflicting Applications
Sometimes, certain applications running concurrently with your screen recording software can interfere with the process. Check for any conflicting applications, such as antivirus software, video players, or virtualization tools. Temporarily disable or close these applications to see if it resolves the issue.
#6. Disable Hardware Acceleration in your Browser Settings
If you get a black screen or green screen when recording online streaming videos, you can try turning off the hardware acceleration option in your browser settings.
In Chrome, you can click the three vertical dots at the top right, go to "Settings" > "System", and toggle off "Use graphics acceleration when available".
💡 If you're experiencing issues with Xbox Game Bar, see this complete guide on how to fix Xbox Game Bar not working.
Screen recording is the process of capturing what is happening on your computer display and saving it as a video file. It can be useful in many scenarios, such as creating tutorials, capturing gameplay, recording presentations, and demonstrating software features.
Screen recording is generally legal for personal use, but it may be subject to restrictions when capturing copyrighted content or sensitive information without permission.
On Windows, you can use third-party software to record screen without Xbox. WonderFox HD Video Converter Factory Pro introduced in this article is a great alternative.
Yes, there are many websites that offer this service. They are convenient, but be careful with privacy, as your video files are often uploaded to their servers.
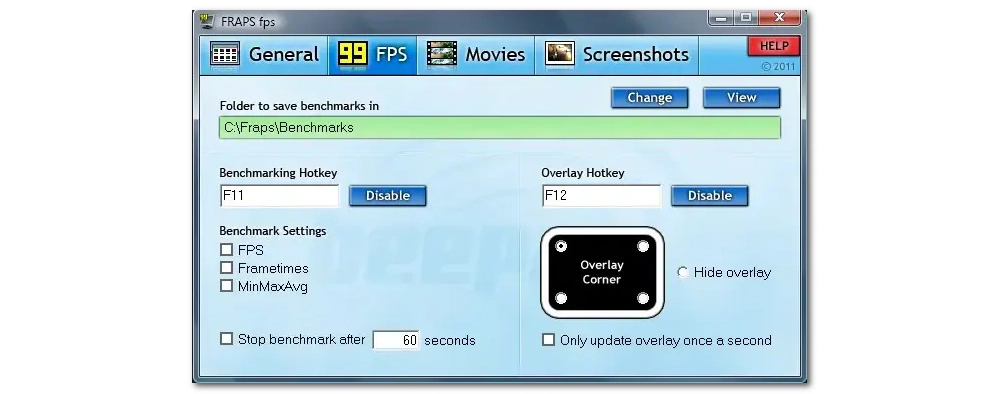
Although Fraps hasn't been updated for years, it's a great choice for recording a video on older Windows versions, such as Windows 7 and 8. It's primarily designed for capturing PC games that use DirectX and OpenGL. It employs a low-compression encoder and makes it possible to produce high-quality recordings up to 7680x4800. But this amazing video quality comes at the cost of large file sizes.
Step 1: Download and install Fraps on your Windows 7 PC.
Step 2: Launch it and click the first "General" tab to tweak the recording settings.
Step 3: Go to the "Movies" option to adjust the hotkeys, FPS, audio source, and other settings.
Step 4: Start your screen activity on Windows 7, like playing a game, and then press the capture hotkey you set before to start recording.

I write about multimedia topics, including video and audio conversion, compression, editing, and downloading. I joined WonderFox in 2020, and my goal is to help readers solve everyday tech problems more easily. In this guide, I have shown you how to screen record on Windows 11, 10, 8, and 7. For a smoother recording experience, it's recommended to use the third-party software.


I write about multimedia topics, including video and audio conversion, compression, editing, and downloading. I joined WonderFox in 2020, and my goal is to help readers solve everyday tech problems more easily. In this guide, I have shown you how to screen record on Windows 11, 10, 8, and 7. For a smoother recording experience, it's recommended to use the third-party software.
WonderFox DVD Ripper Pro
WonderFox DVD Ripper Pro is a professional DVD ripping program that can easily rip any DVD (whether homemade or commercial) to all popular formats, including MP4, MKV, MP3, WAV, H264, H265, Android, iPhone, and so on. It also lets you edit and compress DVD videos efficiently. Download it to enjoy a fast and trouble-free DVD ripping experience.

Privacy Policy | Copyright © 2009-2024 WonderFox Soft, Inc.All Rights Reserved
