

Why can’t I import videos into iMovie? What formats does iMovie support?
Check out this article to learn which video formats you should use in iMovie to ensure the best compatibility.
Whether you’re using a Windows computer, a MacBook, or a mobile phone, you’re sure to find a solution here.
Continue reading for the details now!


iMovie is friendly to videos recorded on Apple devices, but it is not a universal video editor. A file may fail to import because its container, codec, audio track, camera folder structure, or DVD source is not supported. This includes files such as MKV that may contain familiar codecs but still use a container iMovie does not normally import. This guide explains iMovie supported formats first, then shows practical ways to convert DVD and any video for iMovie without turning the page into several repeated tutorials stitched together.
In most cases, iMovie works well with the following video containers and codecs:
However, the file extension alone is not enough. For example, one MP4 may import perfectly while another MP4 fails because it uses an unsupported video or audio codec. Some AVI files can be opened, but many AVI files encoded with DivX, Xvid, Cineform, or unusual audio codecs may still be rejected. Apple also notes that iMovie works with many DV/HDV camcorders, while some formats such as 4:2:2 10-bit H.264 are not supported. So, when you are not sure, convert the video to MP4 or MOV with H.264 video and AAC audio.
What about MKV? iMovie does not normally import the MKV container directly. Even when an MKV file contains H.264 or HEVC video, iMovie may still reject it because of the container or an incompatible audio track. Converting it to MP4 or MOV with H.264 and AAC is the safest solution. If the streams are already compatible, a remux to MP4/MOV can also avoid an unnecessary video re-encode.
For higher-quality editing, you can also use Apple ProRes MOV, but it creates much larger files. HEVC is fine on newer Apple devices, yet H.264 is still the safer option when you need to move the project across older Macs, iPhones, or iPads.
Here are the most common cases behind an iMovie import error:
Before conversion, you can also try updating iMovie and macOS/iOS, importing from the original camera folder instead of a single copied file, or testing the video in QuickTime Player. If the problem remains, transcoding is usually the cleanest fix.
For most users, the best iMovie conversion settings are:
These settings also work well when converting MKV for iMovie. If the MKV contains multiple audio tracks, subtitles, or less common codecs, choose the specific track you need before conversion so the final MP4/MOV stays simple and easy for iMovie to handle.
With the basics clear, you can choose a conversion method depending on where the source video comes from.
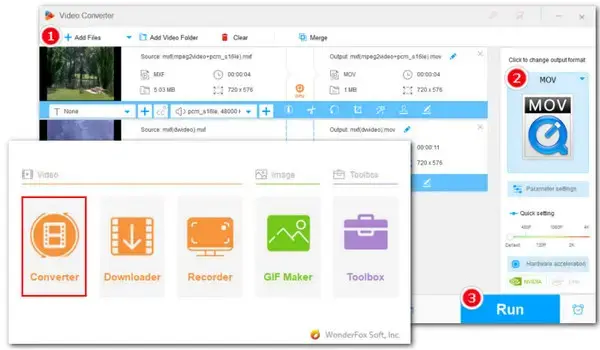
WonderFox HD Video Converter Factory Pro is a beginner-friendly iMovie format converter for Windows. It can convert common videos, camera recordings, downloaded clips, and files that iMovie refuses to import to iMovie-friendly MP4/MOV. It also lets you set H.264, HEVC, MPEG-4, AAC, resolution, frame rate, bitrate, and other parameters. Batch conversion, GPU acceleration, compression, trimming, cropping, rotating, and merging are also available when you need more than a simple format change.
Download and install the converter on your PC. Then follow the steps below:
 Download for Free
Download for Free
Download for Free
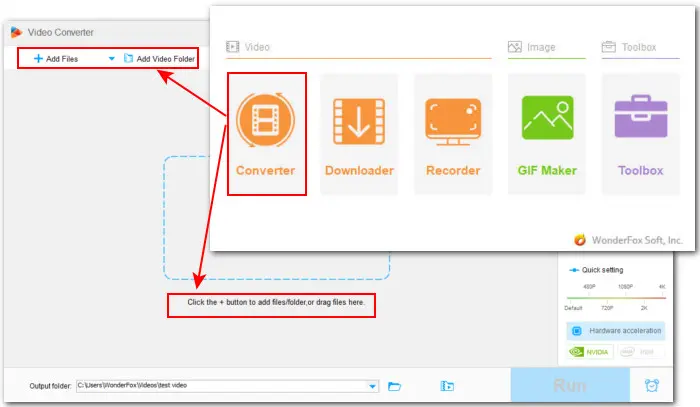
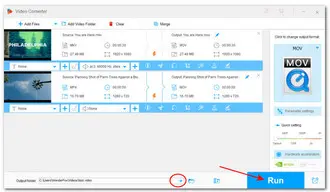
Step 1. Launch the program and open Converter. Click Add Files or drag your video files into the window. You can add common videos, camera clips, downloads, and other files at the same time.
Step 2. Click the format image on the right to open the output profile library. Go to the Apple tab and select "iMovie Video" or "Apple ProRes" profile.
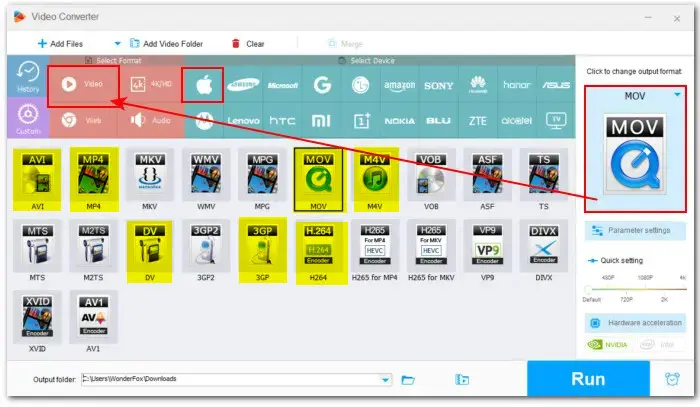
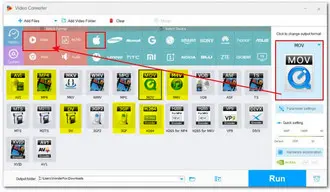
Alternatively, you can also go to the "Video" tab and select MP4 or MOV.
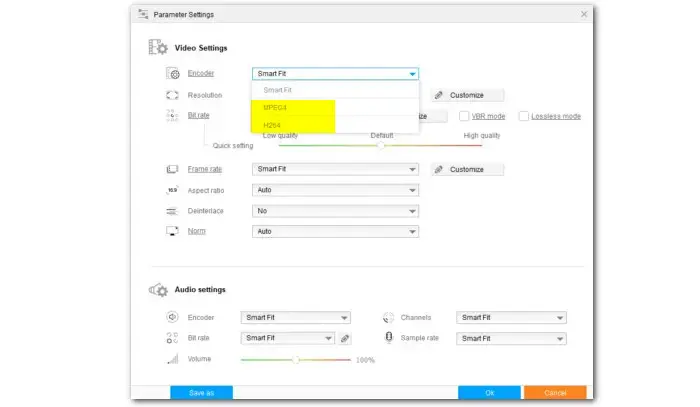
Open Parameter settings. For the safest iMovie import, set Video Encoder to H.264 and Audio Encoder to AAC. For camera footage, keeping the original resolution and frame rate can help preserve the original look.
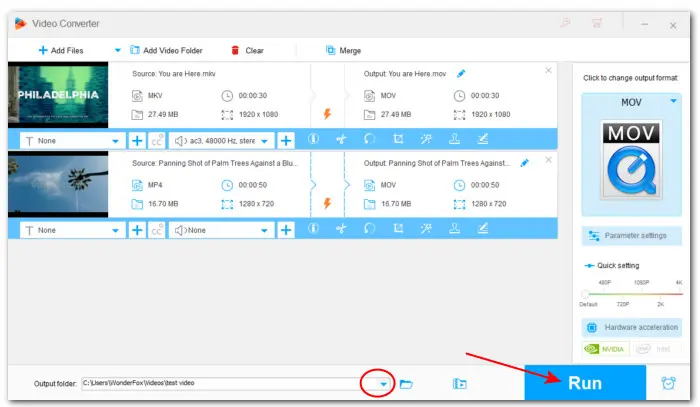
Step 3. Click the inverted triangle button to choose an output folder. Finally, click Run to convert the files. When it finishes, open iMovie and import the converted MP4 or MOV file through File > Import Media.
💡 Note: If your only task is converting a small video file to MP4/MOV, WonderFox Free HD Video Converter Factory is also a workable free option on Windows. Choose the Pro version when you need batch processing, more output control, faster conversion, or 4K/8K workflows.
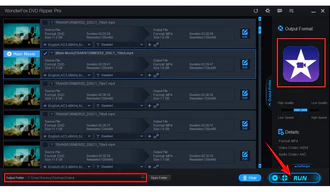
DVD is a different case from normal video files. iMovie cannot read a DVD disc, VIDEO_TS folder, or VOB file directly. To edit DVD movies in iMovie, use WonderFox DVD Ripper Pro to convert the DVD to MP4 or MOV first.
Step 1. Insert the DVD into your DVD drive, open WonderFox DVD Ripper Pro, and click DVD Disc. The program will analyze the disc and mark the main movie title automatically.
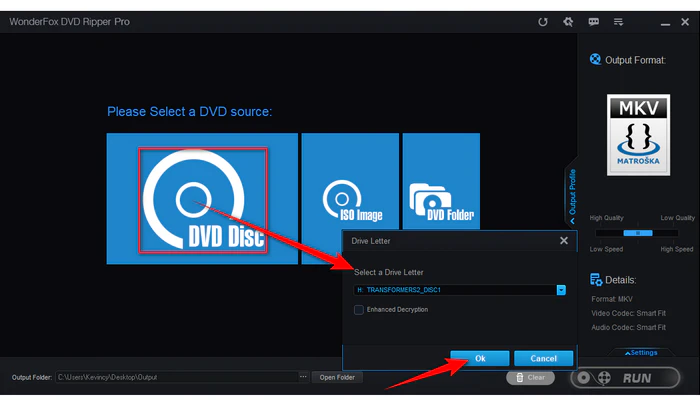
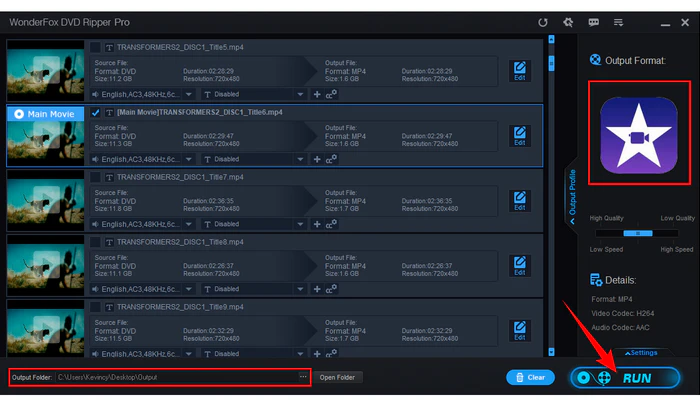
Step 2. Open the output format list and choose an iMovie-friendly profile, such as MP4, MOV, or H.264. You can also adjust resolution, bitrate, frame rate, deinterlacing, subtitles, and audio tracks when needed.
Step 3. Set an output folder and click RUN. After conversion, transfer the ripped video to your Mac and import it into iMovie.
Legal note: only rip DVDs you own or have the right to copy. Do not use DVD ripping tools to redistribute copyrighted content.
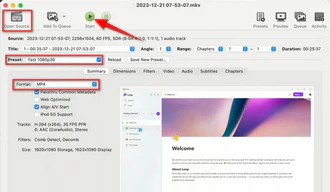
HandBrake is a great tool that's perfect for converting local video files or unprotected DVDs to iMovie-friendly formats. It offers advanced options and customization for video encoding. Let's break down the steps:
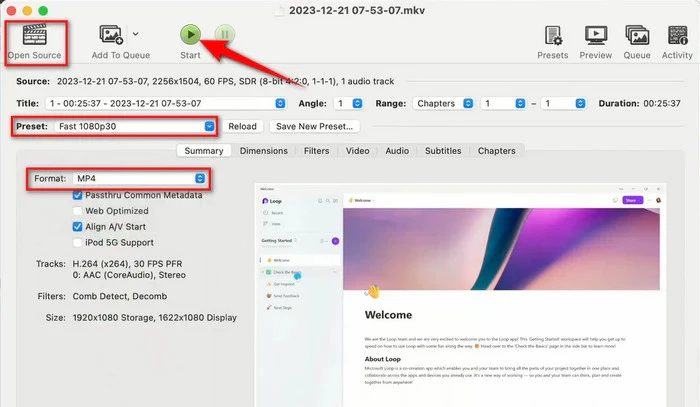
💡 VLC can also convert video files through File > Convert / Stream; choose an MP4/MOV-compatible profile and then import the result into iMovie.
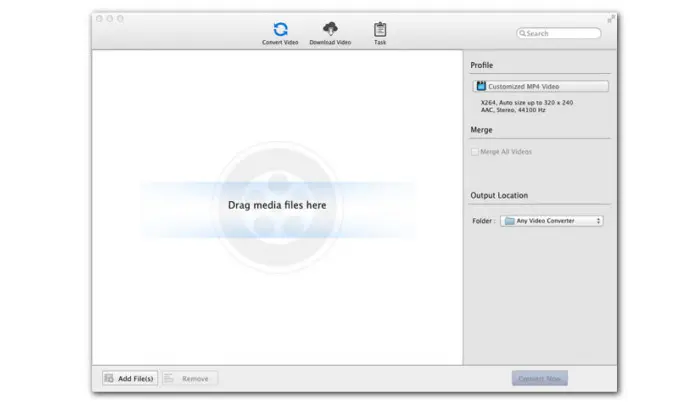
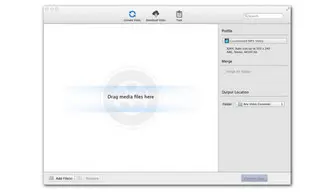
Any Video Converter Free for Mac offers an easy solution to convert your video to MPEG-4 or H.264 MP4 with AAC audio. Besides, this free iMovie format converter also enables you to transcode videos to other iMovie-supported formats including AVI, 3GP, MPEG-2, and DV. Here is a simple how-to guide:
Step 1. Download and install it on your Mac first.
Step 2. Launch the freeware and click on the Convert Video tab.
Step 3. Click Add File(s) to import your video or drag it into the program.
Step 4. From the right Profile drop-down list, choose MP4 as the output container format.
Step 5. Then click the icon next to the output format option to adjust the video and audio codecs to MPEG-4 and AAC.
Step 6. Under the Output Location tabs, check the Folder dropdown list and then click Choose… to set a file destination.
Step 7. Finally, click Convert Now to start the conversion.
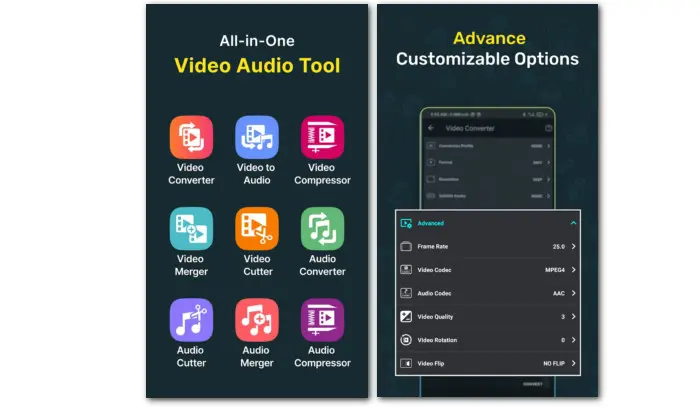
For videos already on an iPhone, iPad, or Android phone, a mobile video converter can help you save the file as MP4 with H.264 and AAC. This is useful when the video was recorded in HEVC but needs to be edited on an older Mac, or when the file was transferred from another device in a less common format.
Video Converter and Compressor is a handy iMovie format converter that can work on both iPhones and Android phones. It supports a wide range of video formats and allows you to quickly convert them to MP4, AVI, 3GP, MOV, and some other iMovie-compatible formats. Also, it enables you to modify the codec, frame rate, resolution, and output quality.
Step 1. Search and then install this converter on your phone from the Google Play Store.
Step 2. Open it and enter the Video Converter tool.
Step 3. Load the video from your folder to the converter.
Step 4. Click CONVERT TO and then expand the Format list to set an iMovie video format.
Step 5. To set the codecs to specific requirements, tap the Advanced slider and head to the Video Codec and Audio Codec options to make a selection.
Step 6. When all settings are ready, click the bottom Convert button to start the conversion process at once.
After that, send the converted video to the device where you edit in iMovie.
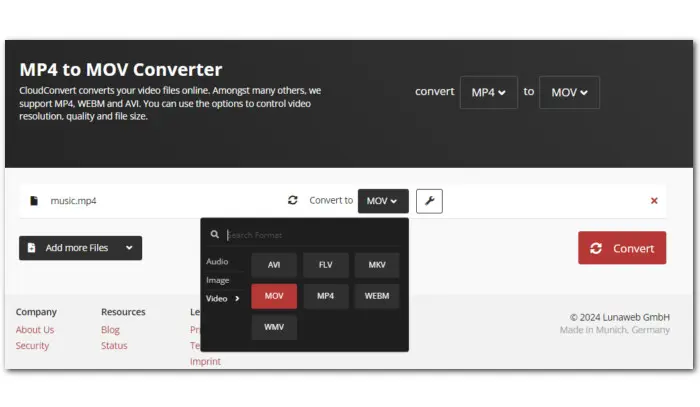
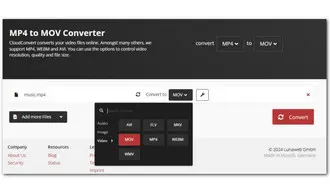
If the file is small and not private, an online video converter such as CloudConvert can be useful. It doesn’t require an account and can be accessed from any internet-connected device. With CloudConvert, you can easily convert videos to MP4 and MOV formats that are compatible with iMovie. It also offers adjustable settings for codec, resolution, FPS, bitrate, and more.
Follow the steps below to convert your video for iMovie free with CloudConvert:
Step 1. Open https://cloudconvert.com/ in your browser on any device.
Step 2. Select and upload your video to it by clicking the Select File button.
Step 3. Click the Convert to box to select MOV or MP4 as the export file format.
Step 4. Hit the settings icon to change the output codecs to MPEG-4 or H.264 for video and AAC for audio.
Step 5. Then click Convert to start converting your video to iMovie-supported format.
Step 6. When the converting process completes, you can download the video to your computer.
Online tools are convenient, but they are not ideal for large camera files, long DVD movies, private videos, or batch conversion because of upload speed, file size limits, and privacy concerns.
Converting videos to iMovie-supported formats is essential for easy importing and editing. But what about exporting files in iMovie? Which export formats does iMovie support?
Once you have finished editing your iMovie project, you need to export it. To do so, click the upper-right share icon, or go to File > Share. Here you’ll see all available export options.
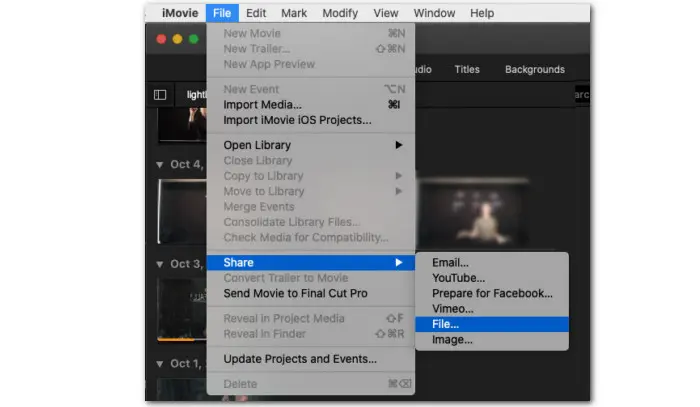
Please note that the Email, YouTube, Facebook, and Vimeo options do not provide direct access to sharing files on these platforms. Instead, these options create files on your device, and you will have to upload them later using the respective websites. Additionally, these options offer limited settings.
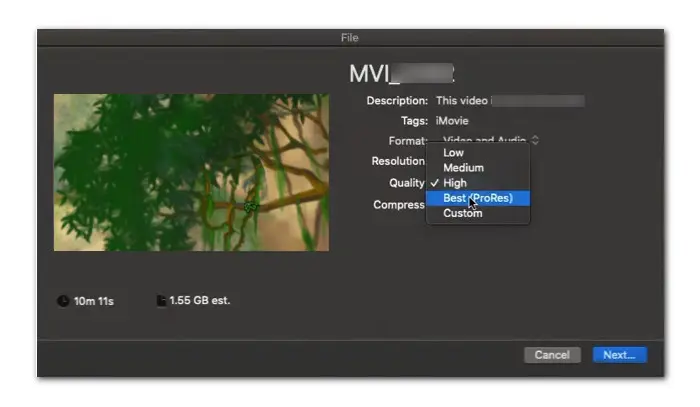
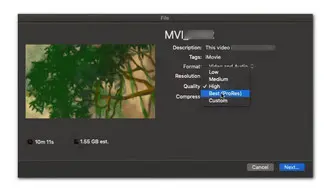
To have full control over your export, you can choose the last File option, which allows you to export iMovie videos as MOV or MP4. In the pop-up dialog box, you can change the file’s Title, Description, Tags, Format, Resolution, Quality, and Compress.
To save iMovie to MP4, you need to select Low, Medium, High, or Custom in the Quality dropdown list. For the best output quality, you can choose the ProRes option and the export will be saved as an MOV file.
Q1. What is the best video format for iMovie?
MP4 or MOV with H.264 video and AAC audio is the safest choice for most iMovie projects. Use ProRes MOV if you need a higher-quality intermediate file for further editing.
Q2. Why does iMovie reject some MP4 or MOV files?
Because MP4 and MOV are only containers. If the internal video or audio codec is not supported, iMovie may still reject the file. Re-encode it to H.264 video and AAC audio, then try importing again.
Q3. Does iMovie support MKV files?
Not as a normal import container. An MKV can contain iMovie-friendly codecs such as H.264 or HEVC, but iMovie may still reject the .mkv file itself or an unsupported audio track inside it. Convert or remux the file to MP4/MOV; H.264 with AAC is the safest combination.
Q4. Can iMovie import camera files?
Sometimes. iMovie may accept AVCHD and other camera recordings when imported from a complete camera archive, but loose clips, broken folder structures, or unsupported encodings may fail. Converting the footage to MP4/MOV is usually easier.
Q5. Can iMovie convert a DVD to MP4?
No. iMovie is a video editor, not a DVD ripper. You need to digitize the DVD with a DVD ripper first, then import the converted video into iMovie.
Q6. Will converting video for iMovie reduce quality?
Any re-encoding can change quality. To minimize loss, keep the original resolution and frame rate, use a reasonable bitrate or quality setting, and avoid converting the same file repeatedly. If an MKV already contains compatible video and audio streams, remuxing instead of re-encoding can preserve the original streams.
iMovie works best with MP4/MOV files encoded with H.264 video and AAC audio. When you cannot import an MKV, DVD, camera recording, downloaded video, or another local file, the quickest solution is usually to convert it to an iMovie-friendly format first. Use WonderFox HD Video Converter Factory Pro for regular videos on Windows, WonderFox DVD Ripper Pro for DVD sources, and HandBrake, VLC, or an online converter for lighter Mac or browser-based tasks.

Kevincy joined the WonderFox team in 2014 and has been a senior columnist ever since. With over two decades of experience in the video editing industry, he shares tutorials, tips, and how-to guides on video/audio processing and personal DVD backups. Family-oriented and passionate about helping others, he is dedicated to making video and audio processing easier for readers.


Kevincy joined the WonderFox team in 2014 and has been a senior columnist ever since. With over two decades of experience in the video editing industry, he shares tutorials, tips, and how-to guides on video/audio processing and personal DVD backups. Family-oriented and passionate about helping others, he is dedicated to making video and audio processing easier for readers.
 Download for Free
Download for Free
Download for Free

Terms and Conditions | Privacy Policy | License Agreement | Copyright © 2009-2026 WonderFox Soft, Inc. All Rights Reserved