



There are many reasons to make a video silent: you may want to add a new voice-over, replace background music, remove a private conversation, or discard an unwanted language or commentary track. The good news is that you do not need a complicated workflow for most videos. This guide covers practical ways to remove or mute audio from video on Windows, Mac, iPhone, Android, YouTube, Canva, Premiere Pro, and online. Formats such as MP4, MOV, WebM, AVI, and MKV can usually be handled by the same method as long as the tool supports the video codec inside the file. There are also separate notes below for YouTube uploads and for the harder case where you want to remove background music but keep speech.
The two results may sound the same, but the workflow can be different.
If you only need a silent clip for sharing or further editing, either approach is fine. If you want to discard an unwanted track from a multi-audio video, avoid carrying private audio, or keep a truly video-only file, choose a tool that lets you remove or deselect the audio track.
Windows users have several easy choices. Clipchamp is Microsoft's current video editor and is convenient for a quick mute. WonderFox Free HD Video Converter Factory is useful when you need broader format support or want to deselect an audio track. VLC is another free option if you already have it installed.
Microsoft now recommends Clipchamp as its video editor for Windows. It comes pre-installed on Windows 11, can be installed on Windows 10, and also has a browser version for Edge and Chrome. The free personal tier can export up to 1080p, while 4K export requires an eligible Microsoft 365 subscription or Clipchamp Premium.
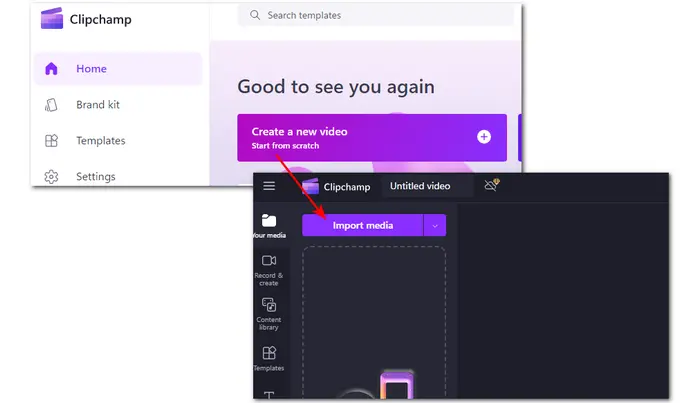
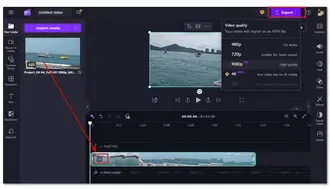
Step 1. Search for "Clipchamp" in Windows, or open the web editor in Microsoft Edge or Google Chrome.
Step 2. Choose "Create a new video" and click "Import media" to add your clip.
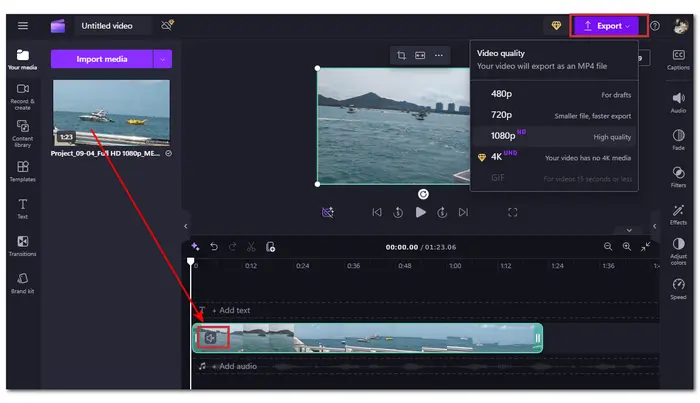
Step 3. Drag the video to the timeline. Select the clip and use the speaker/volume control to mute its audio.
Step 4. Click "Export" and choose a resolution. Clipchamp exports finished videos as MP4, so use another method below if you need to keep a different container format.
The previous Video Editor option is no longer included in the current Windows Photos app. If an older Windows 10 installation still has the legacy editor, its old volume-control workflow may continue to work, but it is no longer the recommended Windows method. Microsoft points users to Clipchamp instead.
WonderFox Free HD Video Converter Factory is a free Windows video converter and editor with no watermark. It is a practical choice when an editor rejects your source file or when you want direct control over the audio track. It handles mainstream video formats and codecs and can output common containers such as MP4, MOV, MKV, and AVI. You can also queue multiple files for conversion and use its basic trim, crop, rotate, merge, and audio tools.
Download the program and follow these steps:
 Download for Free
Download for Free
Download for Free
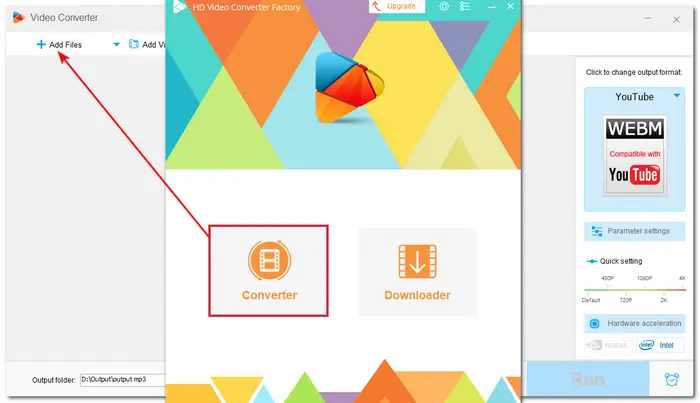
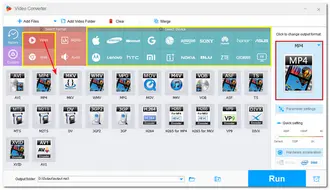
Step 1. Launch the app and open the "Converter" module. Click "+ Add Files" to import your video.
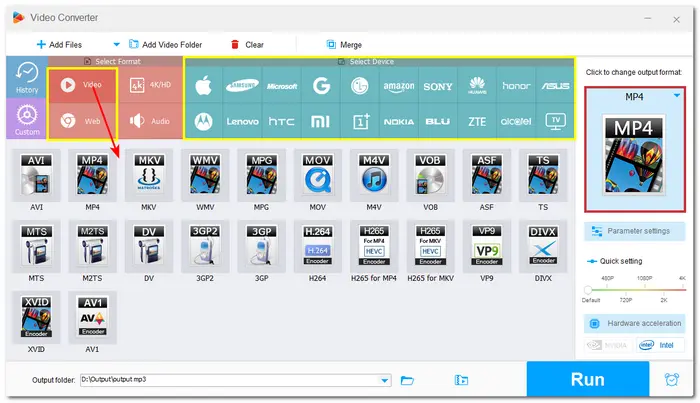
Step 2 (Optional). Open the output format list and choose the format or device profile you need. If there is no reason to change formats, use a suitable profile close to your source and keep the video settings appropriate for your project.
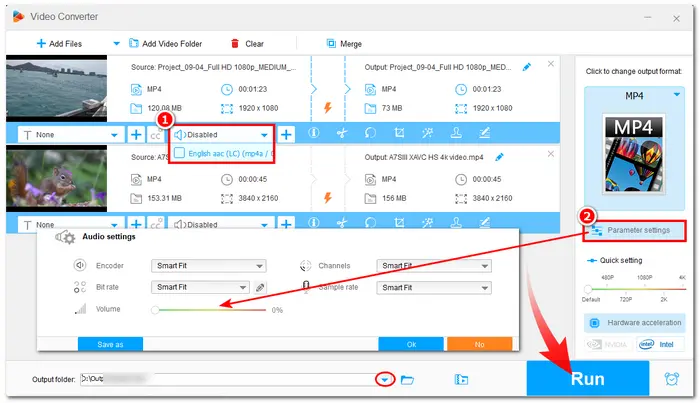
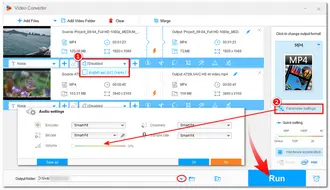
Step 3. Remove or mute the audio.
Step 4. Choose an output folder and click "Run".
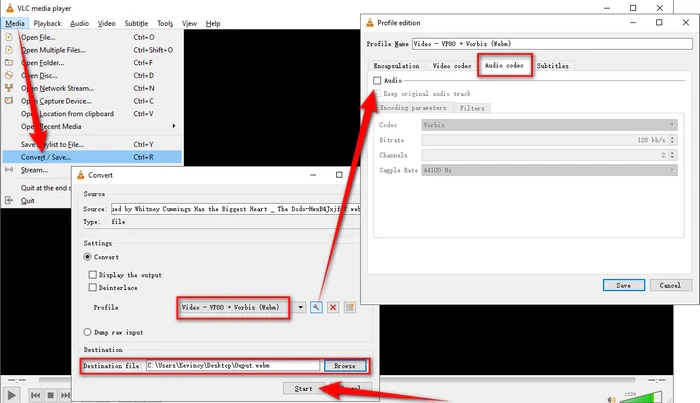
VLC is more than a media player. Its conversion workflow can create a new copy of a video without an audio stream. This is useful for common files such as MP4, WebM, MOV, or AVI, although the exact result depends on the output profile, video codec, and container you choose.
On Windows or Linux:
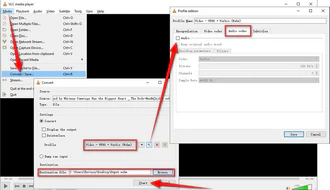
Step 1. Open VLC and go to "Media" > "Convert / Save". Add your video and click "Convert / Save" again.
Step 2. Choose a suitable conversion profile, then click the wrench icon to edit the profile.
Step 3. Open the "Audio codec" tab and disable the audio option. Save the profile settings.
Step 4. Set the destination file and click "Start".
On macOS: open "File" > "Convert / Stream", add the video, choose or customize a profile, disable audio in the Audio Codec settings, and save the result as a new file.
Tip: VLC's normal speaker/mute control only silences playback. It does not change the source file. Use Convert/Save or Convert/Stream when you need a permanently silent copy.
On a Mac, iMovie is better when you want to continue editing after removing the sound, while QuickTime Player is the faster choice when you simply want a video-only copy.
iMovie is Apple's free video editor for Mac and can detach the audio from a video clip so you can delete or edit it separately. If iMovie is not installed, you can get it from the App Store.
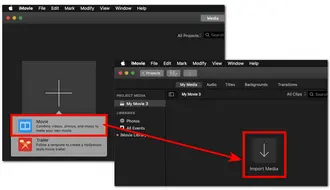
Step 1. Launch iMovie and click "Create New" > "Movie". Then choose "Import Media" to add your video.
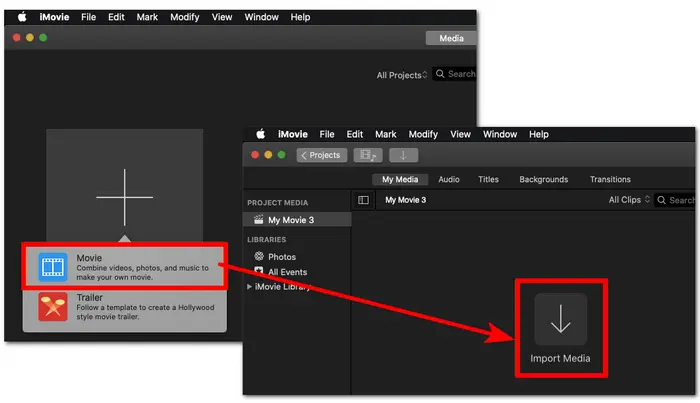
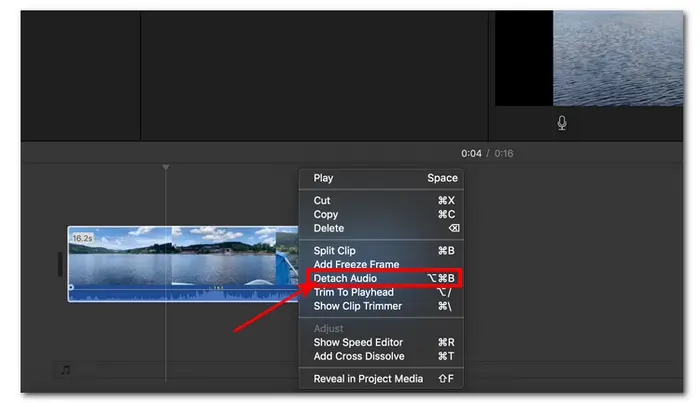
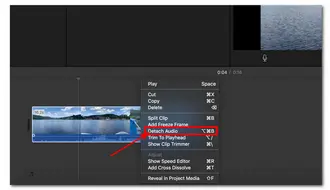
Step 2. Drag the video to the timeline. Select the clip and choose "Modify" > "Detach Audio" (or right-click the clip and choose the detach option).
Step 3. Select the separated audio clip below the video and press "Delete".
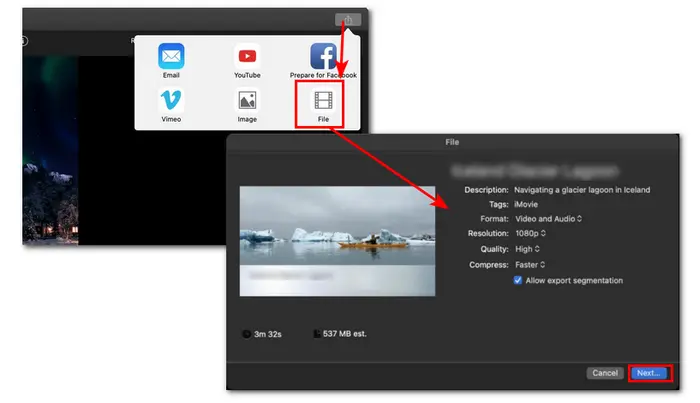
Step 4. Continue editing if needed. When finished, click the share icon, choose "Export File", adjust the export settings, and save the new video.
QuickTime Player is built into macOS and has a direct command for creating a video-only file. It is a good choice when you do not need a full editor.
Step 1. Open the video in QuickTime Player.
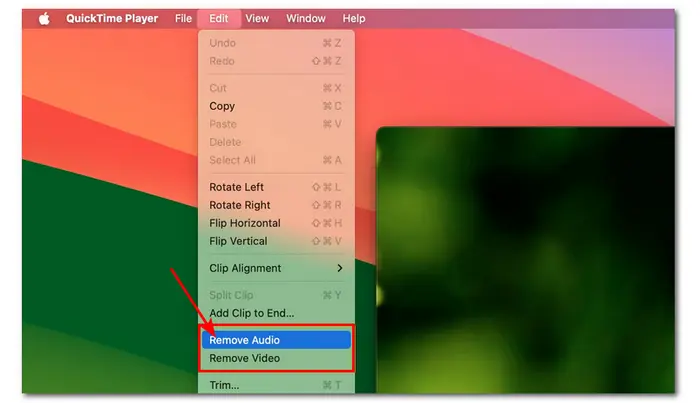
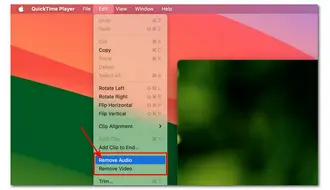
Step 2. Choose "Edit" > "Remove Audio". The open document is now video-only.
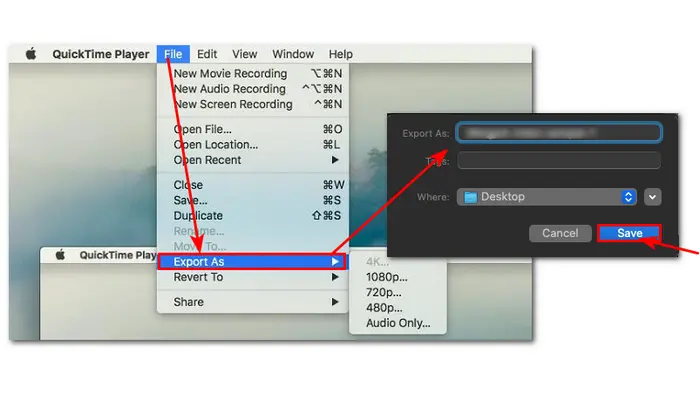
Step 3. Use the File menu to save or export the edited video to a new file.
For a reliable way to remove the sound on iPhone, use iMovie. It can either mute the clip or detach its audio so you can delete the audio portion separately.
Step 1. Open iMovie, create a Movie project, and add the video to the timeline.
Step 2. Tap the video clip, choose the Actions button, and tap "Detach". A separate audio clip appears below the video.
Step 3. Select the detached audio clip and delete it. If you only need silence, you can instead open the Audio control for the video clip and tap the Mute button.
Step 4. Tap "Done" and share or save the finished video.
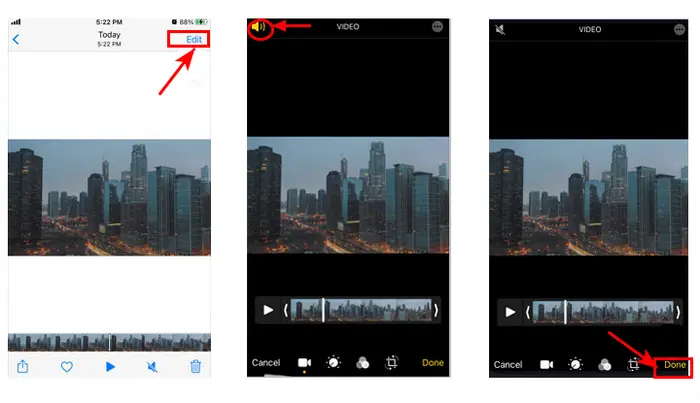
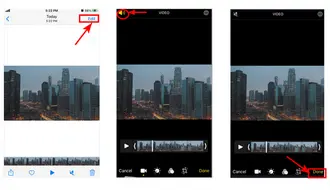
Some iOS versions and iPhone models expose a speaker or audio control when you edit a regular video in Photos. If that control appears, tap it to mute the clip and then tap "Done". The exact Photos controls can vary by iOS version and video type, so use iMovie above if you do not see a mute option.
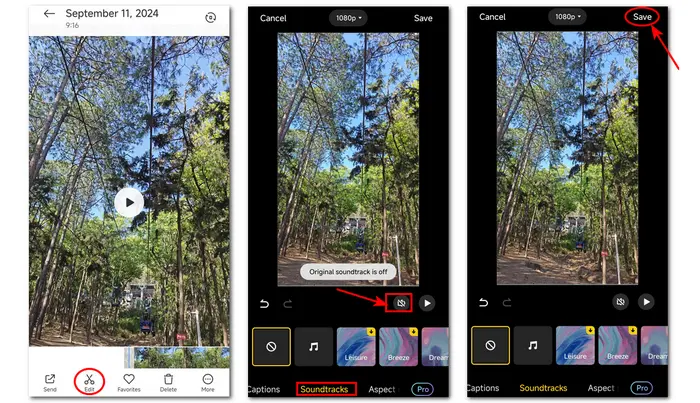
Most Android phones provide basic video controls in the Gallery, Photos, or manufacturer-provided editor. The labels differ across Samsung, Google Pixel, Xiaomi, and other devices, but the usual workflow is similar.
Step 1. Open the video in your Gallery or Photos app and tap "Edit".
Step 2. Look for a speaker, volume, audio, or soundtrack control and set the original video sound to mute or 0.
Step 3. Save the edit or save a copy. If your built-in editor has no audio control, use a mobile editor such as Canva or transfer the video to a desktop tool above.
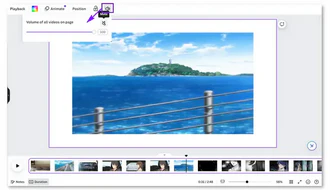
If your video is already part of a Canva project, there is no need to move it to a separate editor. Canva can mute a portion or the entire clip on desktop, iPhone, and Android, and you can add a replacement soundtrack afterward if needed.
Step 1. Open a video design in Canva and upload your clip, then place it on the timeline.
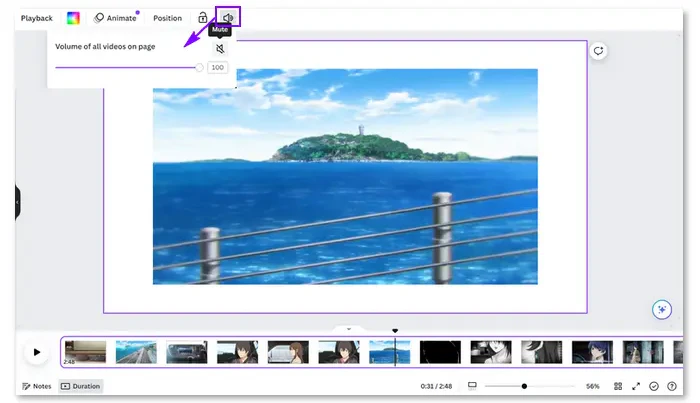
Step 2. Select the video. Open the speaker/volume control and drag the volume to 0 or click the mute icon.
Step 3. Add a new music or voice track if needed, then use "Share" > "Download" to export the finished video.
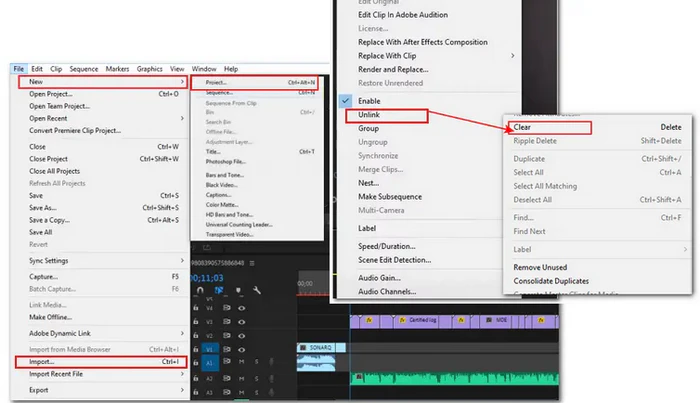
Premiere Pro is not a free audio remover, so it makes the most sense if you are already editing a project there. It gives you precise control over linked video and audio clips, and removing audio from the sequence does not delete the original source media.
Step 1. Import the video and drag it to the Timeline.
Step 2. Select the linked clip and choose "Clip" > "Unlink". Alternatively, hold Alt on Windows or Option on macOS and click only the audio portion of a linked clip.
Step 3. Select the audio clip on the Timeline and press "Delete".
Step 4. Continue editing or export the sequence with the video settings you need.
Online tools are convenient when you do not want to install software. They are best for small, non-sensitive files because the video must be uploaded to a website. File-size limits and retention policies can also change, so check the service before uploading important footage.
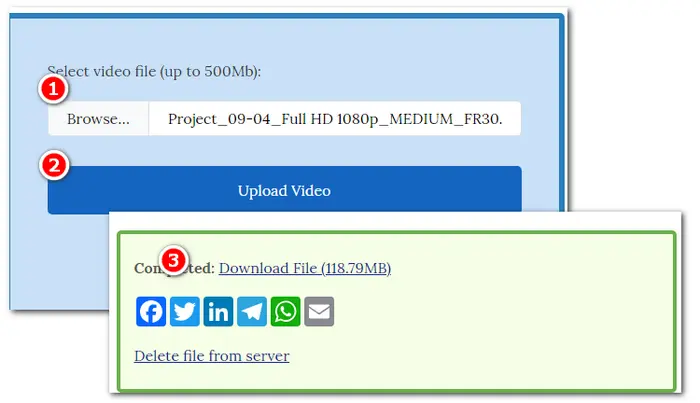
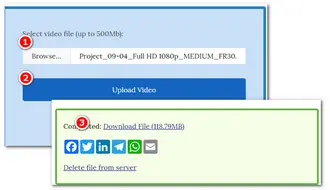
AudioRemover is a simple browser tool that removes the audio from a video without re-encoding the video stream. At the time of writing, its site accepts files up to 500 MB and lists common formats such as MP4, AVI, WMV, and MOV.
Step 1. Visit AudioRemover.com.
Step 2. Click "Browse", choose your video, and click "Upload Video".
Step 3. When processing is complete, download the video-only file. The service states that uploaded files are removed from its server after a few hours.
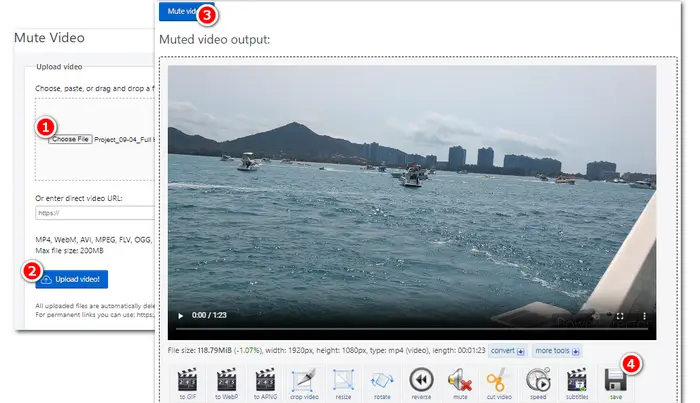
Ezgif has a dedicated Mute Video tool that strips the soundtrack from many common video containers, including MP4, WebM, AVI, MKV, MOV, and others. Its current upload limit is 200 MB, and the site says uploaded files are deleted after one hour.
Step 1. Open Ezgif's "Mute video" tool and choose your file.
Step 2. Upload the video and click "Mute video!" after it finishes loading.
Step 3. Save the processed video to your device.
The best method depends on whether the video is still on your device, has already been uploaded to your channel, or you only want silence while watching it.
Before uploading: remove or mute the audio with any suitable editor above, then upload the silent copy to YouTube. This gives you the most control and is the simplest option when you want the entire video to have no sound.
After uploading: YouTube Studio does not provide a general "remove all original audio" button for every published video. However, if a Content ID claim is attached to music in your video, YouTube may offer "Erase song" or "Mute all sound in the claimed segments" under the copyright-claim actions. The first option attempts to remove the claimed song while keeping other audio such as speech; the second silences all audio in the claimed portion. These options apply to claimed content, not as a universal audio-removal tool for any upload.
Also note that changes saved in YouTube Studio Editor cannot be reverted to the original version through the old restore function since June 2025, so preview carefully before saving. See YouTube Help for the current copyright-editing options.
During playback: clicking the speaker icon in the YouTube player only mutes what you hear. It does not edit or remove the video's audio track.
This is different from making the whole video silent. If the music and speech are on separate tracks, simply mute or delete the music track in a timeline editor and keep the voice track.
If the music and voice have already been mixed into one audio track, a normal audio remover cannot tell them apart. You need a source-separation or stem-separation tool that analyzes the mix and tries to isolate speech/vocals from the instrumental background. The result is an estimate, so complicated mixes can leave music residue, metallic artifacts, or damaged speech.
Audacity is one possible desktop route, but starting with Audacity 3.5, the former "Vocal Reduction and Isolation" effect is no longer included by default. Audacity now points users toward optional AI music-separation plug-ins on supported setups. Because plug-in compatibility can change between Audacity releases, check the current Audacity instructions before relying on that workflow. You can also use an old version to complete the job.
Media.io is an online video editor that offers many advanced and basic video editing features. It can separate the background music and voice from video and audio with its AI Vocal Remover feature. The uploaded video files can be separated into drum and non-drum audio files using its Vocals & Background Music Mode.
VocalRemover.org is another popular online AI-based vocal remover that supports separating the vocal and music from video and audio files. It also supports many other features like cutting, joining, recording, splitting, etc. It is totally free to use and can export the file in MP3 or WAV formats.
After separation, export the isolated voice and replace the original soundtrack in your video editor. If clean speech is important, the best result still comes from the original project files where dialogue and music exist as separate tracks.
Not always. Muting sets the audible volume to zero, while removing the audio track deletes or excludes that stream from the output. Both produce a silent video, but true track removal is better when you do not want the original audio carried in the file.
Yes, if the software exposes the individual audio tracks. For example, WonderFox Free HD Video Converter Factory lets you choose the soundtrack associated with the output. A simple mute control in Clipchamp, Canva, or a phone editor is intended to silence the clip and is not the best choice for selectively keeping one language or commentary track while removing another.
Microsoft no longer includes the previous Video Editor option in the current Photos app and recommends Clipchamp instead. Clipchamp comes pre-installed on Windows 11 and is available for Windows 10 through the Microsoft Store.
It depends on the tool. A workflow that only strips the audio while copying the original video stream can keep the video data unchanged. A video editor that exports a new file may re-encode the video, so the output quality then depends on the resolution, codec, bitrate, and other export settings you choose.
Sometimes, but not perfectly in every video. If speech and music are mixed into one soundtrack, you need AI or stem separation rather than a normal mute/remove-audio command. YouTube's Erase song feature may also be available for some Content ID claims, but it is specifically a claim-resolution tool and may not successfully isolate every song.
There is no single best audio-removal method for every situation. Clipchamp is convenient on current Windows PCs; QuickTime Player is especially simple on Mac; iMovie offers true audio detaching on Apple devices; built-in mobile editors are fine for quick muting; and Canva or Premiere Pro make sense when your project is already there. VLC works when you are comfortable with conversion profiles, while WonderFox Free HD Video Converter Factory is useful when you want straightforward track selection and broader format support.
Before exporting, decide whether you only need silence, need the audio stream removed, or want to separate background music from speech. Those are three different jobs. For YouTube, editing the local file before upload gives you the most control; YouTube Studio's audio-removal options are mainly tied to eligible copyright claims.

Kevincy joined the WonderFox team in 2014 and has been a senior columnist ever since. With over two decades of experience in the video editing industry, he shares tutorials, tips, and how-to guides on video/audio processing and personal DVD backups. Family-oriented and passionate about helping others, he is dedicated to making video and audio processing easier for readers.


Kevincy joined the WonderFox team in 2014 and has been a senior columnist ever since. With over two decades of experience in the video editing industry, he shares tutorials, tips, and how-to guides on video/audio processing and personal DVD backups. Family-oriented and passionate about helping others, he is dedicated to making video and audio processing easier for readers.
WonderFox DVD Ripper Pro
WonderFox DVD Ripper Pro is a professional DVD ripping program that can easily rip any DVD, be it homemade or commercial, to all popular formats including MP4, MKV, MP3, WAV, H264, H265, Android, iPhone, etc. without a hitch. It also lets you edit and compress DVD videos at high efficiency. Download it to enjoy fast and trouble-free DVD ripping experience.
Download for Free
Download for Free

Terms and Conditions | Privacy Policy | License Agreement | Copyright © 2009-2026 WonderFox Soft, Inc. All Rights Reserved