In the following article, we will learn about seven practical volume normalizers for Windows 10 and Windows 11. Whether you want to make songs in a playlist play at a similar level, fix a too-quiet video, or normalize WAV, MP3, FLAC, MP4, and other files, you can find a suitable tool below.
Note: Windows 10 support ended on October 14, 2025, but Windows 10 PCs can still run. The tools introduced below are still useful for Windows 10 users, and most of them also work on Windows 11.
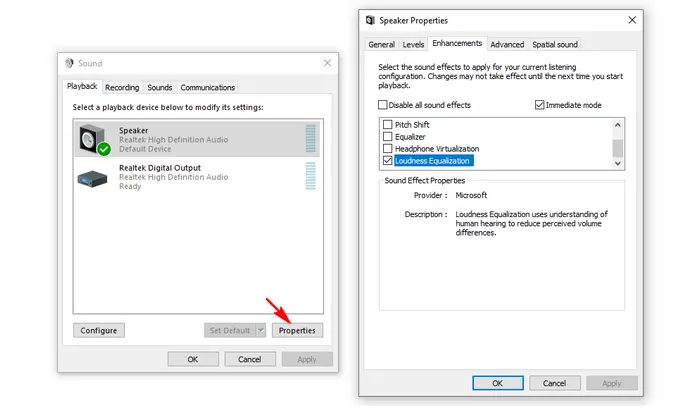
Besides using a sound normalizer app, you can also try the built-in Loudness Equalization feature on some Windows PCs. It does not permanently change your audio files. Instead, it adjusts playback output so that louder and quieter sounds are closer to an average level.
• Right-click on the speaker icon on your Windows computer and select Sounds.
• Go to Playback, choose the default speaker, and click Properties.
• Switch to the Enhancements tab, find Loudness Equalization, and check it if available.
• Click OK to save the change.
This option is not available on every device or audio driver. If you want to permanently normalize audio files, or process WAV, MP3, FLAC, M4A, video soundtracks, and other media files, try one of the tools below.
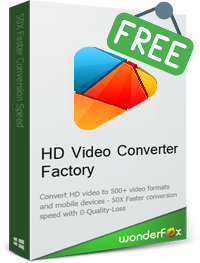
Download Free HD Video Converter Factory to adjust audio/video volume, normalize WAV, MP3, MP4, and more, and change file format in simple clicks.
Official website: https://www.videoconverterfactory.com/free-hd-video-converter/
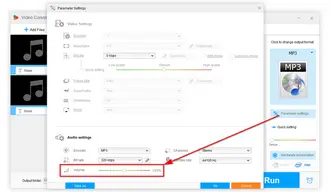
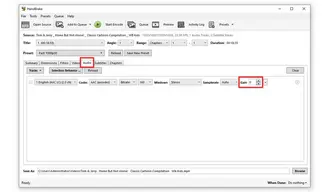
WonderFox Free HD Video Converter Factory is a simple audio and video converter for Windows PCs. It can help you adjust the volume of audio and video files, change audio settings, and export files to common formats.
It is a good choice when you want a straightforward way to normalize volume without learning complicated audio editing terms. You can import a video or audio file, choose an output format, adjust the volume level in the parameter settings, and export the processed file.
The program supports many mainstream audio and video formats, including MP3, WAV, FLAC, M4A, MP4, MOV, MKV, AVI, and more. So, besides general sound normalization, it can also work as a simple WAV normalizer when your WAV recordings or music files play at different loudness levels.
How to normalize volume in Windows with Free HD Video Converter Factory:
Hot Search: Normalize Audio | Normalize FLAC | Normalize MP4 Volume

Official website: https://mp3gain.sourceforge.net/
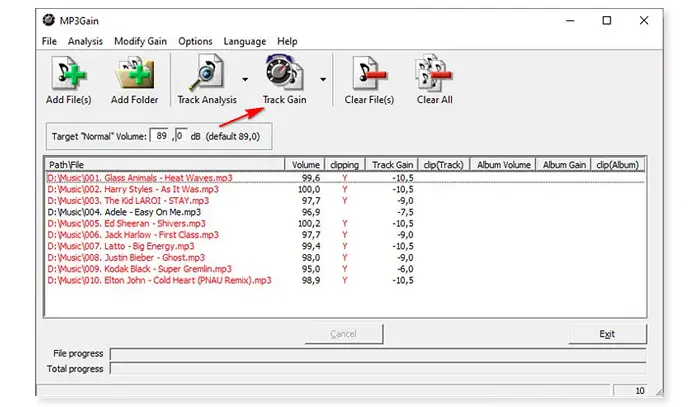
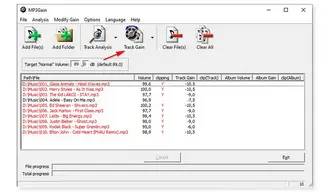
MP3Gain is a free audio normalization tool designed for MP3 files. It can losslessly adjust the volume of single files or a group of MP3 songs so they have a more consistent perceived loudness. It can also analyze how loud a file actually sounds to the human ear.
However, it only accepts MP3. It is not the right tool if you need to normalize WAV, FLAC, M4A, OGG, or video files. For WAV normalization, use WonderFox, Audacity, VLC, AIMP, or another tool below.
To use MP3Gain on Windows, open it and select “Options” > “Filename Display” > “Show File Only”. Then click “Add File(s)” to add your MP3 files. Set the target “Normal” volume and click “Track Gain”. Once done, exit the program.
Official website: https://www.audacityteam.org/
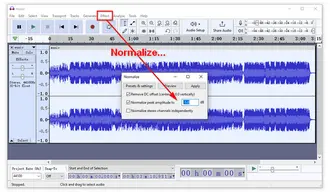
Audacity is a free and open-source audio editor for Windows, macOS, and Linux. It is more advanced than a basic converter, but it gives you more control over how audio is processed.
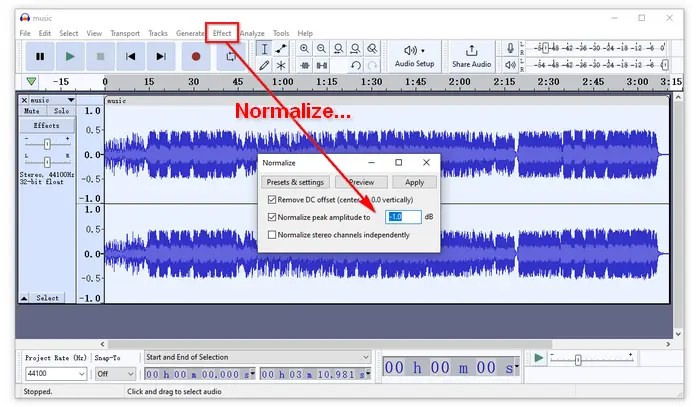
Audacity supports popular audio formats such as WAV, MP3, FLAC, AIFF, M4A, and more. Its “Normalize” effect can help you bring one audio track, multiple tracks, or a selected part of a track to a target peak level. It can also remove DC offset and balance the left and right channels of stereo tracks.
Audacity is a good option if you want to normalize WAV files more precisely. For example, if you have several WAV recordings from the same project but they were recorded at different levels, you can import them into Audacity and normalize them to the same peak amplitude.
To normalize audio in Audacity, click “File” > “Open” to import your audio files. Press “Ctrl + A” to select all tracks, or select the part you want to process. Then go to “Effect” > “Volume and Compression” > “Normalize”. Check “Normalize peak amplitude to” and enter your desired value. The default value is usually around -1 dB, which leaves a little headroom and helps avoid clipping. Finally, click “Apply” and export the normalized audio file.
Note: If the original audio has noticeable background noise, increasing the volume may also make the noise louder. In that case, you may need noise reduction or manual editing before final export.
Official website: https://www.videolan.org/
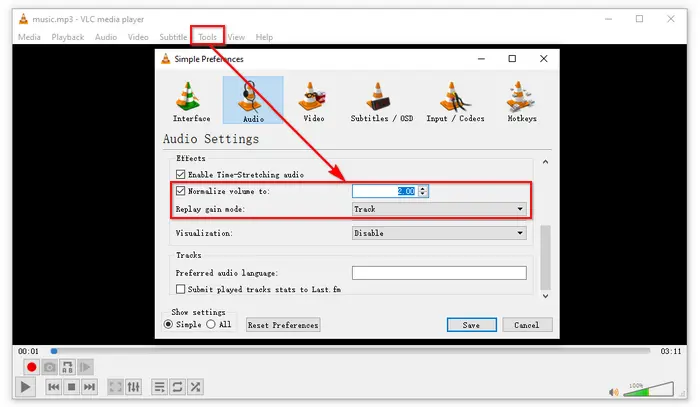
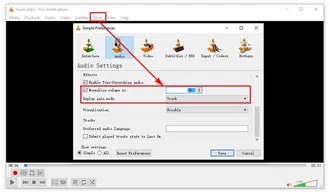
VLC is widely known as a media player, but it also includes many playback and audio settings. You can use VLC to make playback volume more consistent, especially when you are watching videos or listening to audio files in VLC.
Unlike tools that export a newly normalized file, VLC’s normalization feature is mainly for playback. It is useful if you simply want files to sound more even while playing them in VLC, but it is not the best option if you need a permanently processed WAV, MP3, or video file.
To enable volume normalization in VLC, open VLC Media Player, go to “Tools” > “Preferences”, switch to the “Audio” tab, and enable “Normalize volume to”. Save the settings and restart playback if needed.
For WAV files, VLC can help make playback more comfortable. But if you need to export normalized WAV files for a project, Audacity or WonderFox is a better choice.
Official website: https://handbrake.fr/
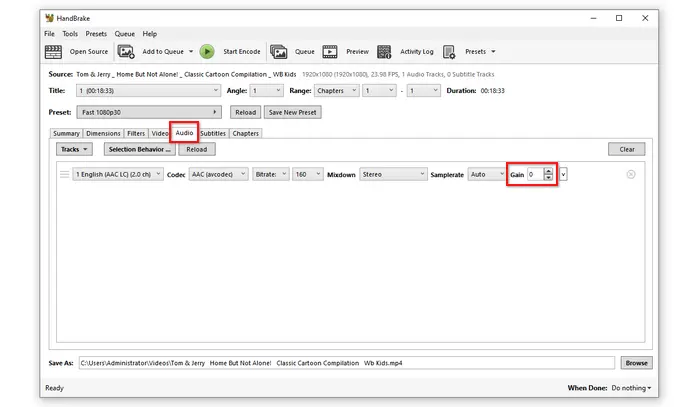
HandBrake is a free and open-source video transcoder. It is mainly used for converting videos, but it also allows you to adjust audio settings during video encoding.
If your problem is a video with sound that is too low or uneven, HandBrake can help you increase audio gain while converting the video to MP4, MKV, MOV, or WebM. It is not designed as a general WAV normalizer, so it is better for video files than standalone audio files.
To adjust audio gain in HandBrake, open the video, choose an output container under the “Summary” tab, go to the “Audio” tab, and change the “Gain” value. Then select an output folder and click “Start Encode”.
HandBrake is useful when you need video conversion and audio adjustment in one workflow, but beginners may find its settings less direct than a simple converter.
Official website: https://www.aimp.ru/
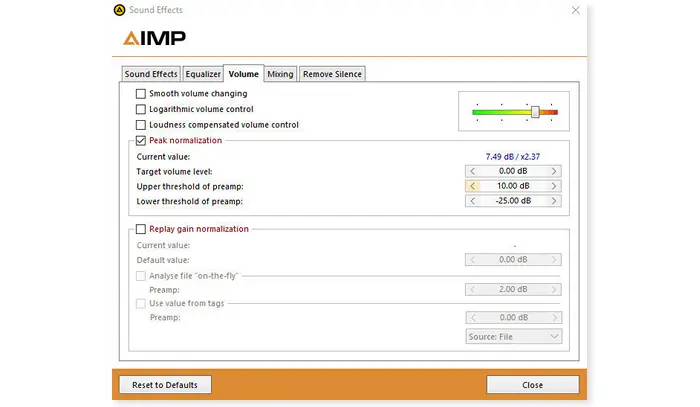
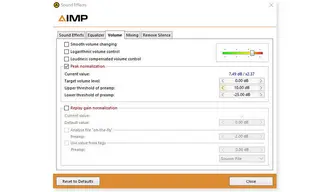
AIMP is a free audio player for Windows and Android. It supports many audio formats, including MP3, AAC, AC3, FLAC, WAV, MIDI, OGG, Vorbis, and more.
AIMP can normalize playback volume using peak normalization or ReplayGain. This makes it useful when you want songs in a playlist to sound more even while listening. Like VLC, it is mainly a playback-side solution rather than a file-exporting normalizer.
To enable volume normalization in AIMP, open the program and go to “Options” > “Sound Effects” > “Volume”. Then enable “Peak normalization” or “Replay gain normalization”. Adjust the value if necessary and close the settings window.
If your goal is only smoother playback, AIMP is convenient. But if you want to create new normalized WAV or MP3 files, use a file-processing tool instead.
Official website: http://kanssoftware.com/index.htm
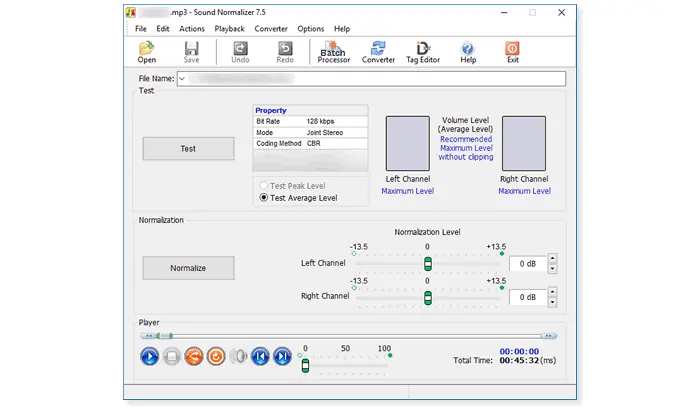
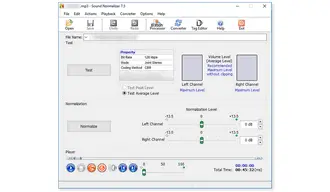
Sound Normalizer by Kanz Software is a Windows program designed to analyze and adjust audio volume. It supports common audio formats such as MP3, MP2, AC3, and PCM. It can also work with WAV-related tasks, including WAV to MP3 conversion and MP3 to WAV conversion.
This tool can analyze the left and right channels and then normalize the sound level. It also includes tag editing features for audio files.
However, Sound Normalizer is not completely free. It offers a trial period, and users need to pay a registration fee to continue using it after the evaluation period. So, it may be worth trying if you specifically like its workflow, but free tools like WonderFox Free HD Video Converter Factory, Audacity, VLC, and AIMP are easier starting points for most users.
For peak normalization, it is usually safer to keep the peak below 0 dB. A common setting is -1 dB, because it leaves a little headroom and helps avoid clipping or distortion.
Yes. You can normalize WAV files with tools like WonderFox Free HD Video Converter Factory, Audacity, VLC, AIMP, and other audio programs. If you want to export a new normalized WAV file, WonderFox and Audacity are more suitable. If you only want WAV files to play at a more even volume, VLC or AIMP can help through playback normalization.
Not exactly. Making audio louder simply increases the volume level. Normalization adjusts audio to a target level, often based on peak amplitude or perceived loudness. If one file has very quiet speech and loud background noise, normalization may raise both the voice and the noise.
Usually no. VLC’s volume normalization is mainly a playback setting. It helps audio sound more even while you are playing files in VLC, but it does not normally create a new normalized audio file.
Yes, REAPER is a powerful audio production tool and can normalize WAV files by peak, RMS, or LUFS. It is suitable for users who work with audio editing, mixing, or mastering. However, REAPER may be too advanced if you only need to quickly normalize a few files. For beginners, Audacity or WonderFox is easier to start with.
Different sound normalizers are suitable for different needs.
If you want an easy way to adjust the volume of audio and video files, WonderFox Free HD Video Converter Factory is a simple choice. It supports common formats and lets you adjust volume while converting files. If you need more detailed audio editing, especially for WAV recordings, Audacity gives you more control. If you only want smoother playback, VLC and AIMP are convenient options. For MP3-only volume matching, MP3Gain is still useful. And if you work with video files, HandBrake can adjust audio gain during conversion.
Choose the tool that matches your actual purpose: playback normalization, permanent file normalization, WAV processing, MP3 gain adjustment, or video audio correction.

Kevincy joined the WonderFox team in 2014 and has been a senior columnist ever since. With over two decades of experience in the video editing industry, he shares tutorials, tips, and how-to guides on video/audio processing and personal DVD backups. Family-oriented and passionate about helping others, he is dedicated to making video and audio processing easier for readers.
![]()
![]()
![]()
![]()
WonderFox HD Video Converter Factory Pro integrates functional tools to help you convert, download, and edit audio & video files with great ease!
Terms and Conditions | Privacy Policy | License Agreement | Copyright © 2009-2026 WonderFox Soft, Inc. All Rights Reserved