


Network Attached Storage (NAS) is a popular storage device where you can store all your digital files and then access them on different devices over the internet. If you own a lot of DVDs, now you have a good opportunity to back up your DVDs for better storage and sharing: Transfer DVDs to NAS drive. Below, I will give you a step-by-step guide on how to rip DVD to NAS using a professional DVD ripping program. If you are interested, please continue reading.
Note: This article focuses on how to transfer DVD to NAS drive from a Windows machine.
It will need a proper DVD ripper to rip DVD to NAS. HandBrake is a nice choice for ripping non-protected home DVDs to MP4 and MKV formats. However, if you have a bunch of store-bought DVDs and wish for more output options, WonderFox DVD Ripper Pro is the better solution. It helps to copy DVDs, both homemade and commercial, to various formats at fast speed and in high quality. Explore more exciting features of this software:
Use WonderFox DVD Ripper Pro to rip all your DVDs (commercial or home-made) to NAS library in lossless quality. Get the best DVD ripper for NAS to digitize DVDs trouble-free!
* Please free download free download the recommended DVD to NAS Ripper and follow the steps below.
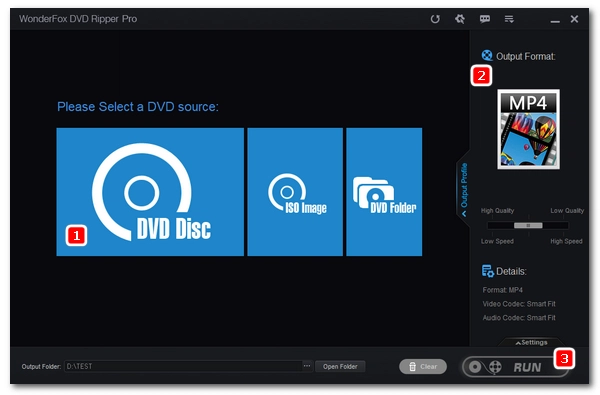
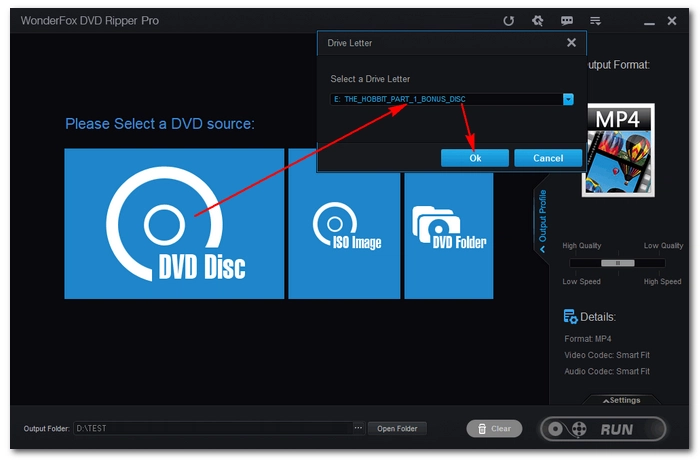
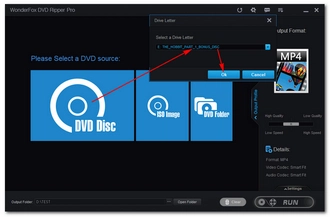
Insert your DVD into your PC’s DVD drive and launch WonderFox DVD Ripper Pro. Next, click DVD Disc to select the DVD you just inserted. Then click OK to load the DVD into the program. You will see the DVD main title is auto-marked after the loading.
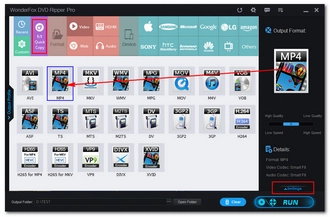
On the right side of the interface, click on the format image to open the output format list. To find the best format to rip DVD for NAS, you can look at the following recommendations.
Tips: You can open the Settings below to adjust video parameters such as encoder, resolution, etc. or let the program smart fit one popular setting for your video.

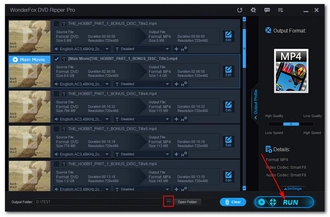
Now, click the three-dot button at the bottom of the interface to set an output folder. Make sure the folder has enough space to hold your converted files. Finally, click the RUN button to start ripping DVD for NAS.

Disclaimer: WonderFox does not advocate any illegal duplication and distribution and all information provided in this article is presented for general informational purposes and personal fair use only. Please refer to the DVD copyright laws in your country before you rip any DVDs. Ripped content CANNOT be used for unauthorized reproduction, distribution or any commercial use.
Now you have ripped DVD files on your computer. It’s time to transfer these files to your NAS drive. Here take Synology as an example.
* Ensure that your QuickConnect ID is enabled.
Step 1. On your NAS, open File Station and select Shared Folder.
Step 2. From your computer File Explorer, select the ripped DVD files and drag-and-drop them to the File Station. The file transfer will process at high speed. You just need to wait, and DSM will notify you when the uploads finish.
The steps are similar to copy DVD to QNAP NAS.
WonderFox HD Video Converter Factory Pro
Terms and Conditions | Privacy Policy | License Agreement | Copyright © 2009-2026 WonderFox Soft, Inc.All Rights Reserved