CBR, 2-pass, CRF/CQ, or CQP? This is the ultimate guide to video rate control, with real test results and a simple rule for picking the right mode to help you achieve the best quality or size.
Four Rate Control Modes in One Place
WonderFox HD Video Converter Factory Pro

You shoot a two-minute clip. It looks sharp on the camera. Then you run it through a converter, and the file comes back at half the size with a side of blockiness. Or you choose the highest quality preset, and the output is bigger than the original.
Why?
The truth lies in the bitrate and how it's allocated by your encoder onto each frame, known as Rate Control.
You can image that bitrate is the budget and rate control is the spending plan. Get the plan right, and a 500 MB file can look better than a 1 GB one. Get it wrong, and you'll pay for pixels you can't see.
In this guide, I'll explain the four fundamental rate control modes: CBR, 2-Pass, CQ/CRF, and CQP, show you the same clip encoded each way, and give you a simple rule for choosing between them.
📌 Tl;dr
• Live streaming? CBR. A steady rate keeps the stream alive.
• Must fit a size limit? 2-pass. It hits the target number and spends where it matters.
• Archiving or building a library? CRF at 50–80%.
• Editing intermediates? CQP 100%.
Generally speaking, Rate Control is the method an encoder (H.264, HEVC/H.265, or AV1) uses to determine how many bits (data) should be distributed to each frame of your video. Some frames are cheap to describe, like a sky, a wall, or a title card. Others are expensive, such as rain, confetti, a camera pan, or an explosion.
There is a good reason why selecting a specific rate control mode is one of the most important decisions when re-encoding a video. Specifically, it defines how your video will look (quality) and how much space it will take (bitrate). When two videos carry the same average bitrate, they may look nothing alike. And if you want your video to look better, be careful of what mode you choose.
Here's the map before the details:
| Mode | What it controls | Encode speed | Size predictability | Best for |
|---|---|---|---|---|
| CBR | A constant data rate | Fast | Very high | Live streaming, broadcast |
| 2-Pass VBR | Quality at a target size | Slow (two passes) | High | Upload limits, high-motion video |
| CRF / CQ | Quality per frame | Fast / very fast (CQ) | Low | Archives, Plex/Emby, 4K movies |
| CQP | A fixed quantizer | Fast | Medium | Editing intermediates, legacy codecs |
The trade-offs:
| Mode | Strengths | Weaknesses |
|---|---|---|
| CBR | Predictable size and bandwidth | Wastes bits on calm scenes; blocks on busy ones |
| 2-Pass VBR | Best quality for a target size | About twice the encoding time; usually CPU-bound |
| CRF / CQ | Excellent quality per megabyte | Size is unpredictable |
| CQP | Consistent, fast, simple | Inefficient; worse quality per megabyte than CRF |
As the name suggests, CBR stands for Constant Bitrate. In this mode, the encoder will invest the same amount of data (bitrate) in each frame, regardless of complexity and motion. In other words, CBR video encoding will deliver a consistent bitrate throughout the whole video file.
The upside is predictability. You know the bandwidth, you know the file size, and a live platform knows what to expect.
The downside shows up in the picture. A calm scene gets more bits than it needs, yet a busy scene gets the same as the calm one and turns to blocks.
When to use this mode? It's best recommended if you want to live stream your video through Twitch, YouTube Live, OBS, or broadcast that can't absorb a variable rate.
2-Pass is one of the Variable Bitrate (VBR) encoding methods. It uses 2 separate passes to encode a video file. The first reads the file and logs where the motion is. Then the second uses that log to render the video around a target bitrate.
Because the encoder has seen the whole file before it starts spending, it can save on the quiet stretches and pay for the hard ones. That's why 2-pass is the mode for a size limit: it lands close to the number you asked for.
The cost is time. Two passes take roughly twice as long, and the work usually falls on the CPU.
This method is suitable for use when there are upload caps, high-motion footage, and disc targets.
CRF stands for Constant Rate Factor. It is a form of perceptual encoding that uses a sophisticated, built-in algorithm to evaluate which areas of the video are important (i.e. details, objects) and which are not (i.e. the background). So you simply choose a quality level, and the encoder spends whatever it takes to hit it. Quiet frames get few bits, busy frames get more, and the final size is whatever it is.
CQ (Constant Quality) is the hardware version, used by NVIDIA NVENC and Intel QSV. It's faster, but it doesn't use the same algorithm, and the same quality percentage won't give you the same file.
CQP stands for Constant Quantization Parameter. Contrary to CRF/CQ, this mode does not use any perceptual-based algorithms. Instead, it applies one quantizer to every block. As a result, CQP is not as efficient as other Rate Control modes, since it will waste bits on unimportant details.
In short, this encoding mode is not recommended for regular use. But it's useful for video editing intermediate files and legacy codecs that do not support CRF/CQ natively.
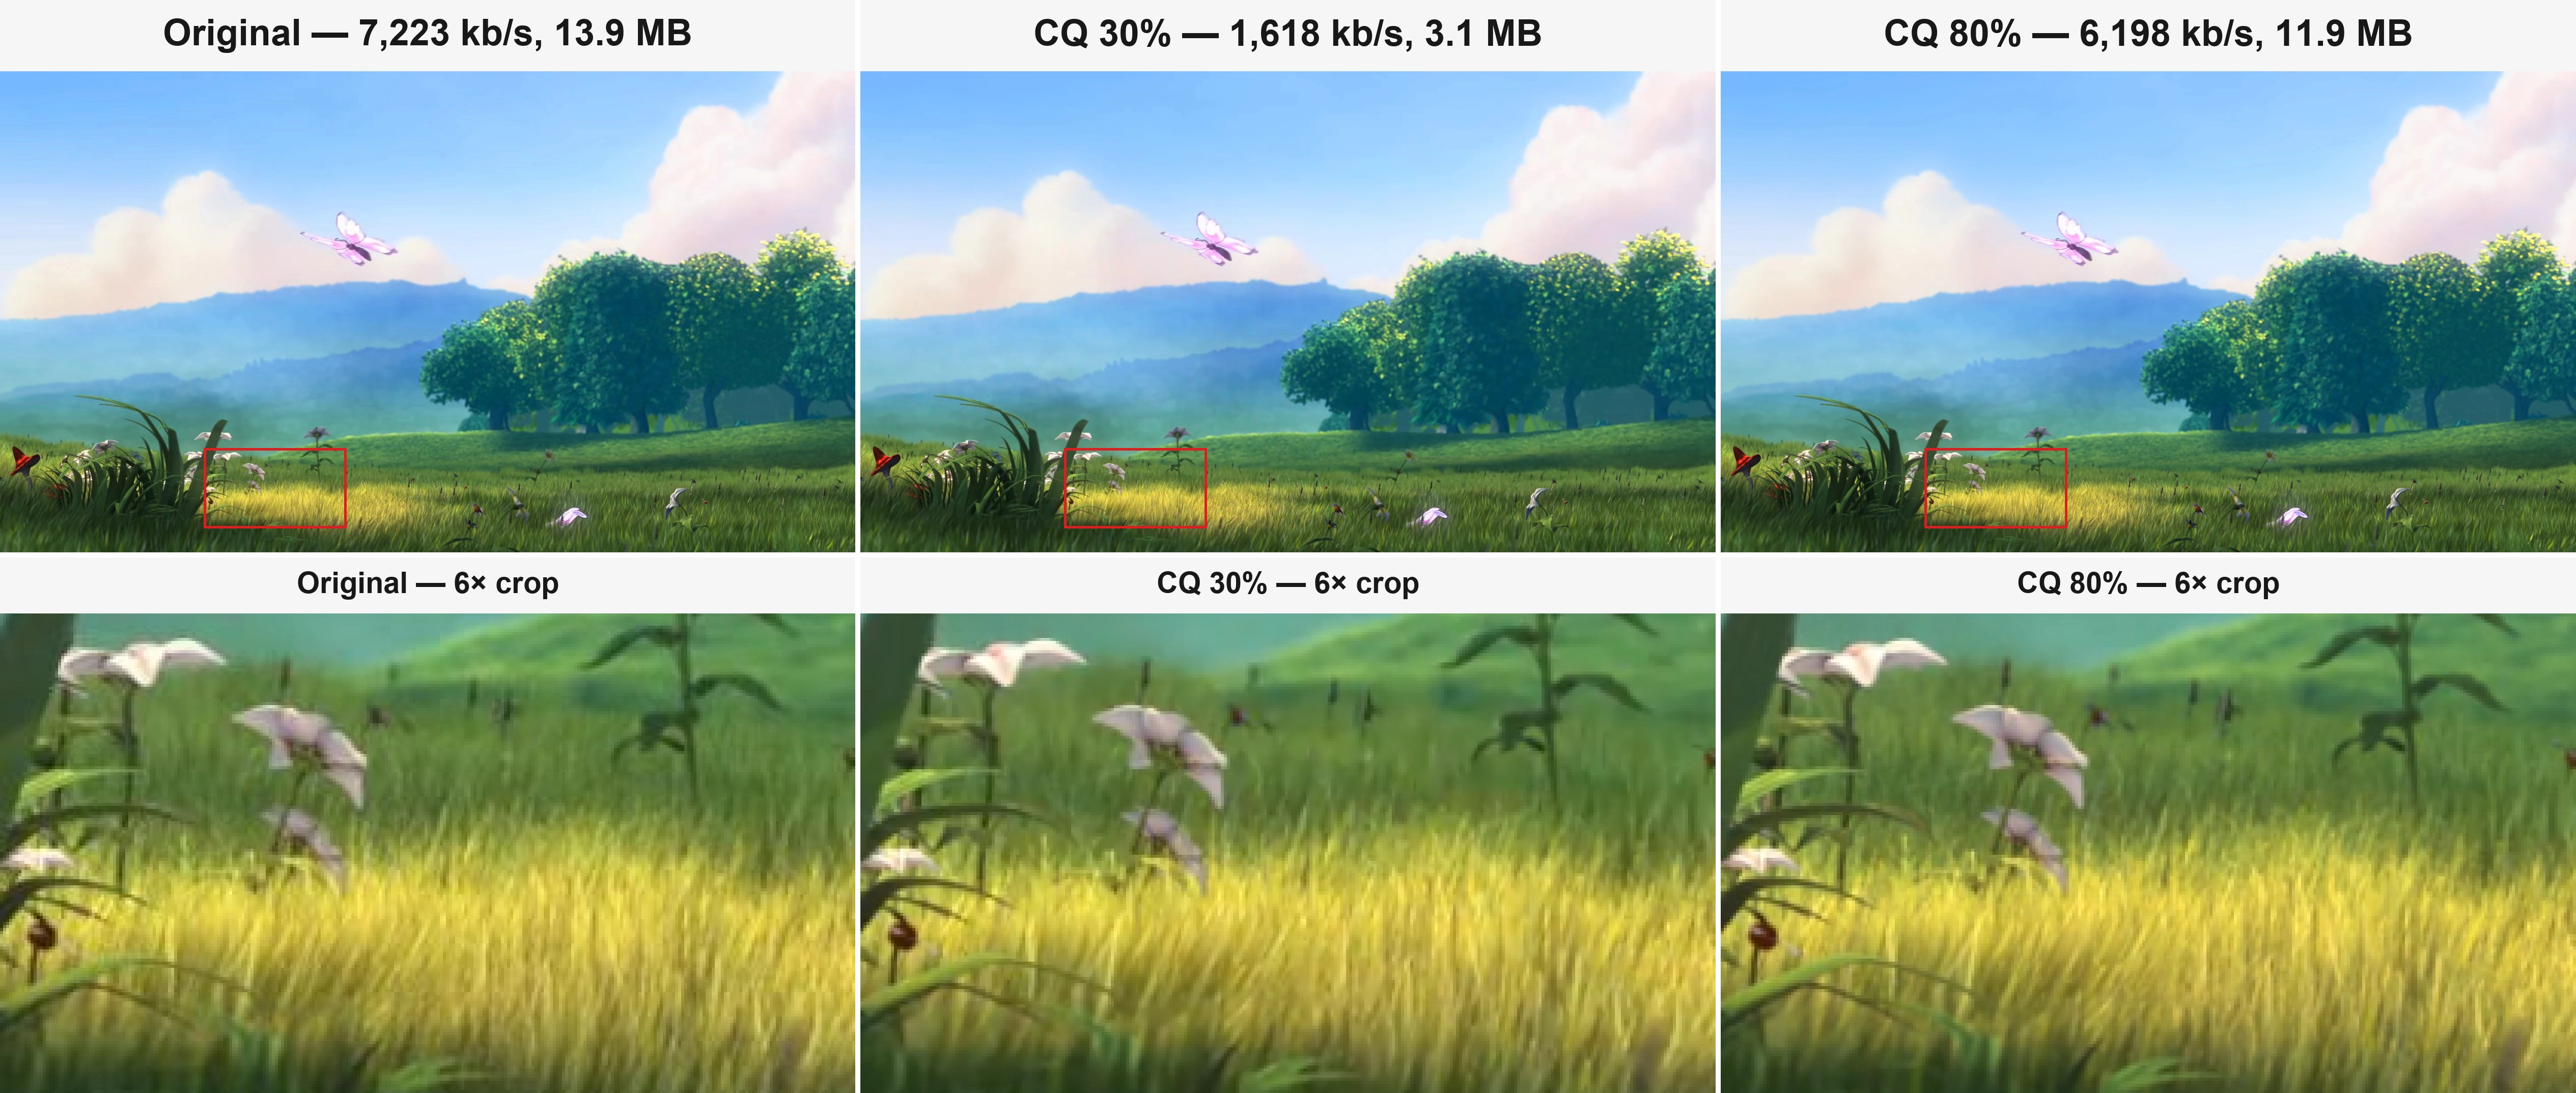
To make this concrete, I ran the same 1080p H.264 clip (13.9 MB, 7,223 kb/s) through each mode, with only the rate control setting changed. And here are the results:
| Setting | Overall bitrate | File size |
|---|---|---|
| Original | 7,223 kb/s | 13.9 MB |
| CBR | 3,523 kb/s | 6.8 MB |
| 2-Pass, 3,500 kb/s target | 3,493 kb/s | 6.7 MB |
| CRF 80% | 2,480 kb/s | 4.8 MB |
| CRF 50% | 1,338 kb/s | 2.6 MB |
| CRF 30% | 599 kb/s | 1.2 MB |
| CQ 80% | 6,198 kb/s | 11.9 MB |
| CQ 50% | 3,081 kb/s | 5.9 MB |
| CQ 30% | 1,618 kb/s | 3.1 MB |
Figure 1. CBR at 3,523 kb/s (right) against the 13.9 MB source (left). At normal viewing size, the frames look close; at 100%, the grass and fur are softer in the CBR output.
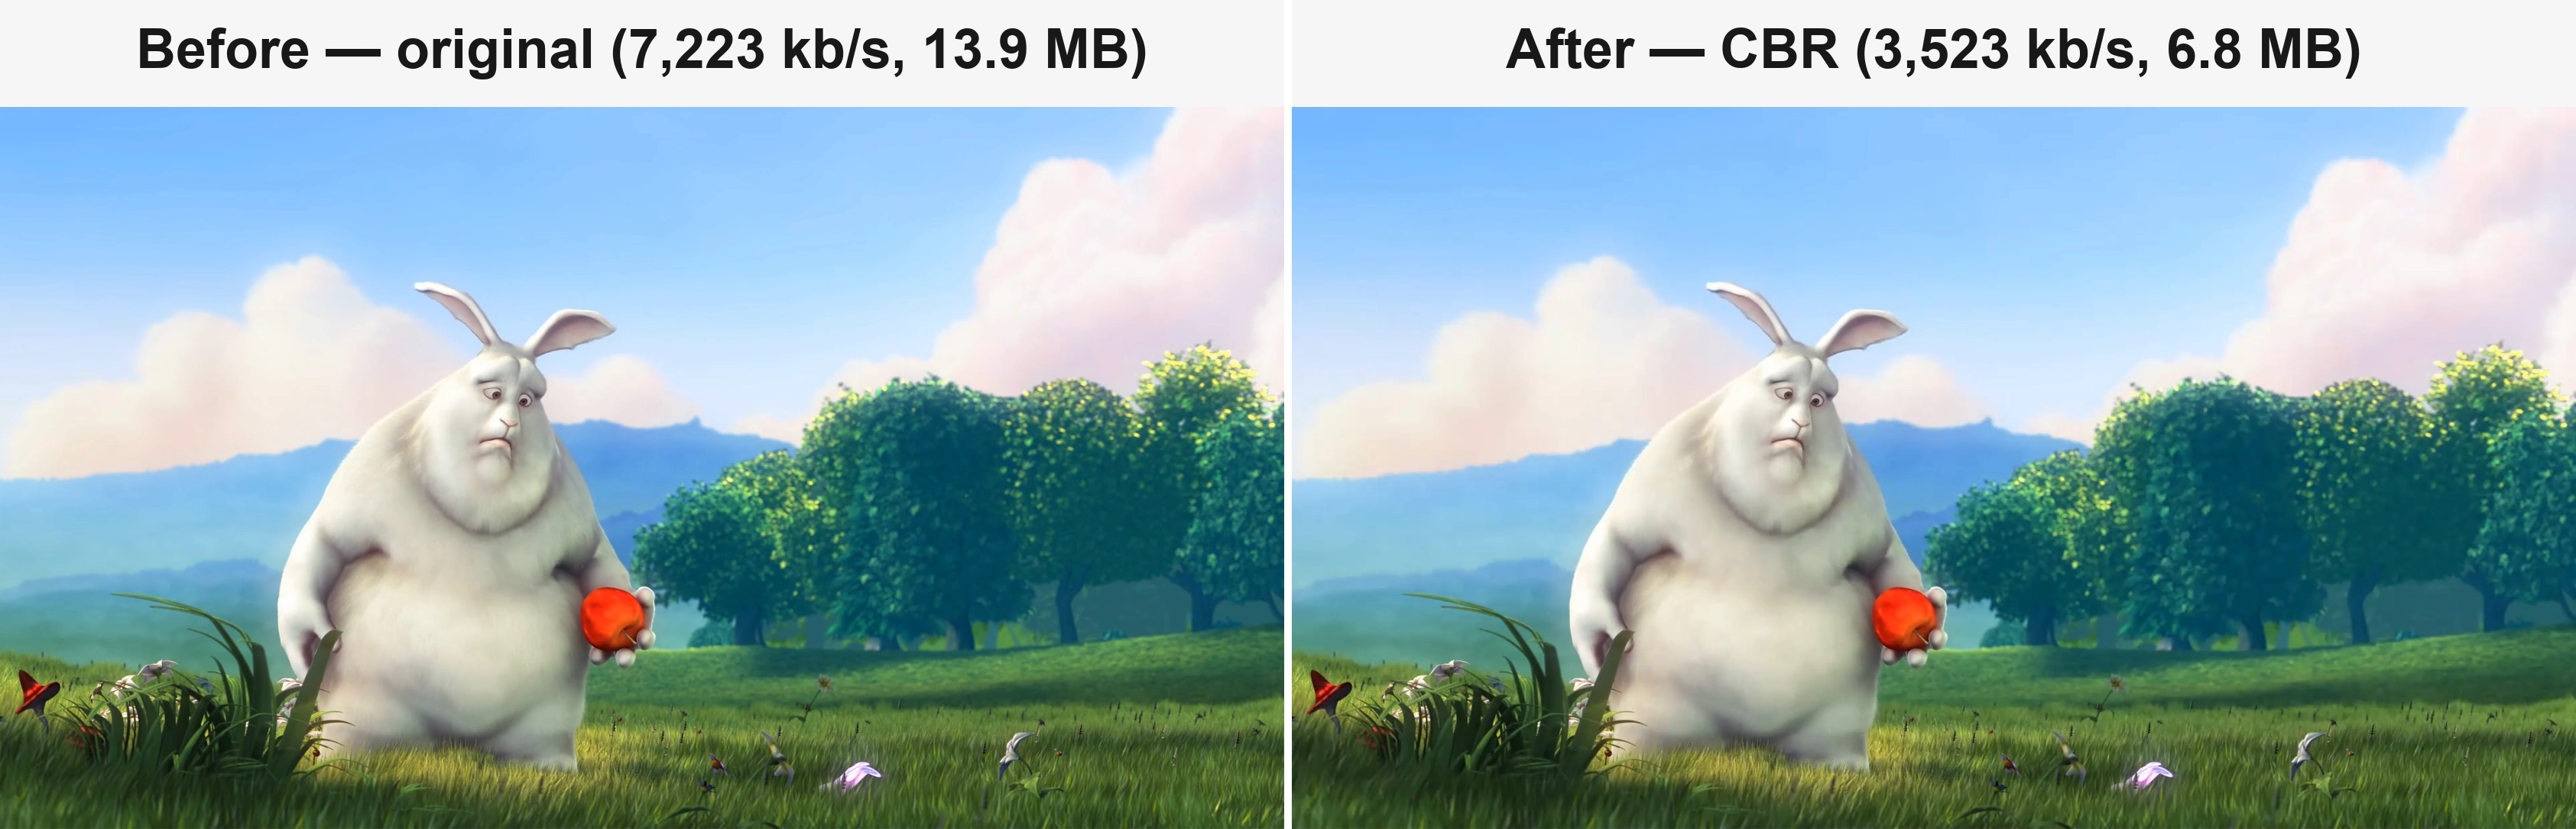
Figure 2. 2-pass with a 3,500 kb/s target. The output lands at 3,493 kb/s and 6.7 MB, with cleaner detail around the eyes and grass.
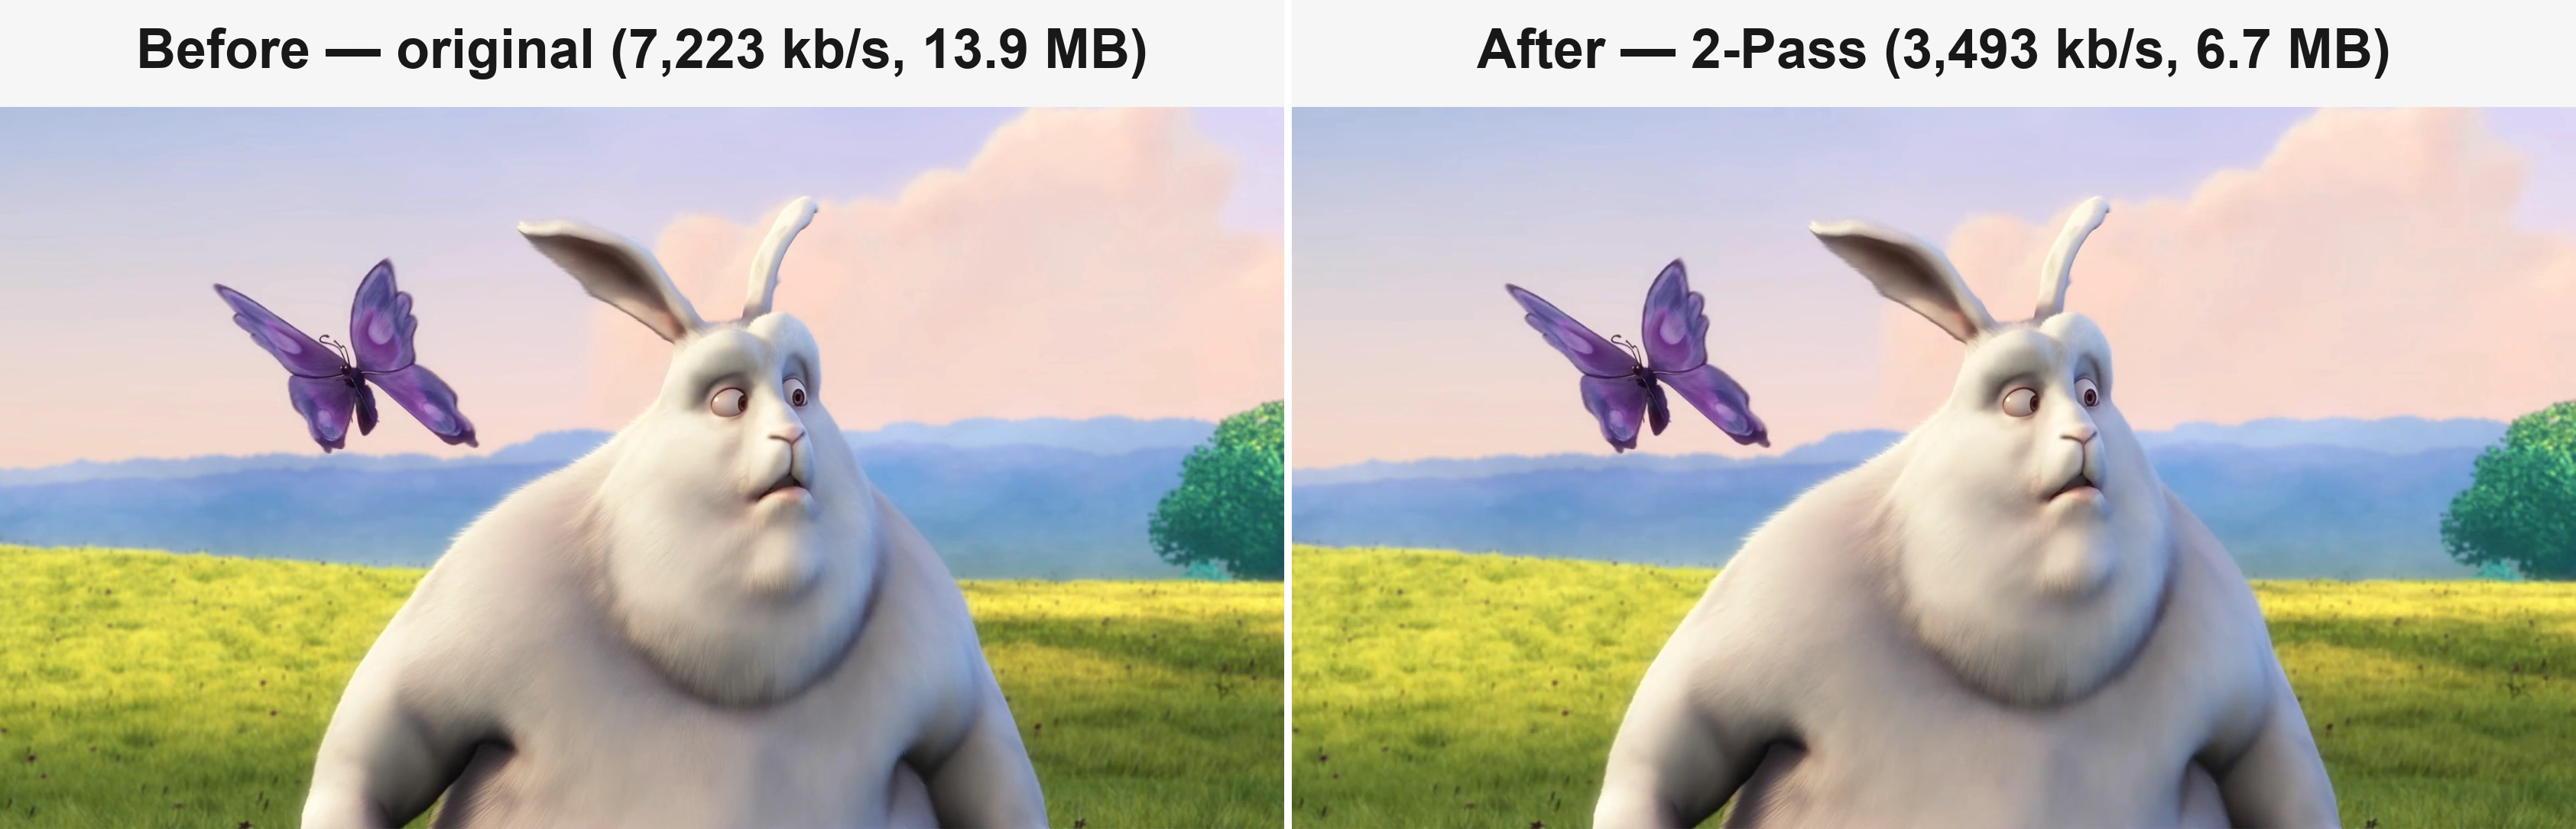
Figure 3. Original (left), CRF 30% (middle), and CRF 80% (right). The bottom row is a 6× crop of the grass, where the difference is easiest to see.
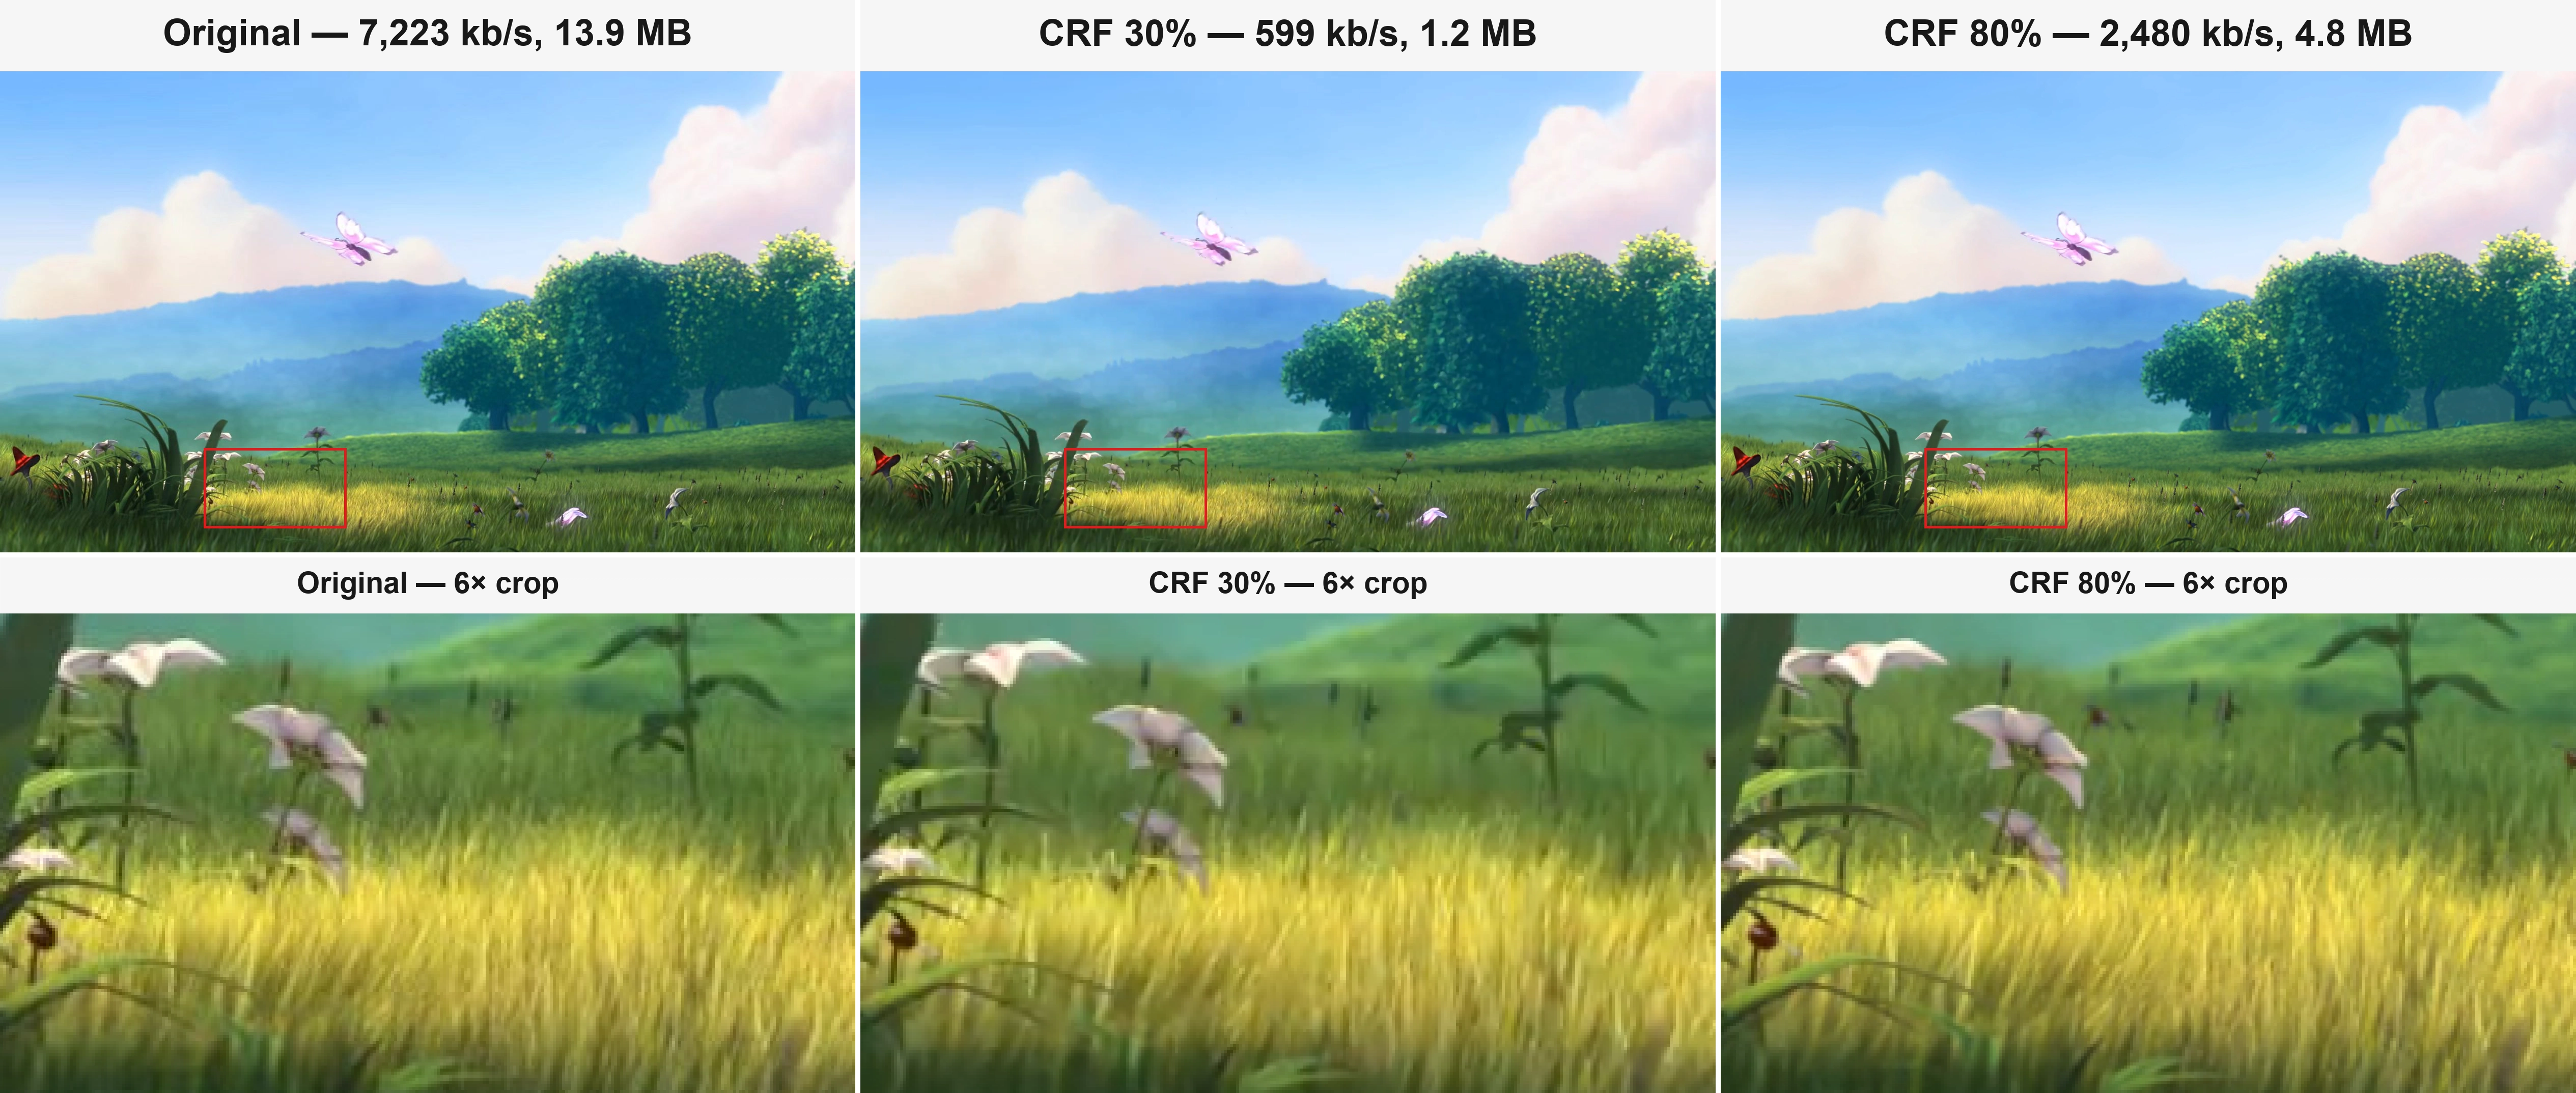
Figure 4. Original (left), CQ 30% (middle), and CQ 80% (right), using the same 6× crop of the grass.
Notes:
👉 Golden rule: CBR protects the stream, 2-pass protects the target size, CRF protects the picture.
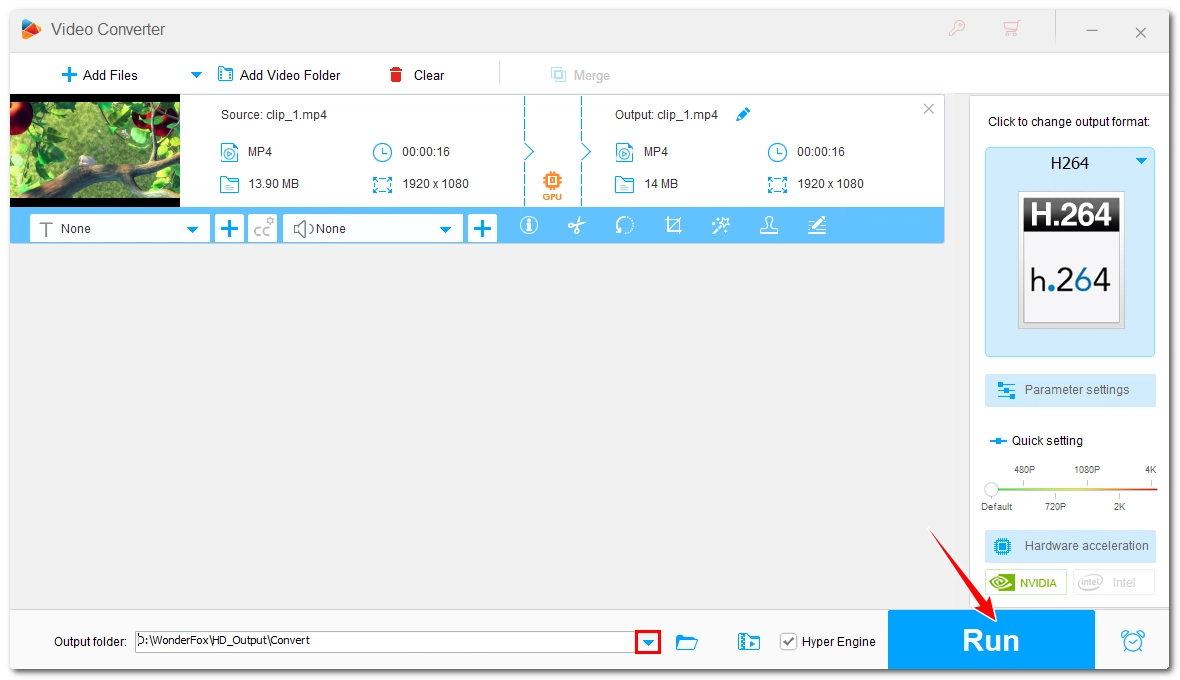
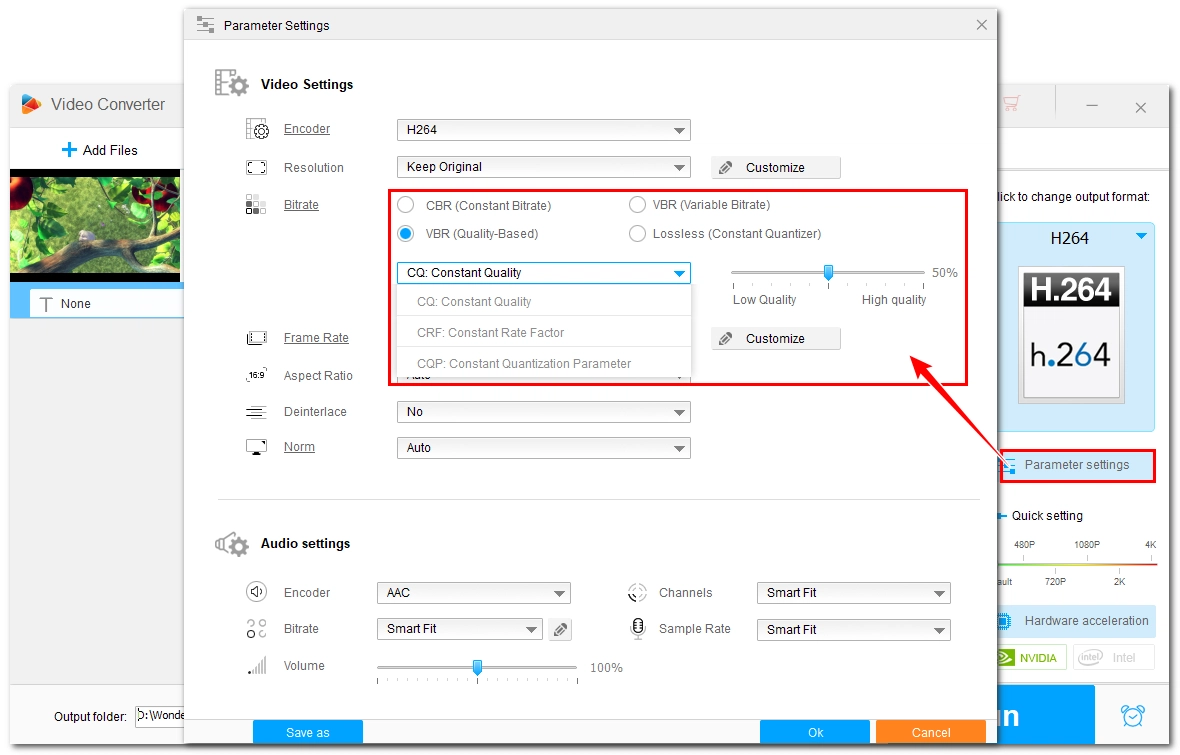
Do you want to start using different Rate Control modes to get the most out of your videos? If yes, WonderFox HD Video Converter Factory Pro is the easiest way to start. It allows you to use all 4 described above Rate Control modes. It's also incredibly intuitive to use and does not require spending hours learning how it works. Below are the basic instructions for changing Rate Control mode. Download the software to get started:
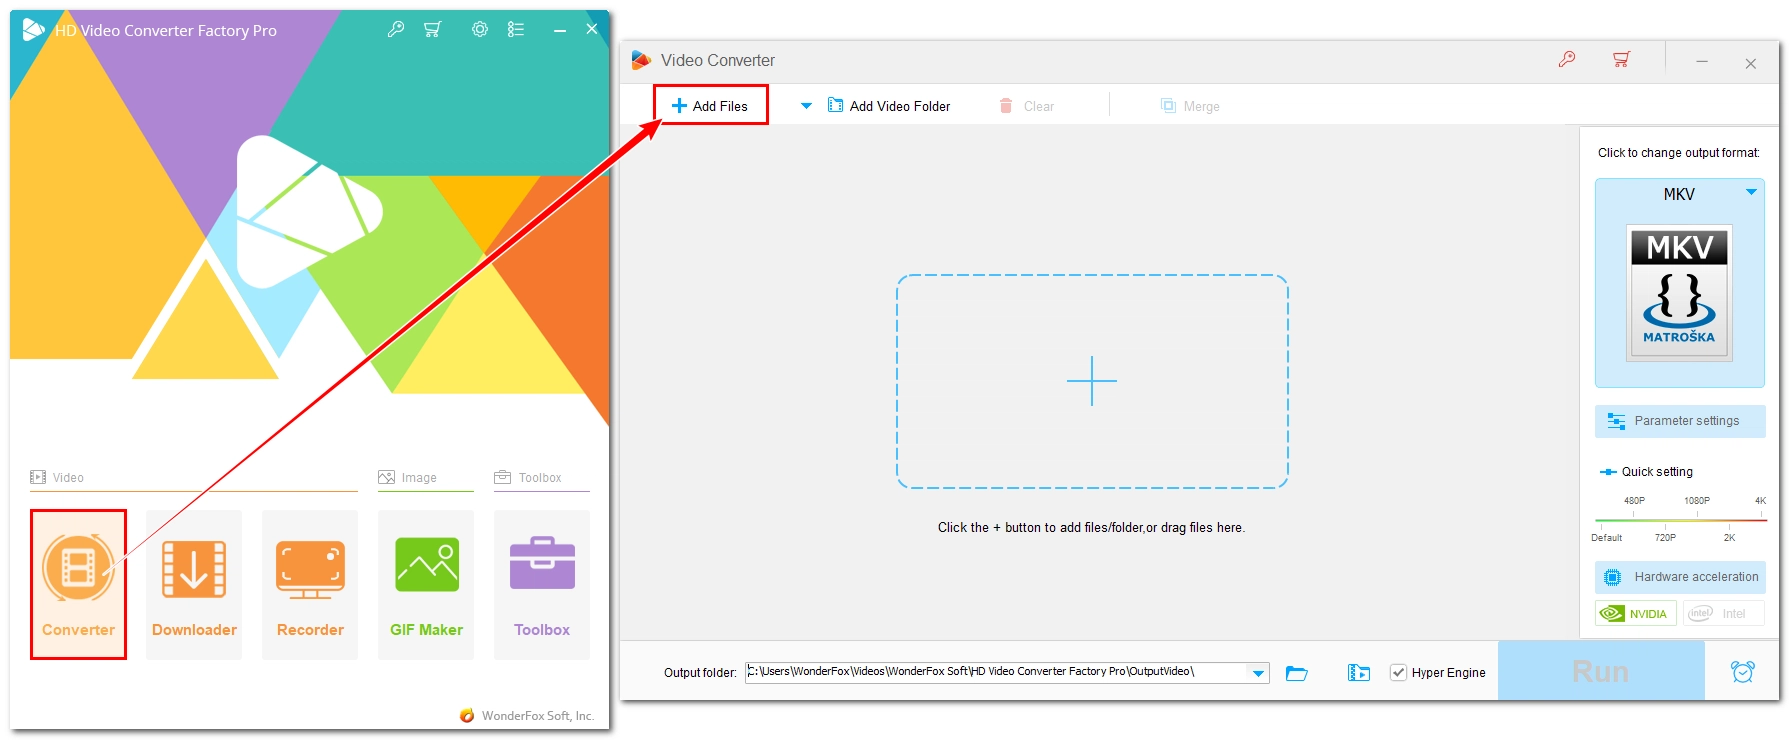
Open the software and go to the Converter module. Click + Add Files (or simply drag and drop the video files you want to convert).
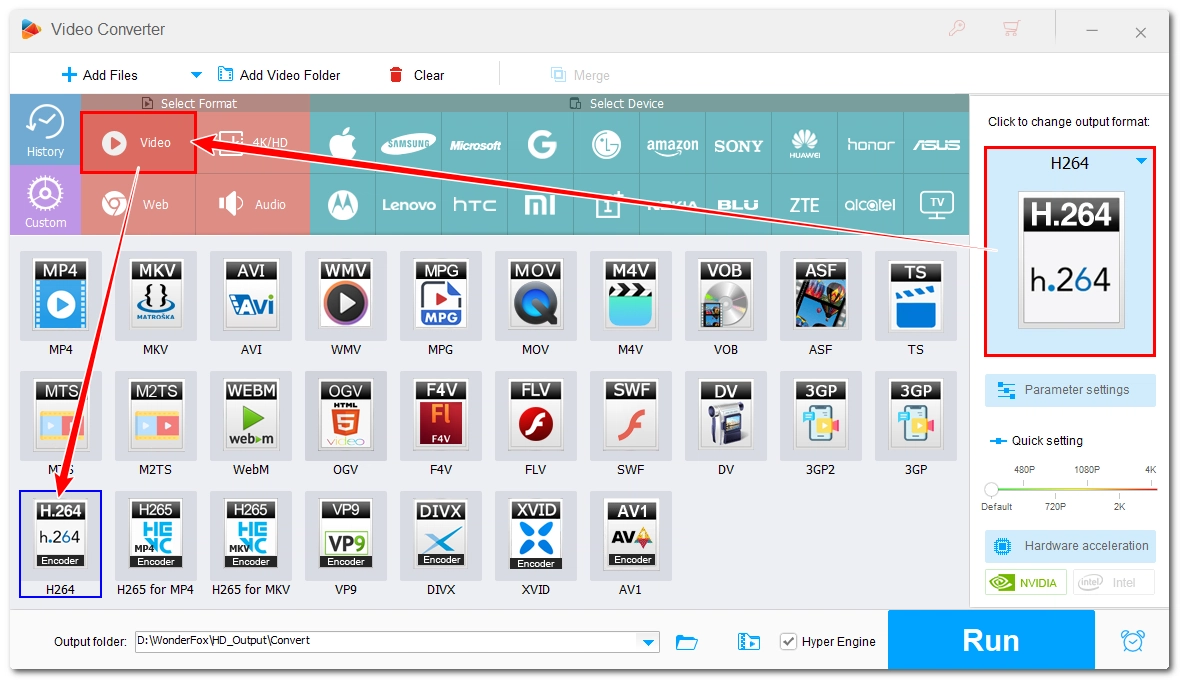
Click on the Output Format section on the right side of the interface. Go to the Video tab, and select the preferred codec (H264, H265, or AV1).
Click the Parameter Settings button. In the Bit rate section, select one of the following options:
A: It depends on you actual use case as they solve different problems. CBR keeps the data rate predictable, which is what live platforms need. VBR gives you more quality for the same average size, which is what storage and uploads need.
A: No. CRF is a single-pass mode that adjusts as it goes. Use 2-pass only when you need the file to land near a specific size, for example, a 25 MB upload cap.
A: In this converter, 50–60% works for most 1080p footage. For 4K, you can often drop a little lower because the extra resolution hides compression.
A: A high quality setting tells the encoder to spend whatever it needs, and that number can exceed the source bitrate. It also happens when the source was already compressed efficiently (say, HEVC) and you re-encode to H.264.
A: No. CQP keeps the quantizer fixed, but it still discards data. Lossless encoding needs a dedicated lossless codec, and those files are much larger.
A: CRF uses a perceptual model on the CPU, whereas CQ uses the hardware encoder's own quantizer scale. CQ is faster, but at the same percentage it usually produces a larger file. In my test, 80% gave 4.8 MB with CRF and 11.9 MB with CQ.
A: CBR for Twitch and other live streams. For YouTube uploads, you can also use CRF at 50–60%, or 2-pass if you have a size cap.
Rate control is the setting most people ignore, but it decides whether a re-encode is an upgrade or a downgrade.
If you want to experiment all four modes with your video, WonderFox HD Video Converter Factory Pro is an easy program to start, with batch conversion and hardware acceleration.
Thanks for reading. Have a good day!

I write about multimedia topics, including video and audio conversion, compression, editing, and downloading. I joined WonderFox in 2020, and my goal is to help readers solve everyday tech problems more easily. In this guide, we've discussed the 4 major rate control modes, covering how they work, their pros and cons, and when to use which mode to achieve the desired results. Hope you enjoyed it!


I write about multimedia topics, including video and audio conversion, compression, editing, and downloading. I joined WonderFox in 2020, and my goal is to help readers solve everyday tech problems more easily. In this guide, we've discussed the 4 major rate control modes, covering how they work, their pros and cons, and when to use which mode to achieve the desired results. Hope you enjoyed it!
WonderFox
DVD Ripper Pro
 Download for FreeDownload for Free

Terms and Conditions | Privacy Policy | License Agreement | Copyright © 2009-2025 WonderFox Soft, Inc. All Rights Reserved.



 Download for Free