“How can I record audio without a microphone for high quality?”
We can easily record audio on the computer with a microphone but the noises coming from the mic may affect the sound quality. In order not to capture the noise of the external environment, you can record audio without using the microphone. The following article introduces 3 simple methods. Quick download the recommended recording tool: https://www.videoconverterfactory.com/download/hd-video-converter-pro.exehd-video-converter-pro.exe
How to Record Audio from PC without Microphone?
Way 2. Use WonderFox Audio Recorder
If you only want the sound playing on your PC, you do not have to record it through a physical microphone. In many cases, the audio can be captured directly from the computer’s sound card or playback device. This helps avoid room noise and keeps the recording cleaner.
A common way to record audio without a microphone is to use the Windows Stereo Mix feature. When available, Stereo Mix can work as a recording input for the audio output of your computer, such as system sound, browser audio, music, gameplay sound, and more.
To make Stereo Mix record the sound from your computer’s speakers or headphones, you should initially enable this feature. Now, I will show you how to record audio on computer without a microphone via Stereo Mix. Follow the steps:
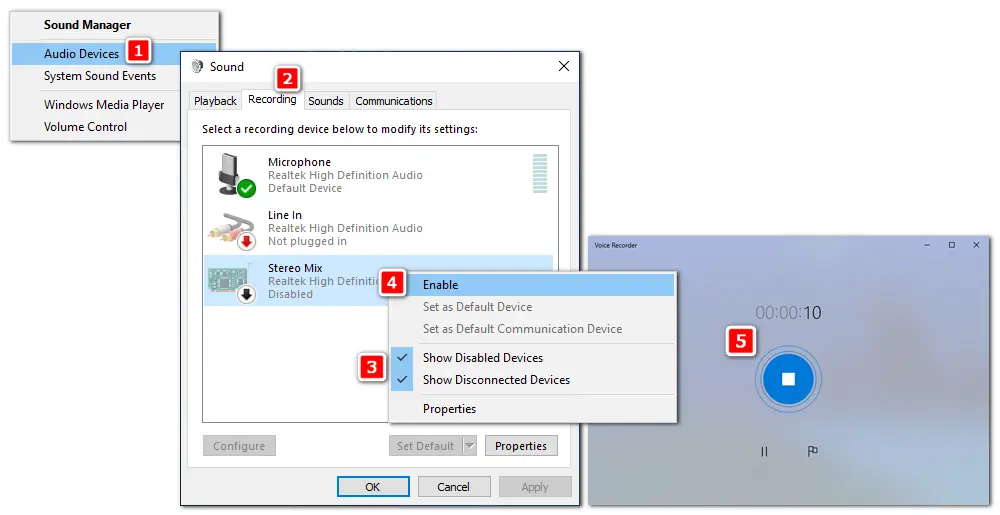
Step 1. Go to the bottom right corner of your computer. Right-click on the sound icon and select "Audio Devices".
Step 2. Right-click in the "Recording" tab and check both "Show Disabled Devices" and "Show Disconnected Devices".
Step 3. Right-click on "Stereo Mix" and select the "Enable" option.
Step 4. You can set Stereo Mix as the default device and disable other options to avoid noise for audio recording.
Step 5. Find and open the "Voice Recorder" or "Sound Recorder" app on your PC to start recording audio without microphone.
That is how to record voice without microphone on computer via Stereo Mix. Note that Stereo Mix may not appear on every Windows PC. It depends on your sound card and audio driver. If you cannot find Stereo Mix even after enabling “Show Disabled Devices,” try updating the audio driver, using Audacity WASAPI loopback, or recording desktop audio with a third-party recorder instead.
Also note that the built-in Windows recording app is mainly designed for simple voice recording. On Windows 11, it is usually called Sound Recorder; on Windows 10, you may still see Voice Recorder. If the app only saves in M4A on your device, you can convert the recording to MP3, WAV, or other formats with WonderFox HD Video Converter Factory Pro or Audacity.
It is an easy and practical screen recorder for Windows, allowing you to capture audio from the desktop, microphone, or both simultaneously and save recordings in MP3 & other popular formats. No limit or lag. Try it now!
In addition to the built-in recording app and Stereo Mix feature, you can use a third-party recorder to capture audio from PC without a microphone. WonderFox HD Video Converter Factory Pro is one of the top-rated audio recorders for PC Windows. Its built-in Recorder can capture desktop audio, microphone sound, or both at the same time. You can save the recording directly as MP3, AAC, AC3, or WAV, so you do not have to record first and convert later.
This is useful when you want to record streaming music, online meetings, gameplay sound, voice-over, system notifications, or other sound playing on your PC. After recording, you can also use the Converter module to trim, merge, compress, or convert the audio file. Below is how to record sound on PC without microphone using HD Video Converter Factory Pro. Free downloadFree download the software, and let’s get started.
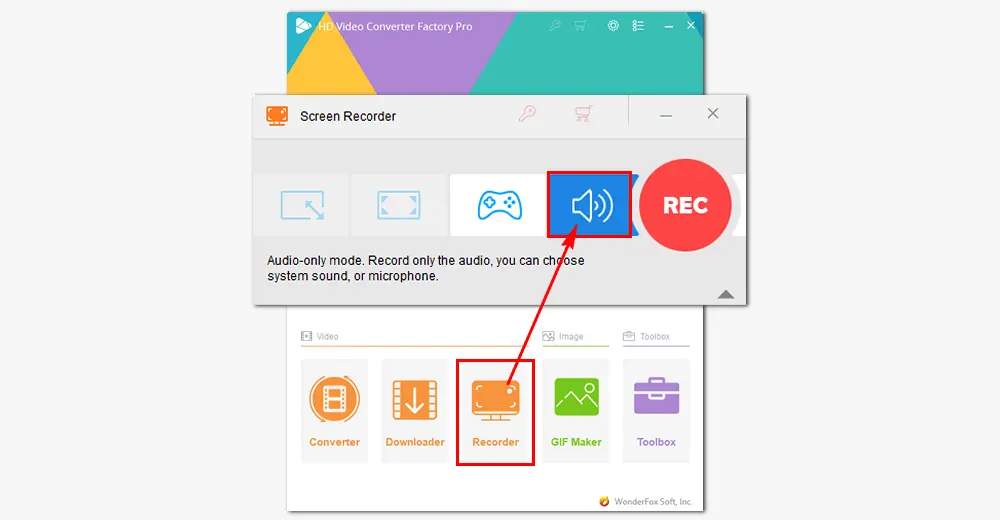
• Run WonderFox HD Video Converter Factory Pro and open the Recorder.
• Click the sound icon in the Screen Recorder window to select the audio-only recording mode.
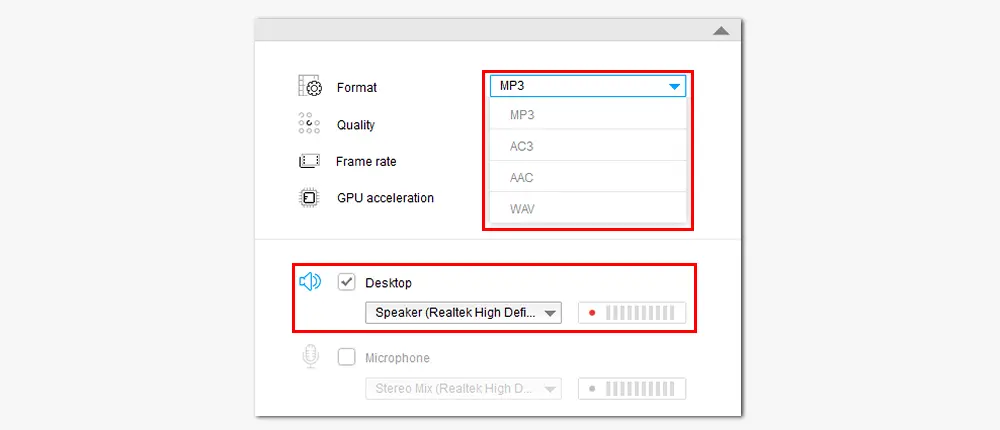
• Choose MP3, AAC, AC3, or WAV from the drop-down list of the Format. For most users, MP3 is the most convenient choice because it works well with phones, players, editors, and sharing platforms. If you want an uncompressed recording for later editing, choose WAV instead.
• To record audio from PC without microphone, check the Desktop option and select the speaker or headphone device you are currently using. If you also want to record your voice, check Microphone as well. This is helpful for tutorials, commentary, online meetings, interviews, and gameplay recordings.
• If the Desktop source does not capture sound correctly, try selecting another playback device, or choose Stereo Mix under the Microphone source if it is available on your computer.
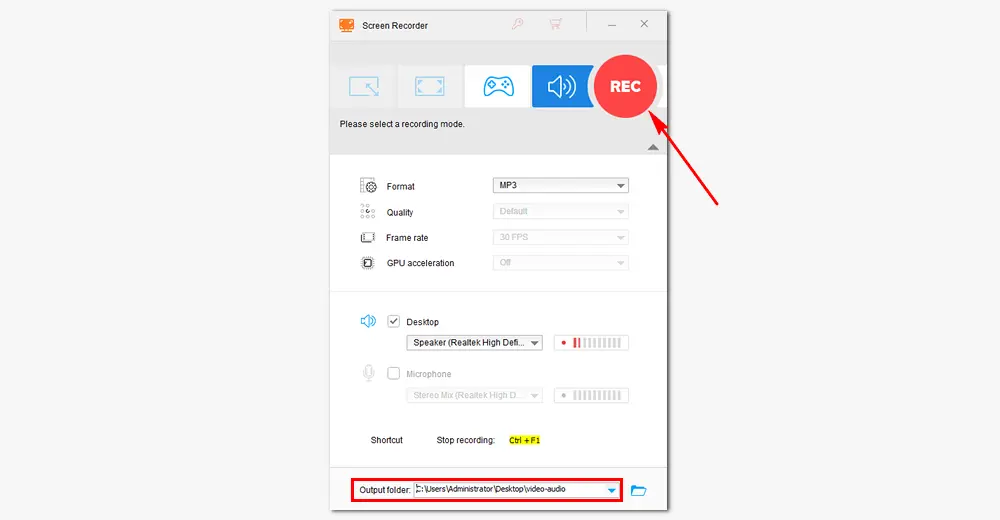
• Click the ▼ button at the bottom to set an output folder.
• Tap the red REC button to start recording audio from your computer. The recording will begin five seconds later, during which you should get ready to play the audio you are about to capture.
• When you finish, press hotkeys Ctrl + F1 to end the recording.
• To record only computer sound, select Desktop and leave Microphone unchecked.
• To record your voice and computer sound together, select both Desktop and Microphone.
• To record a WAV file, choose WAV before clicking REC. To record an MP3 file, choose MP3 directly.
• This method works well on Windows 11, Windows 10, Windows 8/8.1, and Windows 7. It is especially suitable for users who want a simple audio recorder without dealing with virtual audio cables or complicated driver settings.
1. Screen record with audio on Windows;
2. Convert audio/video to 500+ presets in bulk;
3. Download music and movies from websites;
4. Cut, split, merge, compress, change bitrate, etc.
If you have installed Audacity on your computer, you can use this free audio editor to record the PC’s internal sound. On Windows, Audacity can record computer playback through Windows WASAPI and a matching loopback input, such as “Speakers (loopback)” or “Headphones (loopback).” This is a reliable option when Stereo Mix is unavailable.
Audacity is also useful if you want to edit the recording afterward or export it as MP3, WAV, OGG, and other audio formats. However, it may feel less beginner-friendly if you only need a quick recording because you need to select the correct audio host, playback device, and loopback input.
Step 1. Start Audacity. If you haven't installed the software, download it from its official website: https://www.audacityteam.org/
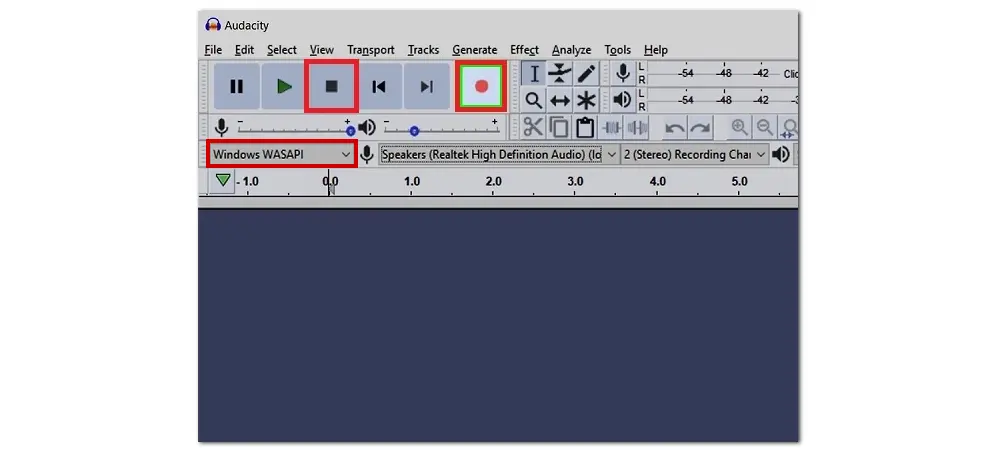
Step 2. Go to "Audio Setup" and set Audio Host to Windows WASAPI.
Step 3. Choose the playback device you are using, such as Speakers or Headphones.
Step 4. For Recording Device, choose the matching loopback option to make Audacity capture the computer's internal audio without recording external voices.
Step 5. Hit the red Record button to start recording the PC's on-screen sound. Once done, click the Stop button at the top of the interface.
Step 6. Click File > Export Audio and save the recording as MP3, WAV, OGG, or another format based on your needs.
The three methods above should cover most computer audio recording needs. But depending on what you want to record, the following tools may also help.
Windows has a built-in recording app for simple voice recording. On Windows 11, it is usually called Sound Recorder; on Windows 10, you may still see Voice Recorder. It is simple and convenient for recording microphone audio, voice notes, lectures, and short memos.
However, it is not the best choice for recording internal computer sound directly. If you want to record system audio with it, you may need Stereo Mix or another audio input supported by your device.
OBS Studio is more suitable when you need to record screen video together with desktop audio, such as gameplay, live streams, tutorials, or presentations. It can capture desktop audio and microphone input, and newer versions also support more flexible app audio capture on Windows 10/11. But for a quick MP3 or WAV audio-only recording, OBS may be more complicated than necessary.
Adobe Audition is a professional audio recording and editing program. It is a good choice for podcasts, voice-over, multitrack editing, noise reduction, and post-production. But if you only want to record computer sound without a microphone, it may be overkill compared with WonderFox or Audacity.
Yes. You can record the internal sound from your computer using Stereo Mix, WonderFox HD Video Converter Factory Pro, Audacity WASAPI loopback, or OBS. These methods record the audio output directly instead of capturing sound through a physical microphone.
Stereo Mix depends on your sound card and audio driver. Right-click the blank area under the Recording tab and enable “Show Disabled Devices” first. If it still does not appear, try updating your audio driver or use Audacity WASAPI loopback instead.
Use an audio recorder that supports multiple input sources. In WonderFox HD Video Converter Factory Pro, select both Desktop and Microphone before recording. This is useful for narration, meetings, tutorials, gameplay, and interviews.
Choose a recorder that supports the target output format directly. In WonderFox HD Video Converter Factory Pro, you can select MP3 for better compatibility or WAV for later editing before recording. You can also record with Audacity and export the file as MP3 or WAV afterward.
OBS can record desktop audio, but it is mainly designed for screen recording, streaming, gameplay capture, and multi-source recording. If you only need a simple audio file, a dedicated audio recorder is usually easier.
Recording audio on a PC without a microphone is not difficult once you choose the right method. Stereo Mix is a quick built-in option if your sound card supports it. Audacity WASAPI is a reliable free solution for recording computer playback when Stereo Mix is missing. If you want an easier way to record desktop audio, microphone sound, or both and save the file directly as MP3, WAV, AAC, or AC3, WonderFox HD Video Converter Factory Pro is a more beginner-friendly choice.
For most users, start with the WonderFox method if you want fewer settings, Audacity if you prefer a free audio editor, and OBS only when you also need screen recording or more advanced audio source control.

Kevincy joined the WonderFox team in 2014 and has been a senior columnist ever since. With over two decades of experience in the video editing industry, he shares tutorials, tips, and how-to guides on video/audio processing and personal DVD backups. Family-oriented and passionate about helping others, he is dedicated to making video and audio processing easier for readers.
![]()
![]()
![]()
![]()

WonderFox DVD Ripper Pro
Do you want to digitize your DVD collections for easy playback on various devices? This DVD ripping software can help you convert DVDs to MP4, MKV, MP3, WAV, Apple TV, iPhone, Android, and 300+ popular presets. It also allows for 1:1 DVD to ISO image or DVD folder backup. Free download the software and build your personal digital library now!
* Do not use it to rip any copy-protected DVD for commercial purposes.
Privacy Policy | Copyright © 2009-2026 WonderFox Soft, Inc. All Rights Reserved
