![]() by Vita
by Vita
Updated on May 7, 2025
You can take advantage of Windows 7 built-in DVD burning feature and Windows DVD maker to burn a DVD, without the need of installing third-party applications. So how to burn a DVD in Windows 7? Here are the detailed instructions.
As a bonus, you may try this DVD ripper if you need to digitize your old DVD collection:
When it comes to burning movies to DVDs on Windows, especially DVD videos, many users are used to installing an extra application like DVD Styler or AnyBurn. But if you’re a Windows 7 user, the Windows 7 burning DVD process becomes much easier since the version includes the built-in data DVD burning feature and still comes with Microsoft DVD authoring software – Windows DVD Maker, which supports DVD movie and a slideshow of photos creation. By means of the two components, you can burn data DVDs and DVD videos as you like. Let’s learn how to burn a DVD in Windows 7.
We also provide a simple article for Windows 10 users to burn DVD. Two Solutions to Burn a DVD on Windows 10
Data DVD is typically for backup aims, which works like a hard drive that saves videos, music, images, applications, and other files. But most data DVDs can’t be played on a regular DVD player unless the DVD player supports the file formats containing in the data DVD disc. If you need to burn a DVD for storage, you can refer to the following steps.
 Choose a Format
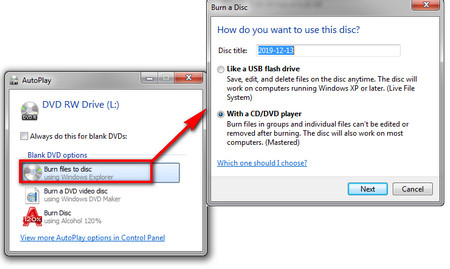
 Step 1. Insert a blank disc into your computer. Usually, a dialog will pop up asking you to choose an option to execute. Select “Burn files to disc”. If the dialog doesn’t appear, head to Computer > Double-click the inserted blank DVD drive letter.
Step 2. Fill the title of disc and choose from “Like a USB flash drive” (Live file system format) and “With a CD/DVD player” (Mastered format).
 Live System File Data DVD
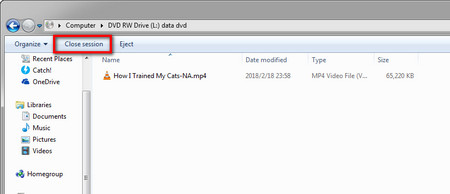
 Step 3. If you choose the Live File System, it will take seconds to format the disc. After that, drag files you want to burn into the disc. The copying time required depends on the file size and the writing speed of your drive. When it finishes, click on “Close session” to complete the process.
 Mastered Format – Data DVD
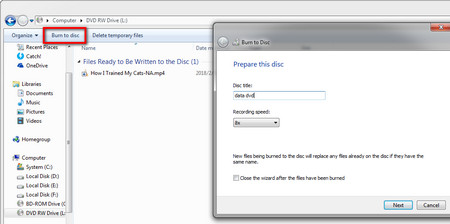
 If you choose the Mastered Format, import the files the same way, but click on “Burn to Disc” on the top left menu bar. It will ask you to fill in the disc title again and choose a burning speed. After the settings, click on Next to start the Windows 7 burning DVD process.
Live File System VS Mastered: Which One Should I Choose? The Live File System allows you to copy files into the disc anytime so long as there has enough space. The Mastered only enables one to burn files onto a disc once. In other words, if you choose the Mastered format, even if you only copy a small file into the disc, the remaining space is not available later unless you use a rewriteable disc and erase the data. It’s recommended to use the Mastered format to burn ISO images or large files that can fill up the disc. Additionally, the Mastered format is more compatible with older versions of Windows system and DVD players so it’s still most people’s preferred option.
Here is how to burn a DVD in Windows 7, which can be played on a standalone DVD player or DVD playback application. In the same way, you can also make DVD photo slideshows. No specific installation. The Windows 7 DVD Maker has given users a convenient solution. Here is how-to.
 Windows 7 Burn DVD Video
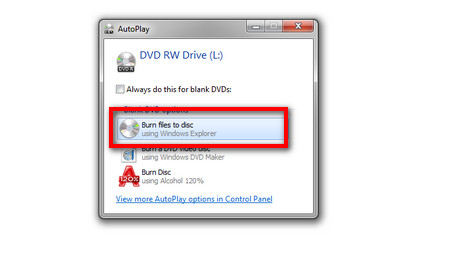
 Step 1. Insert a blank DVD disc into the optical drive of your computer and you will see an AutoPlay dialog. This time choose Burn a DVD video disc using Windows DVD Maker. In case that the dialog isn't activated, you can directly type “Windows DVD Maker” in the search box of the Start menu, which is on the lower left corner of the desktop, and click the Windows DVD Maker shortcut to open the free DVD burning software.
 Add Videos and Photos
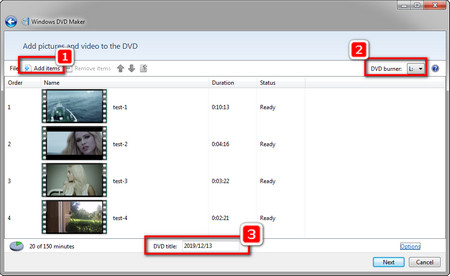
 Step 2. Click on “Add items” to import pictures and videos into the interface, or drag & drop files into it.
Step 3. After adding the files, use the up and down arrowheads or drag each file to rearrange the order. Select “Add items” and “Remove items” to import more or delete unwanted files. You can also right click on a file, and adjust the order, remove and preview the file.
Step 4. Open the DVD burner list and choose the target Windows 7 DVD burner you want to burn files into.
Step 5. Head to the bottom of the interface, enter the title of the disc. There you can also check the space you have left in the disc.
 Advanced Settings
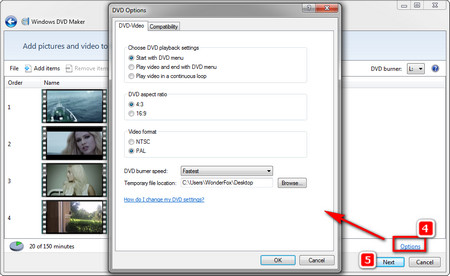
 Step 6. You can further choose more advanced settings. Click on Options on the lower right corner and the DVD Options window appears where you’re able to choose a DVD playback mode, change aspect ratio, convert the DVD to NTSC or PAL format, set burning speed, and specify the location for saving temporary files. Press OK to save the changes. Then click Next.
 How to Burn Disc in Windows 7
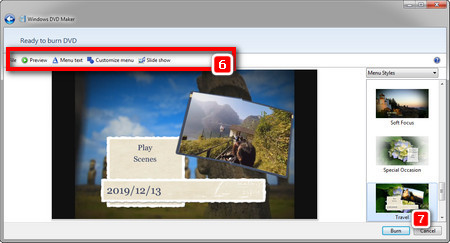
Step 7. Choose a DVD menu template, customize the DVD menu, such as changing DVD menu text, creating your personal DVD menu style, adding music for slideshows and so forth.
Step 8. Click “Burn” to create the DVD. Please be patient. It may take a while for finalizing the burning process.
Final Words
The process of Windows 7 burning DVDs can be pretty easy if you are familiar with the settings and options. We devote to compiling the instructions on how to burn a DVD in Windows 7 in the most straightforward way and with the handiest Windows 7 DVD makers. If you think this article is right for you, please share it with more friends.
Recommended Tool: Fast DVD Ripper Ensures Good Quality

WonderFox DVD Ripper Pro
The professional DVD ripper focuses on the simplest and fastest way to rip DVDs. It can dramatically copy a full length DVD to MPG within 5 minutes and to other 300+ digital formats and devices at a pretty rapid speed. More than a DVD to video converter, it also is a DVD to ISO converter and DVD to Video_TS converter, helping you back up DVD in digital forms in a breeze.