Watermark Videos with the Best Video Watermark Software
 Recommended by the author
![]() Convert Video
Convert Video

![]() by Rocabella
by Rocabella
Updated on Oct 18, 2022
To protect video and copyright, we usually add watermark to video. Of course, sometimes, this video watermark can also play a propaganda role. Whatever the purpose of adding watermark to video, a simple and reliable Video Watermark Software is essential. This post will introduce two video watermark tools and show you how to add watermark in video with them respectively.
Get the recommended desktop utility and add your own logo or text to a video handily.
A watermark is a still image or text that overlaps video. It can cover the entire dimension of video, appearing in the center or one of the corners of video. It can be opaque, but most of the time it's transparent so that it doesn't interfere with video itself. Watermark can help us better protect rights and increase visibility, etc. Then, how to watermark videos? The following part shows two simple methods to create unique video watermark. Read on and follow.

Add Watermark to Video Effortlessly
WonderFox HD Video Converter Factory Pro offers a simple solution to add text, images, and other patterns to videos. It enables you to adjust opacity and position of the text, rotate texts, customize the font size, formatting, colors, add text shadow, and insert symbols as you wish.


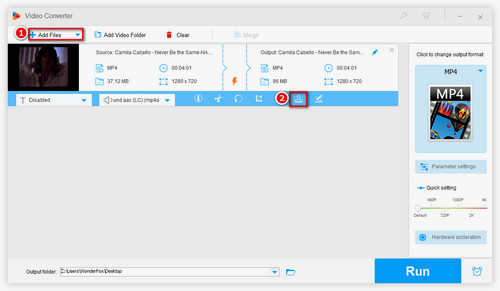
Free downloadFree download, install and launch WonderFox HD Video Converter Factory Pro on your Windows PC. Now, click on Converter icon to enter a new window. Click the Add Files button and select the video you plan to work with. Alternatively, you can drag the file from the folder to the program's working area.
Option 1: Watermark in Word
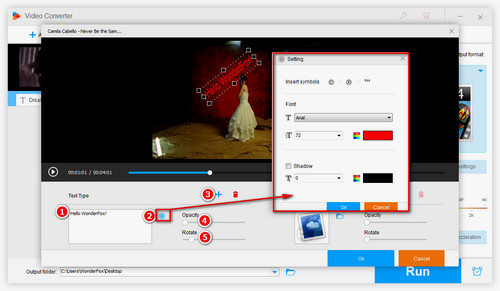
Click the Watermark button to enter a new window. On the lower left side of the new window is the Text Type area. In the white rectangle you can enter the text you want to add. Click the setting button next to the white rectangle, and you can customize fonts, font sizes, colors, shadows, and copyright symbols. Click OK to save your settings.
When you want to add art fonts, you need to search for fonts from the Internet and download them to your computer. Copy and paste the downloaded fonts into system. Usually, you can add fonts from the control panel by searching for Fonts.
Click on the + symbol to add text to video. You can adjust the transparency of text by clicking Opacity button, and rotate the text by clicking Rotate button. By the way, you can click the red delete button if you are not satisfied with the text watermark.
Option 2: Add Photography Watermark into Video
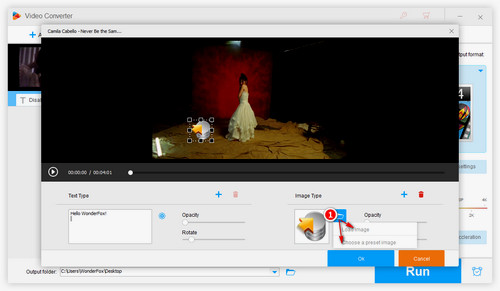
On the lower right side of the new window is the Image Type area. Select the default image is very simple - click on the folder button and then press Choose under a preset image, and pick a picture you like. If you want to load external images, click Load image under the folder button and select your local images.
Again, click on the + symbol to add image watermark to video. You can adjust the transparency of image by clicking Opacity button, and rotate the image by clicking Rotate button. By the way, you can click the red delete button if you are not satisfied with the image watermark.

Click the Output Format on the right side of the interface, and choose one desired video under Video tab. Next, click the inverted triangle button on the Output Folder at the bottom of the interface to set the path to store the watermarked video. Finally, click the RUN button to add watermark to video.
 Watermark in Word
1. Fonts: First of all, you can choose any existing font you like. In addition, you can download various artistic fonts and install them into the system, and then add the text of this font to video. Details will be explained in a later tutorial.
2. Font size: The text size can be adjusted freely.
3. Text color: Free adjustment.
4. shadow: You can set the size, as well as the color.
5. Copyright symbol: C, R, TM, which cannot be typed by keyboard, can be directly inserted here.
 Photography Watermark
Similar to text watermark, image watermark is also a common way to protect videos. Compared with text watermark, image watermark is more lively.
There are two kinds of image watermarks.
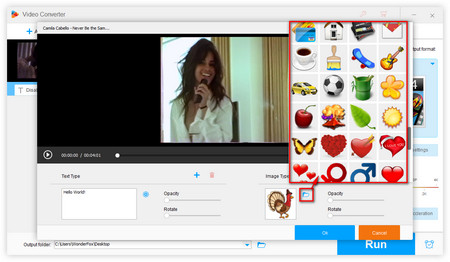
The first is the default image, which already imports over 100 images for you to choose from.
The second is to load external images. This means you can choose any image you want to use as a video watermark. The following image formats can be supported:
.gif;* .jpg;* .pax;* .bmp;* .ico;* .cur;*.png;* .dcm;*.wmf;* .emf;* .tga;* .pxm;* .wbmp;* .jp2;* .j2k;* .dox;* .crw;* .psd;* .iev;*
It should be noted that PNG, ICC and TGA diagrams with transparent channels are all supported. Dynamic images are also allowed to be loaded into the program.
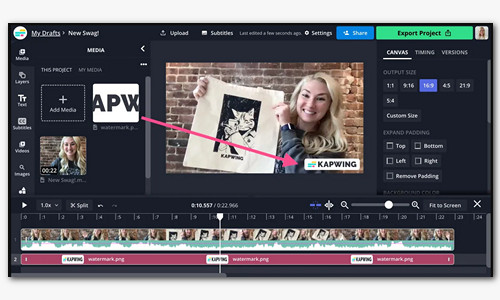
Kapwing is a nice web-based video watermark editor. It has both free and paid plans. The free plan comes with good features but has some limitations. The maximum upload limit in the free plan is 250 MB. Your videos will have a Kapwing watermark in addition to your watermark.
Then, let’s see how to watermark a video using Kapwing.
 Add Video Watermark Online via Kapwing
Step 1. Visit https://www.kapwing.com/tools/watermark;
Step 2. Drag the video to the box available on the right side of the interface or you can hit the Click to upload button;
Step 3. To add a text watermark, click on the Text option from the left side. Then select the style of your text from the templates. You will see a sample text in the video preview.
Step 4. From the right side of the interface, access the tools to change the text format, text color, text size, etc. Also, you can edit it by using the tools available on the left and right sides.
Note: If you want your text watermark to appear in the entire video, place your cursor at the end of the text box (below the video frames) and stretch it to the entire length of the video.
Step 5. At last, click on the Export button to start processing. After the processing gets completed, you can download the video or share it by copying the link.
More Watermark Issues You May Want to Solve
Tutorial on Convert DVD to Video with No Watermark
How to Convert DVD to Digital Video without Watermark

WonderFox DVD Ripper Pro
With the help of WonderFox DVD Ripper Pro, you can convert your physical DVD to almost any digital video format without watermark. In addition, the software can help you remove various DVD encryption methods including DVD CSS, Region Code, multi-angle, RCE, Sony ARccOS, disney-project DRM and Cinavia Protection. Also, adding subtitles to DVD video is possible if you want to cut DVD clips. Download this app to experience it!