Guide on How to Install IPTV + EPG on Kodi Leia & Krypton
 Recommended by the authorRecommended by the author
 How to & Tips
 Convert Video

 by Oswald
Updated on May 7, 2025
Do you know how to use Kodi IPTV to stream live TV, Time-shifted media, or VOD? And do you know how to add scheduling information to your favorite TV shows? If not, this page can definitely be of help. In the following paragraphs, I’ll show you how to correctly install IPTV + EPG (electronic program guide) to your Kodi so as to enjoy your favorite TV shows on Kodi, and with EPG menu.
IPTV (Internet Protocol television) is the delivery of television content over Internet Protocol networks. IPTV is perfectly supported on Kodi media player on various platforms with certain addon installed, and there are lot of addon choices to do that. Among them, PVR IPTV Simple Client is a robust, easy-to-use and configurable IPTV client on Kodi, a basic PVR Addon for Kodi to recieve IPTV Live TV, Radio channels, and EPG directly. It's our recommended addon to watch IPTV on Kodi. In the following, I'll show you how to install and configure PVR IPTV Simple Client on Kodi, and how to watch IPTV with it step by step.
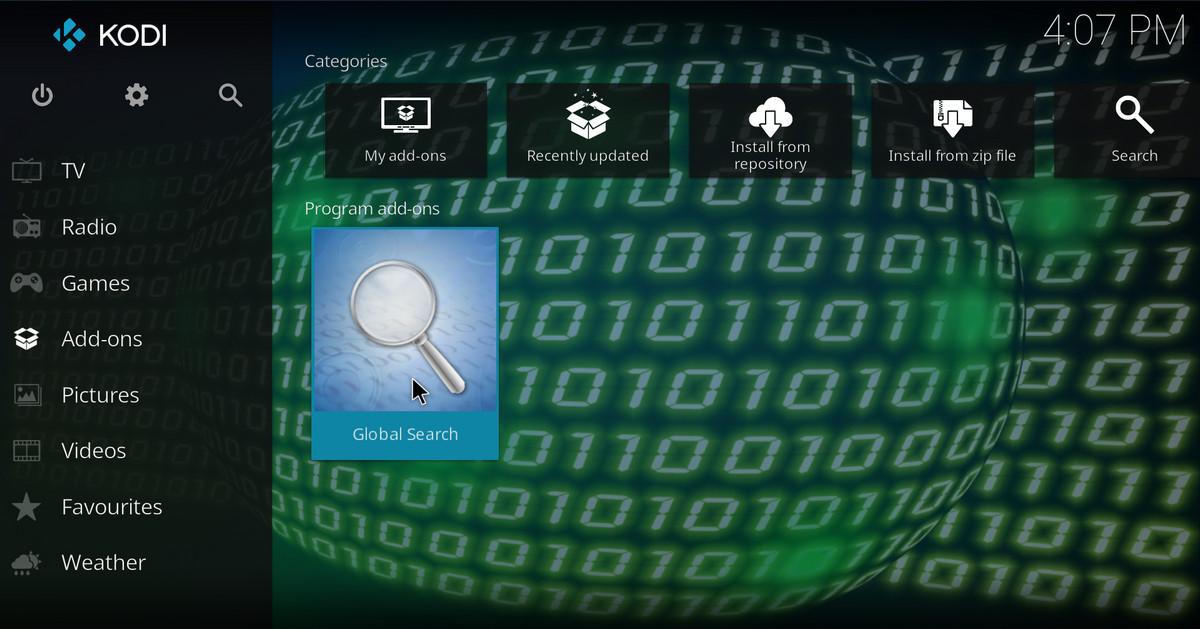
Step 1. Launch Kodi, put your mouse over “Add-ons” and select “Search” from the categories, follow the further instructions to install Global Search add-on if prompted.
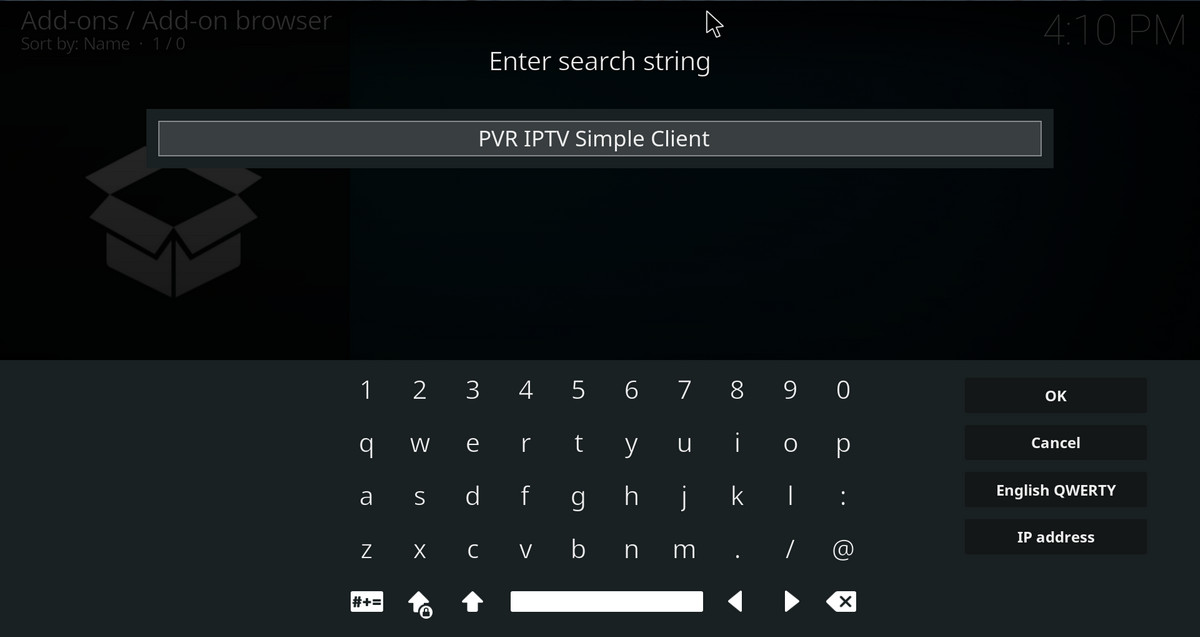
Step 2. Search the Kodi add-on “PVR IPTV Simple Client”, it’s a widely-used and easy client that supports M3U playlists, streaming of Live TV for multicast/unicast sources, listening to Radio channels and EPG. Then click on the one and only result.
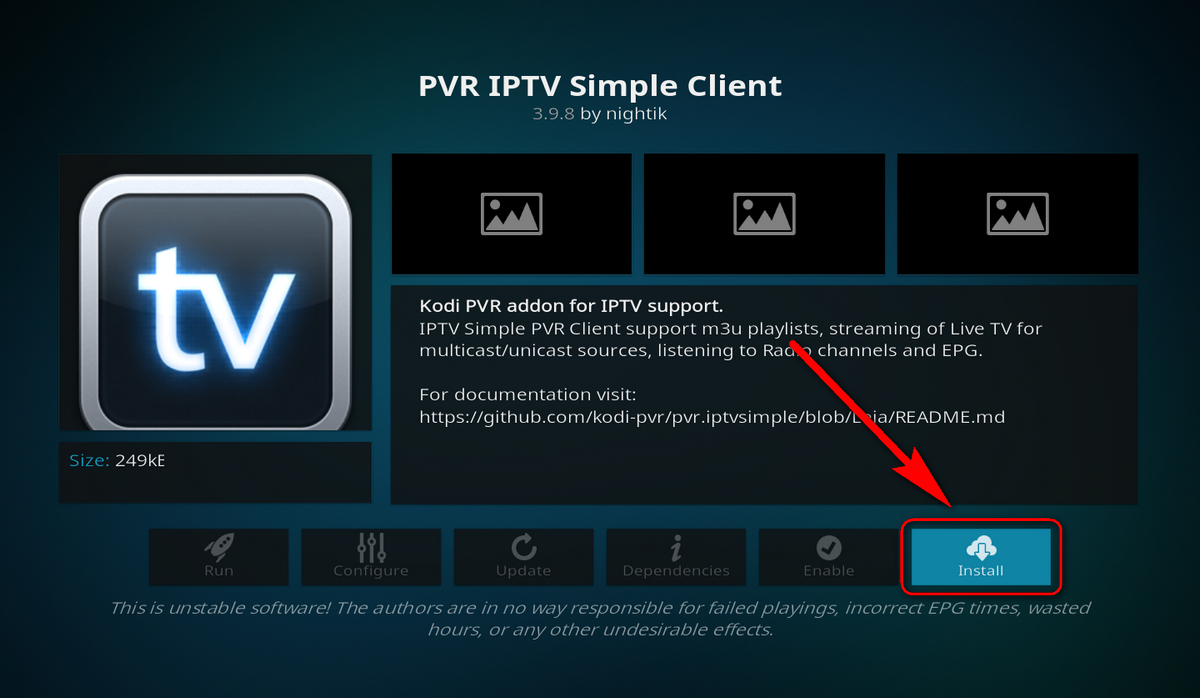
Step 3. Click on the “Install” button on the lower-left side to install the latest PVR IPTV Simple Client, wait till “Add-on installed” information prompts.
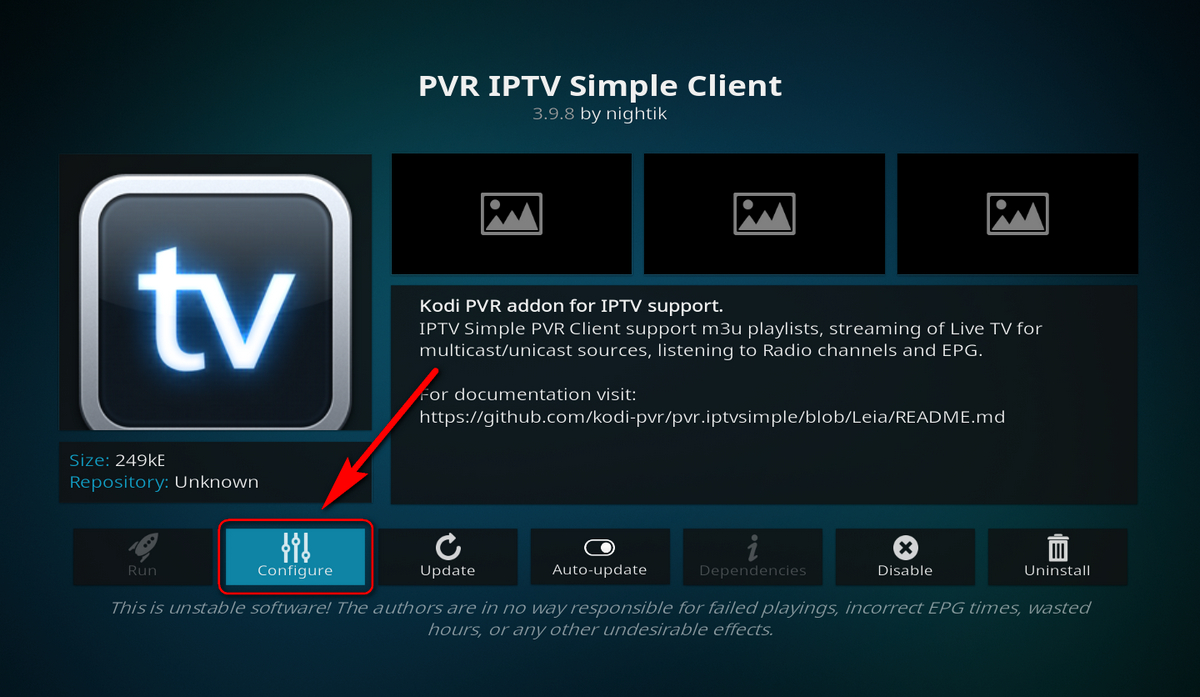
Step 4. Click on the installed PVR clients – PVR IPTV Simple Client, or search it again as Step 2 if you’re lost. Then click on “Configure”
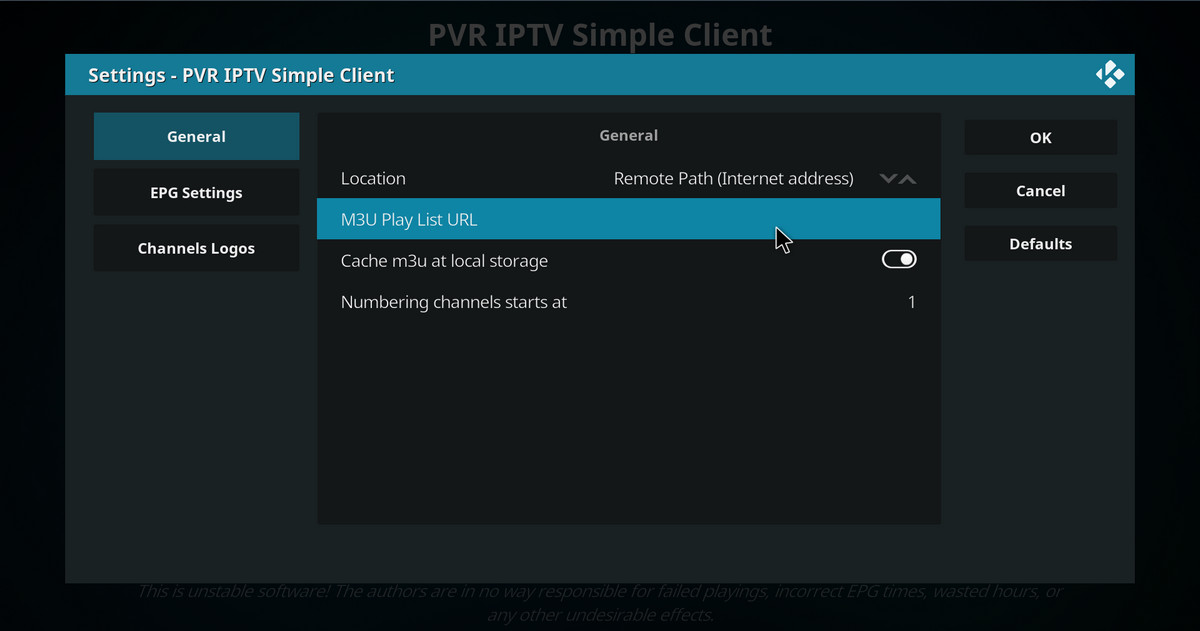
Step 5. From the “General” tab:
· Set “Location” as “Local Path (include Local Network)”, if your M3U8 playlist is on your local drive or local network. Then set the M3U Play List Path as the exact path of the .m3u8 file on your local drive/network.
· Set “Location” as “Remote Path (Internet address)”, if you are having is a M3U8 URL along with an EPG URL from your IPTV provider, copy & paste or type in the M3U8 URL into “M3U playlist URL” box, and then enable “Cache m3u at local storage”.
Set the “Numbering channels starts at” to “1” in both situations and click on “EPG” button to proceed.
Tips:
· The naming of each channel in m3u8 file should be in accordance with its naming in your EPG XML, so as to match each channel to the corresponding information correctly.
Based on the channel's naming in the EPG list, modify the channel's naming after "#EXTINF: -1," in your .m3u8 playlist (open with Notepad), and so on to modify other channel names not matching.
· Insert into, if there are given username and password.
· Don’t have an M3U8 playlist yet or your playlist is in TXT format? Learn how to create M3U8 playlist for IPTV.
Additionally, here's our recommended free IPTV source: https://github.com/iptv-org/iptv, here you can find a collection of 8000+ publicly available IPTV channels from all over the world.
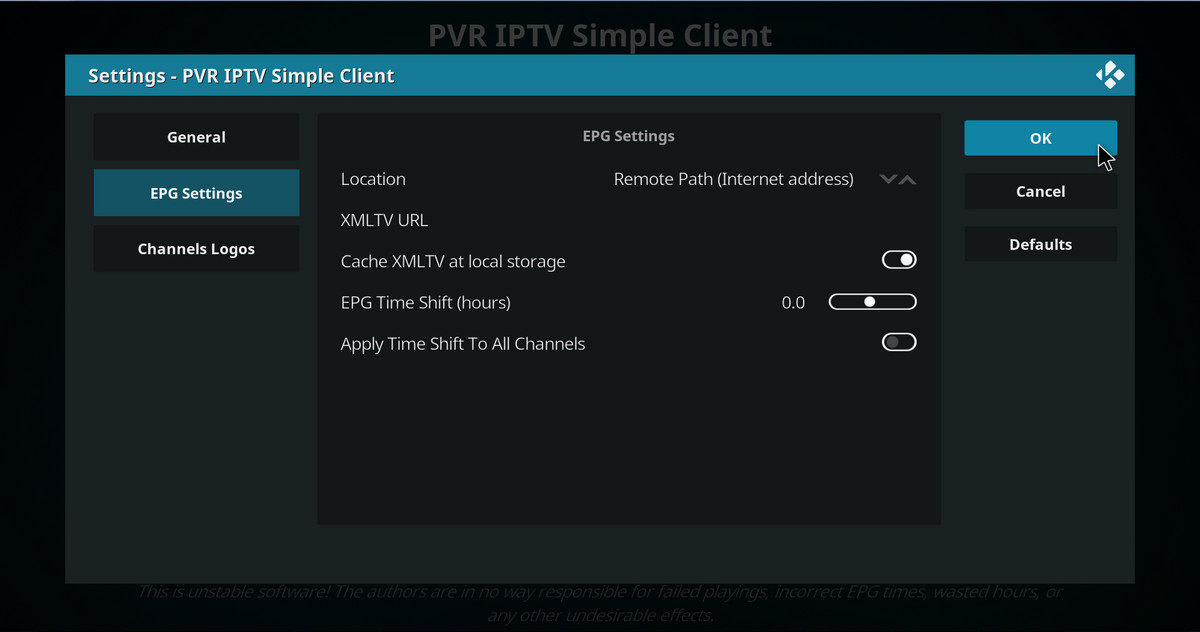
Step 6. From the EPG Settings tab:
· Set “Location” as “Local Path (include Local Network)”, if you have a XMLTV EPG at hand, and set the XMLTV Path as the EPG path on your local drive/network
· Set “Location” as “Remote Path (Internet address)”, if what you are having is a EPG URL, usually similar to the M3U Play List URL, copy & paste or type in it into XML URL box.
Keep everything else as default, then click “OK” button on the right side to save all the changes.
Tips:
An M3U8 playlist from paid IPTV provides often comes with EPG (Electronic Program Guide), the electronic service guide that features interactive graphical user interface usually in grids; list of different channels and their corresponding programs with airing schedules; categorized channels according to genre; search capabilities and customization tools.
But if you don’t have an EPG yet, there are some XMLTV EPG grabbers out there that can help us to collect TV-program guide data from selected TVguide sites for our favorite channels. Here are two good ones:
WebGrab+Plus http://www.webgrabplus.com/
XMLTV GUI http://www.birtles.org.uk/xmltv/
Step 7. Then restart Kodi and it’s time to go to “TV” for your IPTV. After clicking on and entering “TV”, there should be a message on the upper-right side saying “PVR manager is starting up”.
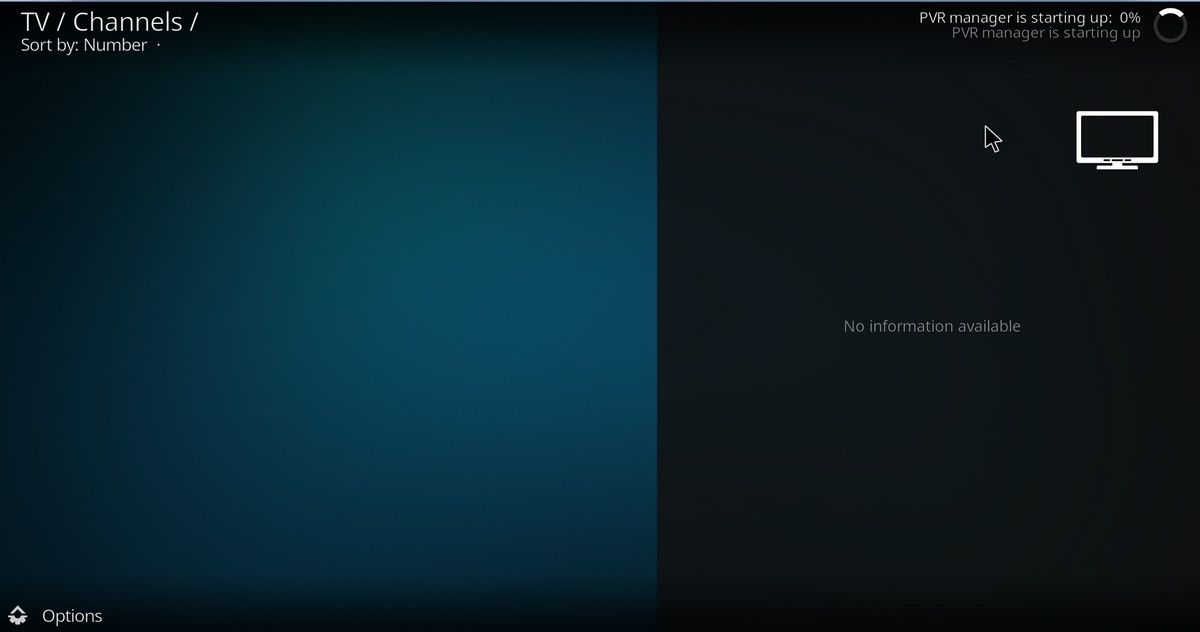
Step 8. Wait till it’s done, select your favorite channel, and enjoy your IPTV with EPG!

Recommended: Top-rated and Well-received DVD Video Converter
WonderFox DVD Video Converter
· Fast convert your video/DVD collections to MP4, MOV, MKV, WMV and 500+ digital formats and devices
· Automatically enhance your video quality for better viewing enjoyment
· Compress your media library without quality loss, significantly free up storage for your devices
· Decrypt/bypass any advanced DVD copy protection
· Download videos and music from YouTube, Vimeo, FB, Dailymotion and 1000+ websites in original quality