


DaVinci Resolve is one of the most powerful video editing apps that provides many advanced video editing functions for users to create and edit video files. However, while providing such advanced editing features, there are also some problems when editing in DaVinci Resolve, like choppy/lagging/stuttering playback. You can feel this extremely strongly when working with some advanced features like VFX compositing, color grading, and motion tracking. But what’s the reason behind the error?
Now you know the possible reasons for DaVinci Resolve's lagging playback. And it is time to proceed with the following methods to prevent and stop DaVinci Resolve from lagging.
The following are the top 8 solutions for DaVinci Resolve video playback lagging issue. Before starting, you can try to restart your computer and the software, and reinstall DaVinci Resolve on your device first to see if the video stuttering issue is solved.
Programs like DaVinci Resolve need to meet specific system requirements for smooth running. So it is important to make your computer meet the minimum system requirements of DaVinci Resolve. For SD video processing, we need at least 8 GB of RAM. But for HD video processing, you need at least 16 GB or 32 GB of RAM. See the full system requirements for macOS, Windows, and Linux:
The H.264 or HEVC-encoded videos usually behave well in video recording and uploading. However, as stated earlier, such high-compression codecs are not optimized for editing. They may need a longer time to decompress for editing, and thus cause the DaVinci Resolve stuttering playback issue. While there are some codecs that are good options for editing, like ProRes, DNxHD/HR, and Cineform. So you can use a video converter to change the video codec for smooth editing. WonderFox HD Video Converter Factory Pro is a professional video converter that supports all video inputs and can convert videos to ProRes effortlessly in batches. Install it on your Windows PC and follow the simple steps to fix video lagging in DaVinci Resolve caused by improper file codecs.
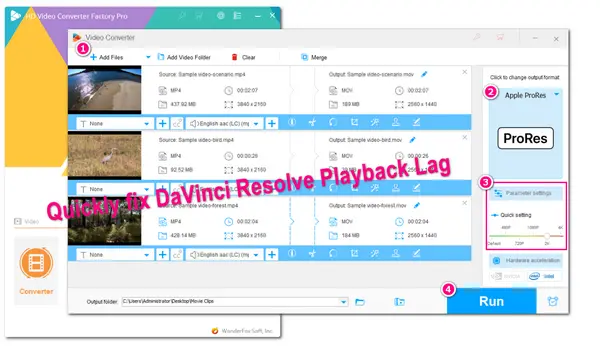
Step 1. Download and launch HD Video Converter Factory Pro on your desktop. Select “Converter” to enter and click “+ Add Files” to import your videos.
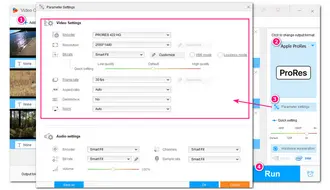
Step 2. Click the right-side format image to open the output format list. Go to the “Apple” device section and choose the “ProRes” profile below. (By default, the codec is set to ProRes 422 HQ. If you want a specific ProRes codec, navigate to the “Parameter settings” window and switch to a new ProRes type under the “Encoder” drop-down list.)
Step 3. Specify an output path and press “Run” to start the conversion.
With the support of batch mode, you can convert multiple files simultaneously. Once done, add the converted videos to DaVinci Resolve to see if the video stuttering in DaVinci Resolve goes away.

Lowering the video resolution is also an efficient way to prevent lagging playback in DaVinci Resolve since high-resolution videos like 4K or 8K videos usually require more resources to process. Here you can downscale the timeline resolution inside DaVinci Resolve, which will not change the output video resolution.
Lower the Timeline Resolution
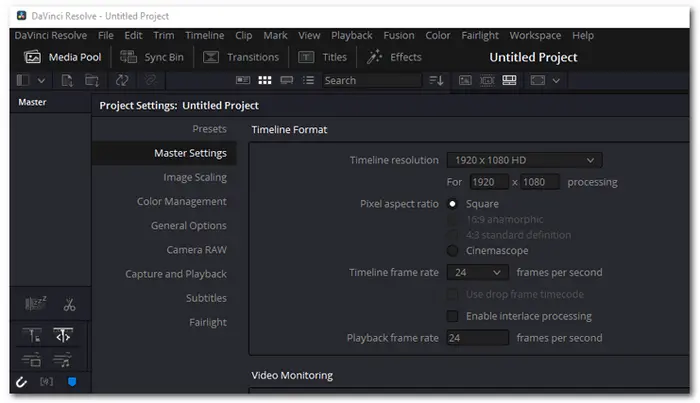
Step 1. Launch DaVinci Resolve and add the videos.
Step 2. Move to the top menu bar and select “File” > “Project Settings” to open the “Project Settings” panel.
Step 3. Select the target timeline resolution under the “Time Resolution” panel.
However, if the video is encoded with H.265, this way may not make much difference. So you can try to change the video codec as well as lower the video resolution outside.
To lower video resolution while keeping decent video quality, you can also give WonderFox HD Video Converter Factory Pro a try. Being a professional video converter, this program can also help you downscale the video resolution from 4K to 2K, 1080p, etc. in a few simple clicks.
Free downloadFree download this tool here and follow the steps below:
Step 1. Launch the software and open the “Converter”. Drag and drop the high-resolution videos into the program.
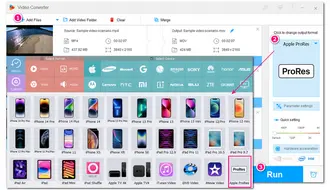
Step 2. Go to the output format section and select “ProRes” under the “Apple” device tab for a better editing experience.
Step 3. Adjust the video resolution to “2560*1440” or “1920*720” in the “Parameter settings” window. Here you can also adjust other video & audio settings. You can also directly go to the “Quick settings” section and drag the slider to “2K” or lower.
Step 4. Specify a destination path for the output videos and click “Run” to start conversion.
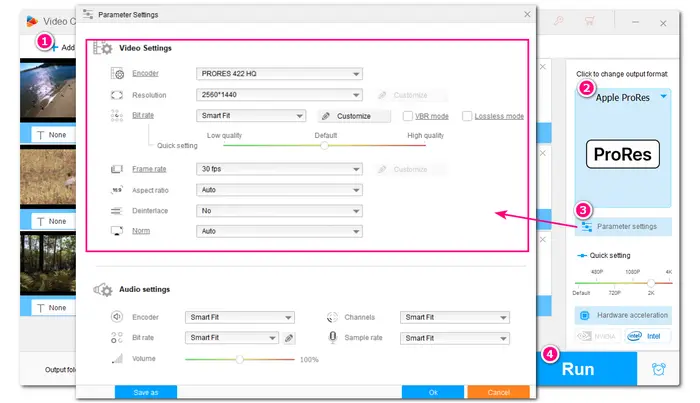
Tips. Sometimes the higher frame rate of videos can also hinder DaVinci Resolve from smoothly processing and playing your videos. As a result, the video will be choppy or stuttering during the playback. So if your videos are shot in 60 FPS or higher, try to lower the frame rate to 24, 25, or 30 fps with HD Video Converter Factory Pro in the “Parameter settings” window.
DaVinci Resolve has two versions, a free version and a paid version. The paid (DaVinci Resolve Studio) version supports hardware acceleration for decoding and encoding formats like H.264, H.265, etc. If you are using the free version and find the MP4 video editing in DaVinci Resolve gets laggy and stutter, then upgrade DaVinci Resolve Free to DaVinci Resolve Studio is a quick solution to fix the H.264/H.265 video editing choppy issue.


The following methods are fixing the DaVinci Resolve playback lagging issue by modifying the settings inside DaVinci Resolve.
Multiple video effects can put a heavy strain on real-time preview, then then cause playback lagging and choppy issues. So you can enable the render cache to produce a render cache file for storing the rendered frames when rendering a clip. The rendered cache file can make the video editing with better quality and smaller size, thus improving the playback performance. To enable render cache, you need to:
1. Press “Playback” on the top bar and then select “Render Cache”.
2. Select the option between “Smart” and “User”.
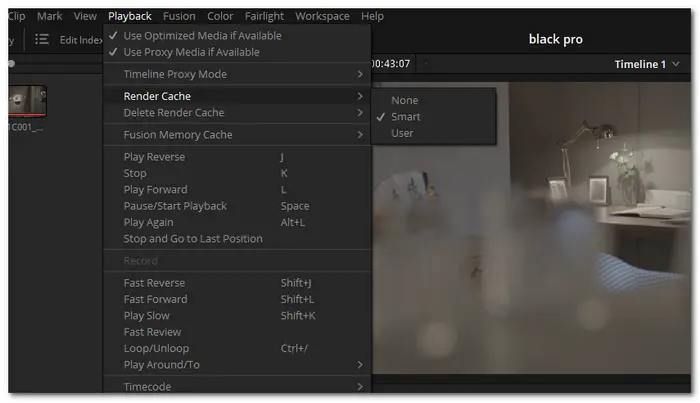

Difference between “Smart” and “User”:
Smart: DaVinci Resolve can automatically render clips that are beyond your GPU’s capability to play in real-time. And users can also choose a certain clip to render.
User: The user can render the section by right-clicking and selecting Render Cache Fusion Output. If the corresponding choices are chosen under Master Settings, it also renders the transition, composite, and Fusion effects.
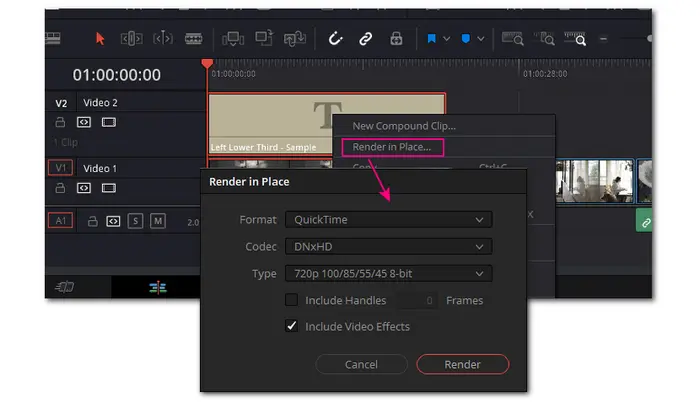
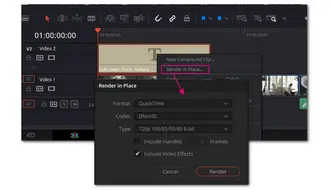
Although enabling render cache can greatly prevent video lagging issue and improve the playback performance for the entire timeline, sometimes there are still certain files that cannot play smoothly since intensive effects are applied. In such cases, using the “Render in Place” can be helpful. It can render the selected effect-heavy clips and replace them in the timeline to free up resources and improve the playback performance.
How to enable the “Render in Place” feature in DaVinci Resolve:
1. In the edit tab, right-click to select your clip and then choose “Render in Place”.
2. Now choose the “Format”, “Codec”, and “Type” of the proxy version of your clip.
3. If you want to keep some editing flexibility, just select the “Include Handles” box.
4. Press the “Render” button and the clip will be replaced in the timeline.
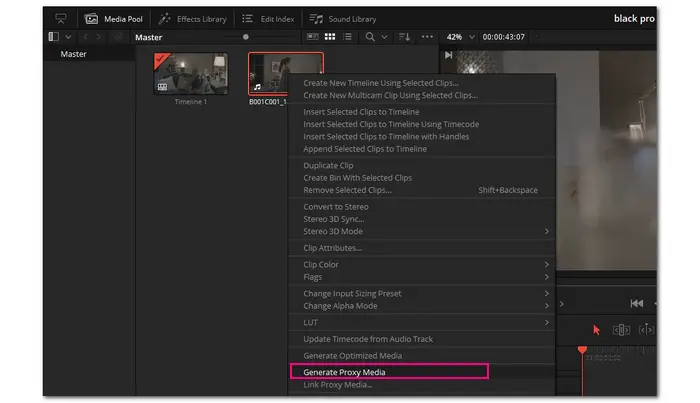
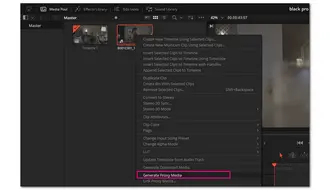
Another way to fix the lagging playback issue in DaVinci Resolve is to use proxy media while editing. Some users may think that using proxies will require more processing time. However, a proxy file is a smaller copy of the original with a lower resolution that can be easier for computers to process and greatly improve the editing workflow. By using proxy media files during the editing process, you can achieve smooth playback and editing. To get a proxy file in DaVinci Resolve, you can:
1. Go to your “Media Pool” and find & right-click on the video you want to create a proxy file for.
2. Select “Generate Proxy Media”.
Then it will take some time to make the video friendlier for editing.
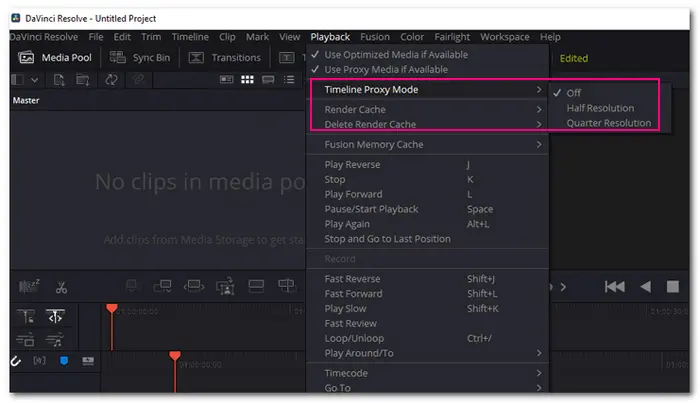
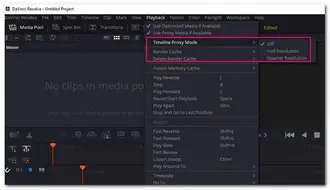
If you encounter the DaVinci Resolve timeline playback choppy issue when editing, you can also use the “Timeline Proxy Mode”. It only downscales the playback resolution to half or a quarter of the original timeline resolution instead of generating a new proxy media file. By choosing a lower timeline resolution and enabling the timeline proxy mode, you can then enjoy a smoother video playback experience. The following are the steps for you to enable the timeline proxy mode to improve DaVinci Resolve performance.
1. Go to the top menu bar and select the “Playback” option.
2. Hover over the “Timeline Proxy Mode” and then select either “Half Resolution” or “Quarter Resolution”.
But note that this method cannot help fix the issue with H.265 encoded videos.
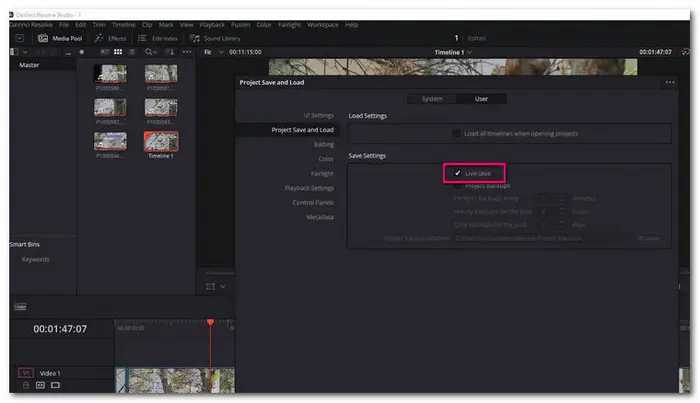
“Live Save” is a feature in DaVinci Resolve that can help save every change you make when editing videos. However, it will slow down the playback and editing performance if your database is on a remote drive. So you can try to disable the “Live Save” feature to fix the DaVinci Resolve video lagging issue if you always remember to save the project once in a while during editing.
How to disable the “Live Save” feature in DaVinci Resolve:
1. Click “DaVinci Resolve” in the upper-left corner and then select “Preferences”.
2. Under the “User” tab, select “Project and Load”.
3. Uncheck the “Live Save” option under the “Save Settings” section.
That’s all about the 9 fixes for solving the DaVinci Resolve playback lagging issue. DaVinci Resolve is a powerful video editing program, but some problems may occur during the editing process. If you encounter the DaVinci Resolve playback lagging issue, just try the methods provided in this post to fix it. If all the solutions in this article cannot work with your problem, you can contact with Blackmagicdesign’s support center for help.
Nevertheless, we hope you can find this article helpful. Thanks for reading till the end! Have a nice day!
You may also like:

Terms and Conditions | Privacy Policy | License Agreement | Copyright © 2009-2024 WonderFox Soft, Inc.All Rights Reserved