Google Earth is a map application on computer that renders a 3D representation of Earth based primarily on satellite imagery. With it, you can see cities and landscapes from various angles. Then a screen video recorder is essential if you want to record a Google Earth tour video for some purposes. So this post demonstrates some handy ways on how to record Google Earth videos.
Windows users are recommended to try this easiest screen recorder for Google Earth video capture. It is simple to use, without restriction, and built-in with multi-features.
Install it here to get started: https://www.videoconverterfactory.com/download/hd-video-converter-pro.exe https://www.videoconverterfactory.com/download/hd-video-converter-pro.exe
Instead of using other third-party screen recorder apps, there’s a built-in screen recording tool in Google Earth Pro that allows you to record video in Google Earth in the fastest way. Of course, the Google Earth Pro app's built-in screen recorder may not be professional enough to bring you a wonderful screen recording experience. Anyway, it is completely free to use, and you can give it a try with the following tutorial if you are fond of this way.
Step 1. Launch your browser and search for Google Earth or directly enter https://www.google.com/earth/index.html. In the top menu bar of the interface, switch to the “Earth Versions” tab and select “Google Earth Pro on desktop” or directly scroll down to the bottom of the interface to download the Google Earth Pro.
Step 2. Follow the onscreen instructions to complete the setup and launch Google Earth Pro on your desktop.
Step 3. Now you can enter the area that you want to view in the “Search” box on the top-left and press the “Record a Tour” button on the top menu section of the map. Then the recording bar will appear at the bottom left of the map. You can press the microphone icon to record the screen with audio automatically or press the red button to start recording without sound.
Surely, you can also first initiate the recorder and then start your tour.

During recording, you can switch to any place you want, and it will capture the video in good quality. Once down, re-click the red record button to stop recording. And it will automatically play the recorded video.
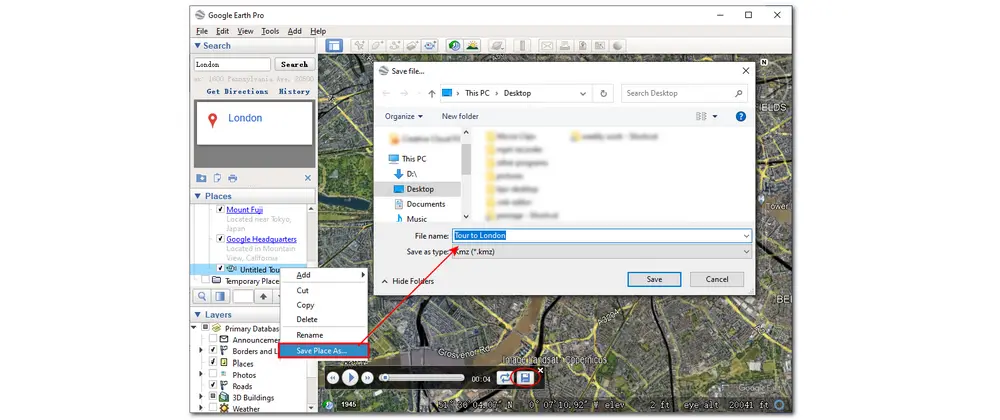
Step 4. Now, tap on the “Save” icon and give a name to the video. You can also add a description and a view to the video. Then tap “OK” to save the video.
Step 5. Find the recorded tour under the “Places” tab and right-click it. Select “Save Place As...” and then choose the output path and name the file. Click "OK”, and the KMZ file will be saved to your local folder.
As stated before, the Google Earth built-in screen recording tool is not professional enough for video capture. If you want a screen video recorder that provides more options to customize and is also easy to use, you can try the all-in-one video processing tool, WonderFox HD Video Converter Factory Pro.
WonderFox HD Video Converter Factory Pro integrates a video converter, editor, downloader, and recorder together to bring you a one-stop video capturing and editing experience. With it, you can easily record video in Google Earth in high quality. It allows you to record full-screen video and part of the screen as you like. Not just for Google Earth video recording, you can also use it to record gameplay at 60 FPS, video meetings, streaming videos, and more. Before starting recording, you can customize the recording format, quality, frame rate, and sound source to get the desired recorded video. Other practical features are also provided to surprise you.
Record Google Earth video on PC effortlessly.
Capture screen and audio separately or simultaneously.
Record any screen activities in HD even 4k resolution.
Provide built-in video converter, player, and editor.
Without further ado, just download this screen recorder right now and follow the instructions below to start recording.
* Before recording, please open Google Earth on the web to be well prepared.
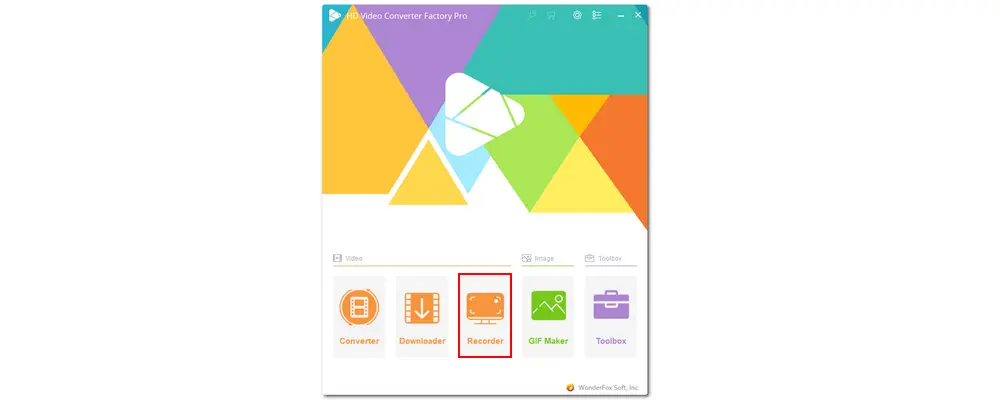
Launch HD Video Converter Factory Pro after the installation, and you will see five parts on the home interface. Click to enter the “Recorder” module.
There are four recording modes for you to choose from. To record video in Google Earth, you can choose the first mode to record part of the screen and drag the cursor to select the recording region or the full-screen mode to capture the whole screen. Then press “OK” to confirm the recording area.
Then you can move on to customize other recording settings, including recording format, quality, frame rate, etc. You can select MP4, AVI, MOV, or MKV as the output format, choose High/Low Quality or leave it as default, set the frame rate to 10/30/60 FPS, and turn on the GPU acceleration if your device has the support. Check the audio source if you want to record screen with audio. Click the inverted triangle button to specify an output folder for the recorded video.
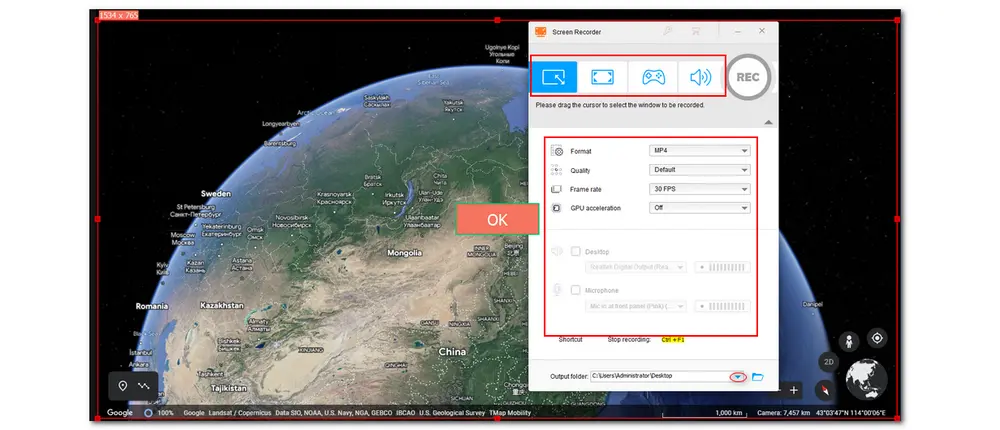
All set, the last step is to start recording by clicking the red “REC” button. Once the recording begins after a five-second countdown, the program will minimize on the border of the recoding region. When finish recording, press the hotkeys “Ctrl + F1” or click the square “stop” icon to end the recording.

Batch convert videos to 500+ formats and devices
Download movies and music from 1000+ sites
Compress recordings without losing quality or re-encoding
Make GIFs, ringtones, split screen, video slideshows
Add/Extract/Remove subtitles and soundtracks
If you want to record video in Google Earth with a third-party open-source screen recorder, you can give OBS Studio a try. It is a popular free program for video capture and live streaming. Moreover, it is available on Windows, Mac, and Linux. It provides many capture sources that allow you to make recordings of text, images, webcams, capture cards, and much more. Being a professional screen recorder, it has a complex interface that may make it difficult for beginners to start recording. But don’t worry, the following content will show you how to screen record Google Earth with OBS.
* Open Google Earth on the web before starting recording.
Step 1. Download OBS from its official interface (https://obsproject.com/) and then launch it on your PC.
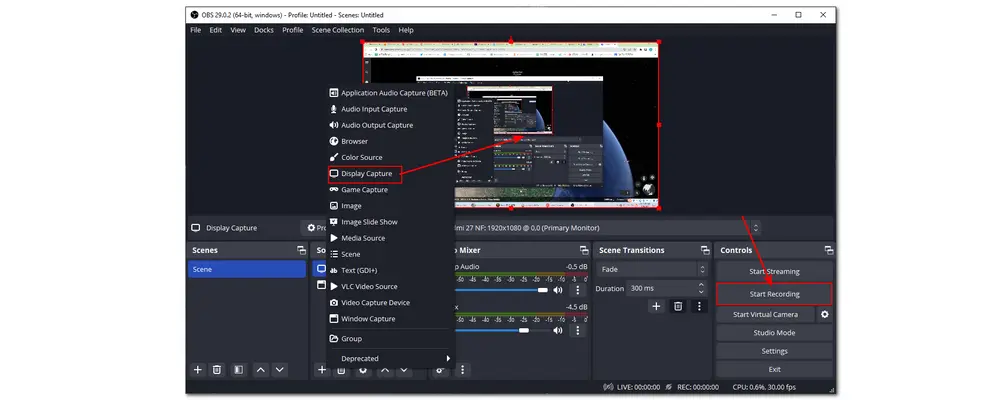
Step 2. Click the “+” button under the “Sources” tab and then select “Display Capture”. You can name the capture or leave it as default. Then press “OK” to add the capture.
Step 3. Now, close other windows and make sure the capture window only shows Google Earth. Press “Start Recording” under the “Control” section to begin recording. Once done, tap on the “Stop Recording” option. It will show the save path at the bottom left corner of the interface.
* You can change the output path in “File” / “Controls” > “Settings” > “Output” > “Recording” > “Recording path” and click “Browse”.
Also Read: OBS MKV to MP4 | OBS Not Recording Full Screen | Crop Video in OBS Studio | OBS Recording Black Screen
Apart from desktop screen recorders like WonderFox HD Video Converter Factory Pro, OBS, etc., some online screen recording tools can help you screen record Google Earth online without downloading anything. And FlexClip is one of the recommended online screen recorders. You can use it to record anything on the screen, like online webinars, courses, gameplay, presentations, video tutorials, and more. After recording, you can edit the recorded video at will. But it only supports recording a video for up to 30 minutes.
Below are the steps on how to start Google Earth video capture with FlexClip.
* Open Google Earth on the web or the desktop Google Earth Pro first.
Step 1. Launch the browser and search FlexClip or directly open it with this link: https://www.flexclip.com/tools/screen-recorder/
Step 2. Press the “Start Recording” button and then choose the recording mode (“Screen Only”). Click “Next Step” and then select whether to record audio or not.
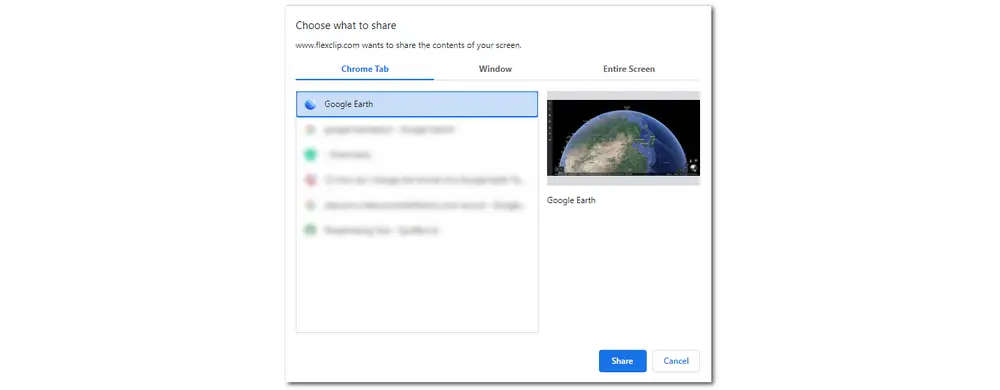
Step 3. Hit “Start Recording” and select “Google Earth” under the “Chrome Tab” or “Google Earth Pro” under the “Window” tab. Tap on the “Share” button and it will start recording automatically. Now, just start your Google Earth tour.
Step 4. Once finished, click “Stop sharing” to end the recording. You can then view the recorded video and decide to “Re-record” or “Download and Edit”.
* By selecting “Download and Edit”, the recorded video will be downloaded to your local folder and the FlexClip video editor will automatically open. If you don’t want to edit the recording. Just close the FlexClip Editing window.
Here are some related questions about Google Earth Video Recording.
Download and launch Google Earth Pro, browse to the location on the map, and generate a travel route. To add a form, use the “Add Path” and “Add Polygon” options under the “Add” sub-menu. You should relocate a new dialog that appears on your screen. To design a shape, click the start point and drag. After selecting the endpoint, click OK.
To save the Google Earth tour as a video file, you’d better use a third-party screen recorder like HD Video Converter Factory Pro to record the tour video in .mp4 or other digital video formats. Although Google Earth Pro allows you to record the tour, it can only save the tour in a .kmz file which is actually not a video file, but an XML (text) file that marks up a map with icons, polygons, and paths.
Above is all I want to share with you about how to record a Google Earth tour as video. You can use a variety of tools to record a tour on Google Earth. But note that the Google Earth Pro built-in recording tool cannot record a video file. You can only rely on other third-party screen recorders to record Google Earth tours as video files.
Thanks for reading till the end. Hope you can get a Google Earth tour video without issue. Have a nice day!

WonderFox DVD Ripper Pro
1. Rip digital files from DVD to MP4, MKV, MOV, MP3, WAV, M4A, and other 300+ formats.
2. Remove DVD region code, CSS, UOP, etc.
3. 5 minutes to rip a DVD to MPG MPEG-2.
4. Cut video clips and change output video settings.
5. 1:1 copy DVD to ISO or DVD folder.
* Please refer to the DVD copyright laws before ripping a copy-protected DVD.
Privacy Policy | Copyright © 2009-2024 WonderFox Soft, Inc.All Rights Reserved
