Since version 3.0, the VLC media player has got Chromecast support to cast media files from Windows (10) PC, Mac, and Android to Chromecast. However, many users encountered VLC Chromecast not working and black screen issues when casting VLC to Chromecast. How to fix the problems for movie enjoyment on big screen displays? The following article will guide you through several solutions.
Tips. The default Chromecast video formats are MP4 and WebM. Convert your video to a Chromecast-supported format with this fast video converter: https://www.videoconverterfactory.com/download/hd-video-converter-pro.exehttps://www.videoconverterfactory.com/download/hd-video-converter-pro.exe
Firstly, let’s see how to stream videos from VLC media player to Chromecast on a Windows 10 or Mac computer:
1. Open VLC media player.
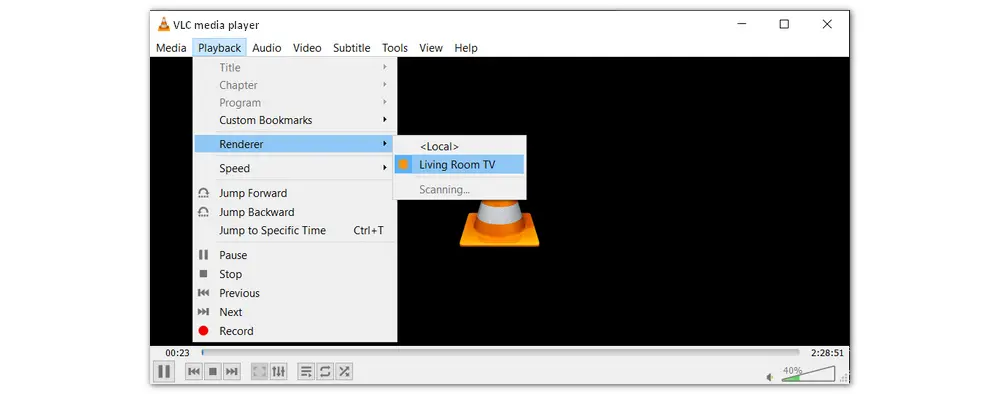
2. Click "Playback" on the top menu bar and select "Render".
3. Choose your Chromecast device from the list.
4. Open a video or audio file for casting and playback on your Chromecast TV.
If you receive a message saying “Insecure site”, click “View Certificate” and then “Accept Permanently”.
1. Switch your Wi-Fi to the 2.4 Ghz band if available. But this is a temporary solution. You can find a permanent one in the following fixes.
2. Check if your VLC media player and Chromecast are under the same WIFI network. If not, connect them to the same network.
3. There is a “Scan” option under “Render” in VLC media player. Click the option to find your Chromecast device.
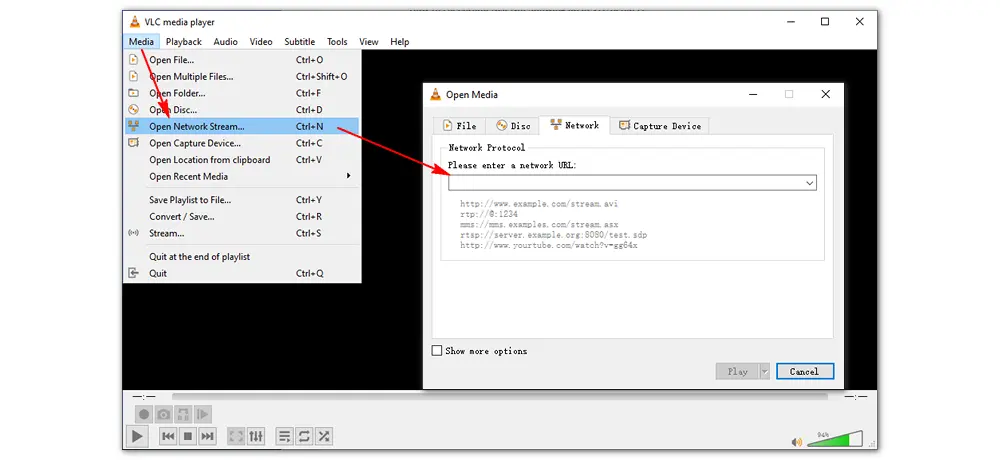
If it is stuck on scanning, you can use VLC to open a random multicast network stream in the range of address 224.0.0.X (X can be 100 ~ 199). Wait for a while (several seconds) and check for available renders again. Check if this method has resolved the VLC renderer Chromecast not working issue.
4. Reset VLC preferences. Click “Tools” in the top menu of VLC and select “Preferences”. Then, click the “Reset Preferences” button at the bottom of the window.
5. Reboot VLC media player and Chromecast. This can help refresh the connection and resolve temporary glitches. You can also restart your router to fix networking issues that may present VLC detecting the Chromecast.
6. Sometimes, security measures can block the communication between VLC and Chromecast. Here is how to disable Firewall and Antivirus on your computer:
Click the “Start” menu and navigate to “Settings” > “Updated and Security” > “Windows Security” > “Firewall and Network Properties” > “Public/Home/Private”. Toggle the switch to turn off “Windows Defender Firewall”. Click “Yes” if promoted.
Also, disable the Antivirus from the system tray.
7. Disable VPN or Proxy. If you are using a VPN or proxy, turn it off in case it interferes with the device discovery process.
The above shares 7 methods to resolve the VLC cast to Chromecast not working issue. If you have tried these solutions but found nothing, you may try another computer.
Similar Articles: VLC Not Playing YouTube Videos | VLC Lagging/Stuttering/Buffering | VLC Freezing | VLC Unidentified Codec
1. Update your VLC media player and Chromecast to the latest versions. If the VLC Chromecast not working problem persists, try other workarounds.
2. Ensure your casting device and Chromecast are connected to the same Wi-Fi network.
3. Disable and re-enable the audio track. Here’s how to:
Start streaming to your Chromecast > Disable the audio track in VLC > Re-enable the audio track. It should play fine now. If not, move to the following workarounds of VLC stream to Chromecast black screen issues.
4. Configure your Firewall and open the VLC port. You can add VLC media player to prevent Windows Defender Firewall from blocking the VLC connection (allow the VLC port).
Configure Firewall: press “Windows + R” > type “Control” and click “OK” > go to “System and Security” > open “Windows Defender Firewall” > click “Allow an app or feature through Windows Defender Firewall” > click “Change settings” > locate VLC media player and check both “Private & Public” boxes > click “OK” to save the changes.
Open the VLC port: open VLC and go to “Tools” - “Preferences” > click “Show all settings” (at the bottom left of the window) > navigate to “Stream output” - “Sout stream” - “Chromecast” > set the “HTTP port” to 8010. Next, allow this port through your firewall using the command ufw (sudo ufw allow 8010) or iptables (sudo iptables -I INPUT 1 -i eth0 -p tcp --dport 8010 -j ACCEPT).
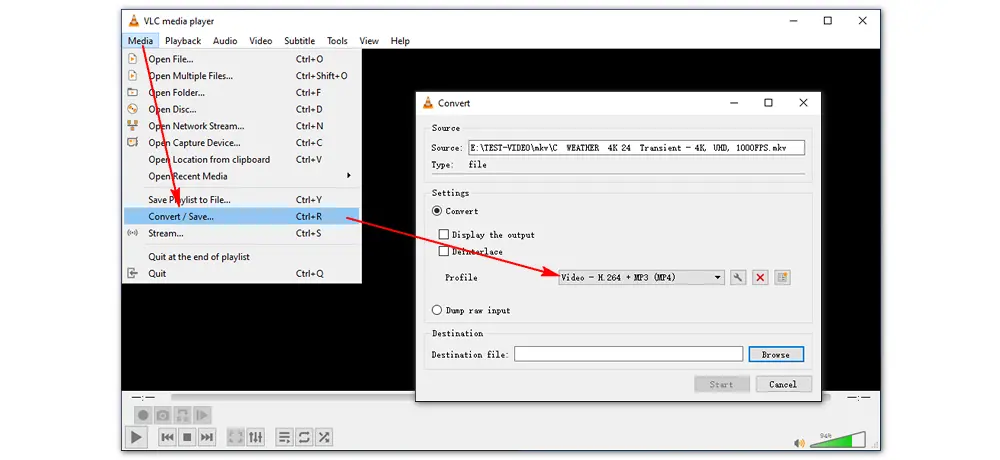
5. Transcode your video to a supported media format for Google Chromecast. Chromecast devices only support MP4 and WebM video files. Thus, you can convert your video, such as MKV, MOV, WMV, and AVI, to MP4 to WebM for playback on Chromecast. You can use the built-in VLC converter or a professional video converter to achieve that goal.
Learn How to Convert VLC to MP4 | Best Video Converter to MP4 | MOV to MP4 VLC | TS to MP4 VLC | Best Free Video Transcoder
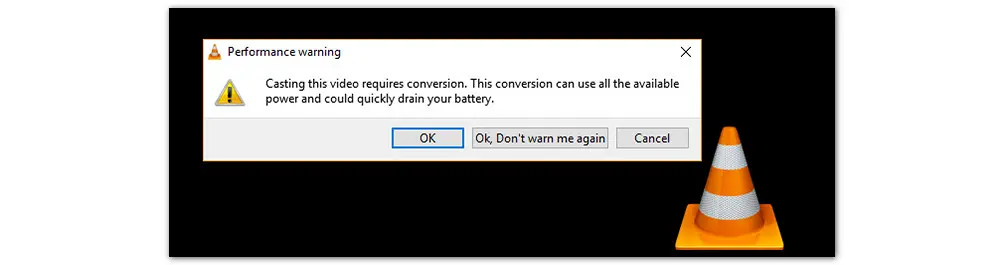
And many people received a performance warning: Casting this video requires conversion. This conversion can use all the available power and could quickly drain your battery. Some clicked “OK”, but nothing happened. In this case, the best solution is to change the video format before you throw it to VLC.
Recommended software for the conversion task: WonderFox HD Video Converter Factory Pro
VLC to Chromecast black screen errors like VLC Chromecast black screen with audio MKV/AVI/WMV are due to the incompatible video format or codec with Chromecast. It’s easy to resolve the issue using HD Video Converter Factory Pro, as this program offers optimized presets for Chromecast and other devices. With only 3 steps, you can convert videos to Chromecast supported formats and play them smoothly. Below is a quick guide.
* Please free download the software on your PC.
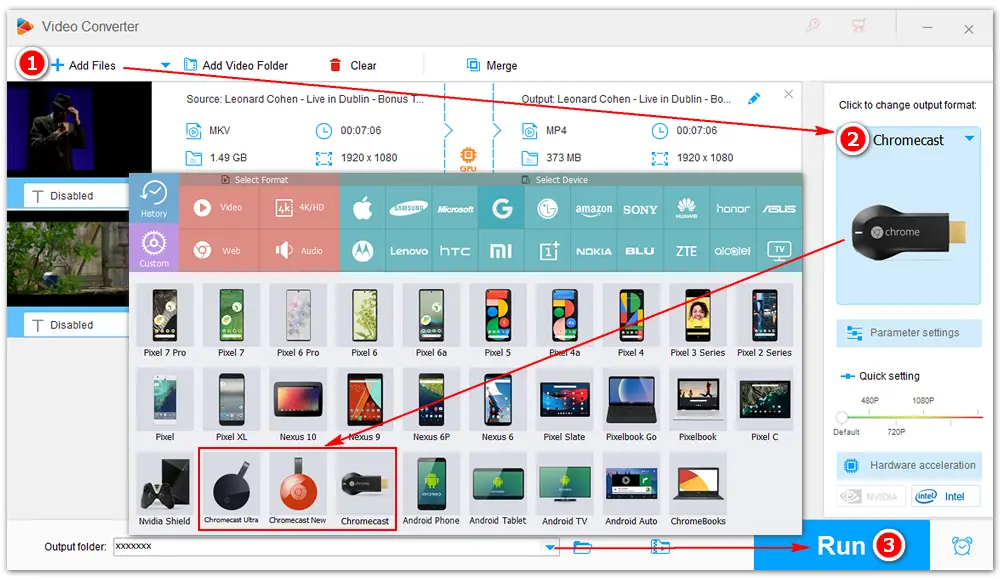
Step 1. Launch HD Video Converter Factory Pro and open the “Converter”. Click “Add Files” to import your video/movie files. Batch mode is supported.
Step 2. Click the big format image on the right side. Go to the “Google” tab and select your Chromecast model (“Chromecast”, “Chromecast New”, or “Chromecast Ultra”).
Note: The default video format for Chromecast is MP4. You can choose “WebM” as the target format in the “Web” category.
Step 3. Specify an output folder and press “Run” to start the conversion. It should take several seconds to minutes, depending on the file size.
Specific instructions for streaming and casting video files to Chromecast: MKV to Chromecast | AVI to Chromecast
This article shares how to fix VLC cast to Chromecast not working and VLC to Chromecast black screen errors. I hope that one of these solutions has resolved your issue. If you still have problems, you can ask for further assistance in the VLC support community.
That’s all for now. Thank you for reading till the end. Have a nice day!
Privacy Policy | Copyright © 2009-2024 WonderFox Soft, Inc.All Rights Reserved
